The Model Wizard
1. Overview
The Model Wizard is the dialog titled EP3 - Model Wizard. It opens when EP3 starts without a file and each time you choose File > New. The EP3 Interface and Model Settings covers the rest of the interface.
The dialog opens tall enough to show each tab without scrolling, up to the height of the EP3 window; the template trees grow to fill it. Drag a corner to resize it, and EP3 remembers the size you choose.
The Wizard has one tab per category: Model Settings, Internal Loads, Constructions, Service Hot Water, HVAC Systems, and Building Geometry. You can visit the tabs in any order and fill in as many or as few as you need. Each tab’s label shows how many items are checked on it, for example Internal Loads (1). This chapter covers the tabs in the order they appear.
Two buttons sit at the top of the dialog:
- Execute Wizard imports everything selected across all tabs, applies the model settings, draws the building (when the Building Geometry tab asks for one), assigns the HVAC systems’ zone equipment to the space types (§10), switches the model to simplified view, and closes the dialog. The button is disabled while a value on the Model Settings or Building Geometry tab is invalid; the invalid field is highlighted with a message. A summary of what was imported appears in the status bar.
- Skip - detailed mode closes the Wizard and leaves a blank model, in complex view, for building by hand.
Simplified view shows a reduced set of object types and fields in the dialogs; the view button in the top toolbar switches between simplified and complex view at any time (The EP3 Interface and Model Settings).
Everything Execute Wizard does is one undo step: Ctrl+Z immediately afterward reverts the whole Wizard.
On every tab with a template tree (Internal Loads, Constructions, Service Hot Water, HVAC Systems), you can check as many items as you like. Checking more than one space type, construction set, or HVAC system adds all of them to the model side by side.
2. Model Settings
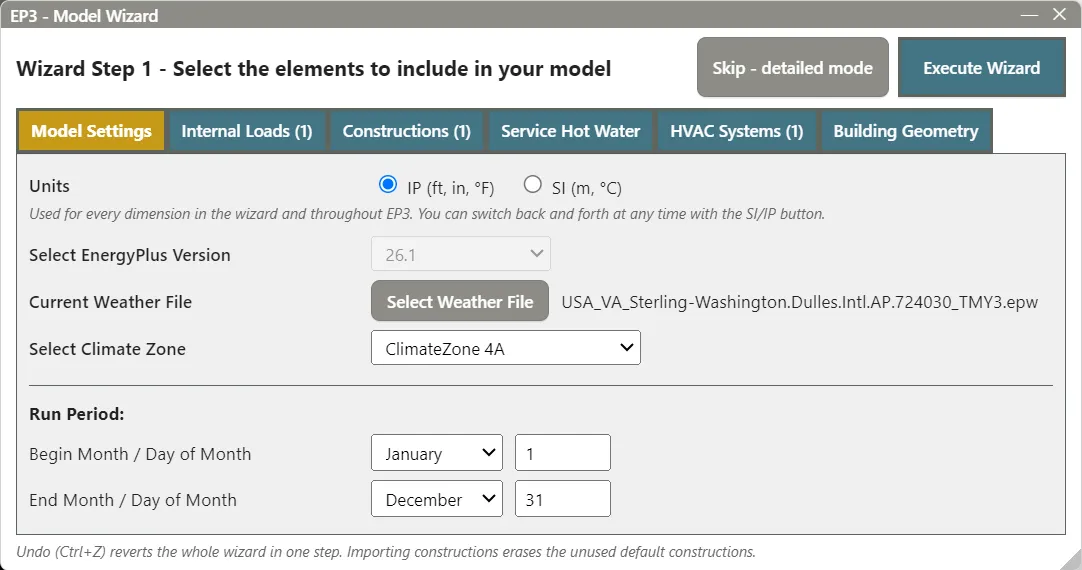
The Model Settings tab collects the settings every model needs:
- Units — IP (ft, in, °F) or SI (m, °C). The choice applies immediately to every dimension in the Wizard and to the rest of EP3. After the Wizard, the SI/IP button in the top toolbar switches units at any time; values are stored in SI either way.
- Select EnergyPlus Version — the EnergyPlus version this model is written for: every version from 26.2 down to 23.1, with 26.2 selected for a new model. The model takes the version as soon as you pick it, and the dialogs then show only that version’s object types, fields and choices. Change it later with File > EnergyPlus Version… (EnergyPlus Versions). When a checked template needs a newer version than the one picked, Execute Wizard asks whether to change to it (EnergyPlus Versions).
- Current Weather File — Select Weather File opens a file browser filtered to
.epwfiles. Weather, Climate, and Design Conditions covers weather files and design days. - Select Climate Zone — the ASHRAE climate zone (ClimateZone 0A through ClimateZone 8), used by the ASHRAE 90.1 Appendix G (PRM) generator. Blank means Automatic: the zone is read from the weather file’s
.statfile when you select the weather file (Weather, Climate, and Design Conditions). Pick a zone to override it. - Run Period — Begin Month / Day of Month and End Month / Day of Month, written to the model’s
RunPeriod. An impossible date (February 30, for example) disables Execute Wizard until it is corrected. Running Simulations covers the run period and other simulation settings.
3. Template tabs
The Internal Loads, Constructions, Service Hot Water, and HVAC Systems tabs share one layout:
- A Filter (regular expression) box narrows the tree to matching names as you type.
- The tree lists template files: those that ship with EP3 under EP3 Library, and those in your Library Locations under User Library. A folder’s checkbox checks or clears everything inside it, and the count beside it is the number of items it holds.
- Library Locations expands to list the folders of your own templates, with Add folder… and Remove. One list serves every tab. Library Locations are saved with your EP3 installation, so they apply to every model.
- If objects or EEMs with the same name exist decides what happens when a template holds an object or EEM whose name is already in the model: Keep the existing ones, Create new ones with a numbered name, or Overwrite inputs in the Global model (the Wizard’s default). Overwriting makes the existing object’s inputs the template’s: a field the template leaves blank is cleared too, so a template re-imported after a library update does not keep a value the library no longer sets. Its lists, HVAC connections and name are kept. An object a space type or zone type has in the model and the template’s does not, such as a
WaterUse:Equipmentthe library has since renamed, is deleted, and a list that named it, such as aWaterUse:Connectionslist, no longer does. The import history lists it as Removed (not in the template).
3.1 Template files and their EEMs
A template is an .ep3 file, a saved EP3 model: any .ep3 file in a Library Location, or in a folder inside one, is a template. EP3 reads what each file holds, and each tab lists only the files that have something for it:
- Internal Loads — the file’s
SpaceType/ZoneTypepairs. - Constructions — its constructions.
- Service Hot Water and HVAC Systems — its systems. A system is an EEM of the file whose Alternative Category is SWH System or HVAC System, with the equipment that EEM switches on. HVAC equipment that is on at Global and in no such EEM is offered as one more system, named Global, which imports as a new system EEM named for the file.
A file is a branch of the tree, with its items under it. A file that offers a tab one item and no EEMs is a single checkbox, named for the file; hovering over it shows the item’s name. Each item brings every object it owns or references: a construction its materials, a template pair its loads, schedules, thermostat, and sizing, and a system its loops, components, curves, and schedules.
On the Internal Loads and Constructions tabs, a file that offers EEMs shows one button for each, on the file’s row and in line with the file name, for the EEMs that change the items you have ticked, such as an EEM that lowers the lighting power of one of its space types. A dark grey button is an EEM that is on; a pale grey button with a struck-through name is one that is off. Click a button to turn the EEM on or off for the whole file. Expanding the file shows its items, with a dot under each button in the rows of the items that EEM changes: a filled dot when the EEM is on, a hollow one when it is off. Clicking a dot does the same as clicking the button. Items you have not ticked show no dots, and an EEM drops out when the last item it changes is unticked. Ticking an item turns on the EEMs that change it. Hover over a button or a dot to see the EEM, what it changes in that item (in the units the model displays), and the EEMs it builds on. With many EEMs, the columns scroll sideways inside the tree.
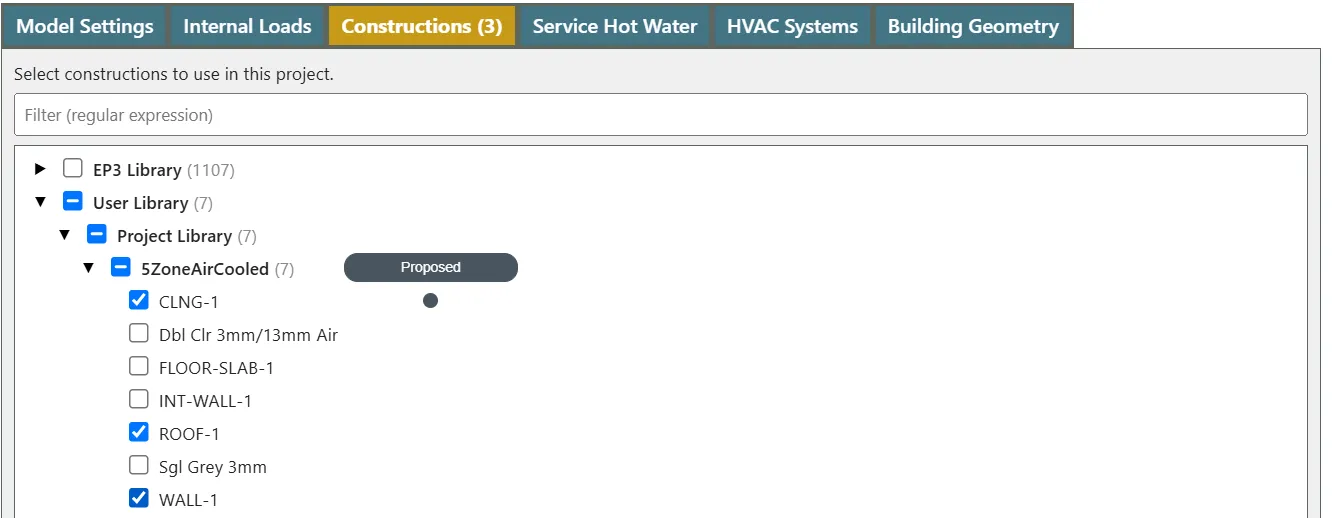
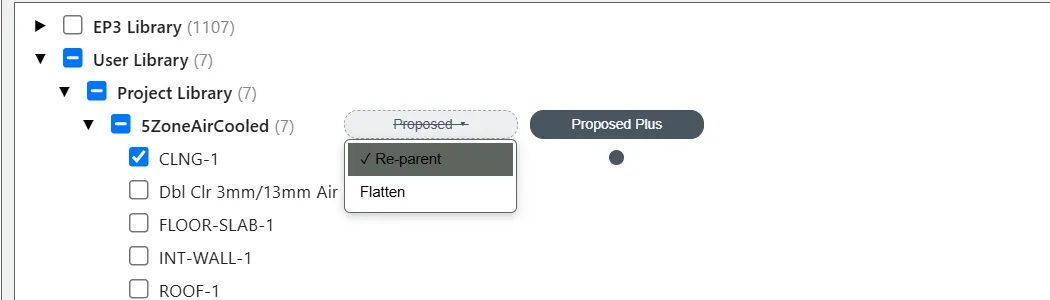
An EEM that is on is imported as an EEM of the model, with its values. Turning an EEM on also turns on the EEMs it builds on. When an EEM is turned off while one built on it stays on, hovering over its button opens a menu with two choices:
- Re-parent (the default) leaves its values out; the EEMs built on it take the nearest EEM above it that is on as their parent, or Global.
- Flatten copies its values into the EEMs built on it, so they work as they did in the file.
EEMs match by name: two templates that both have an EEM called “Low LPD” give one “Low LPD” in the model.
4. Internal Loads
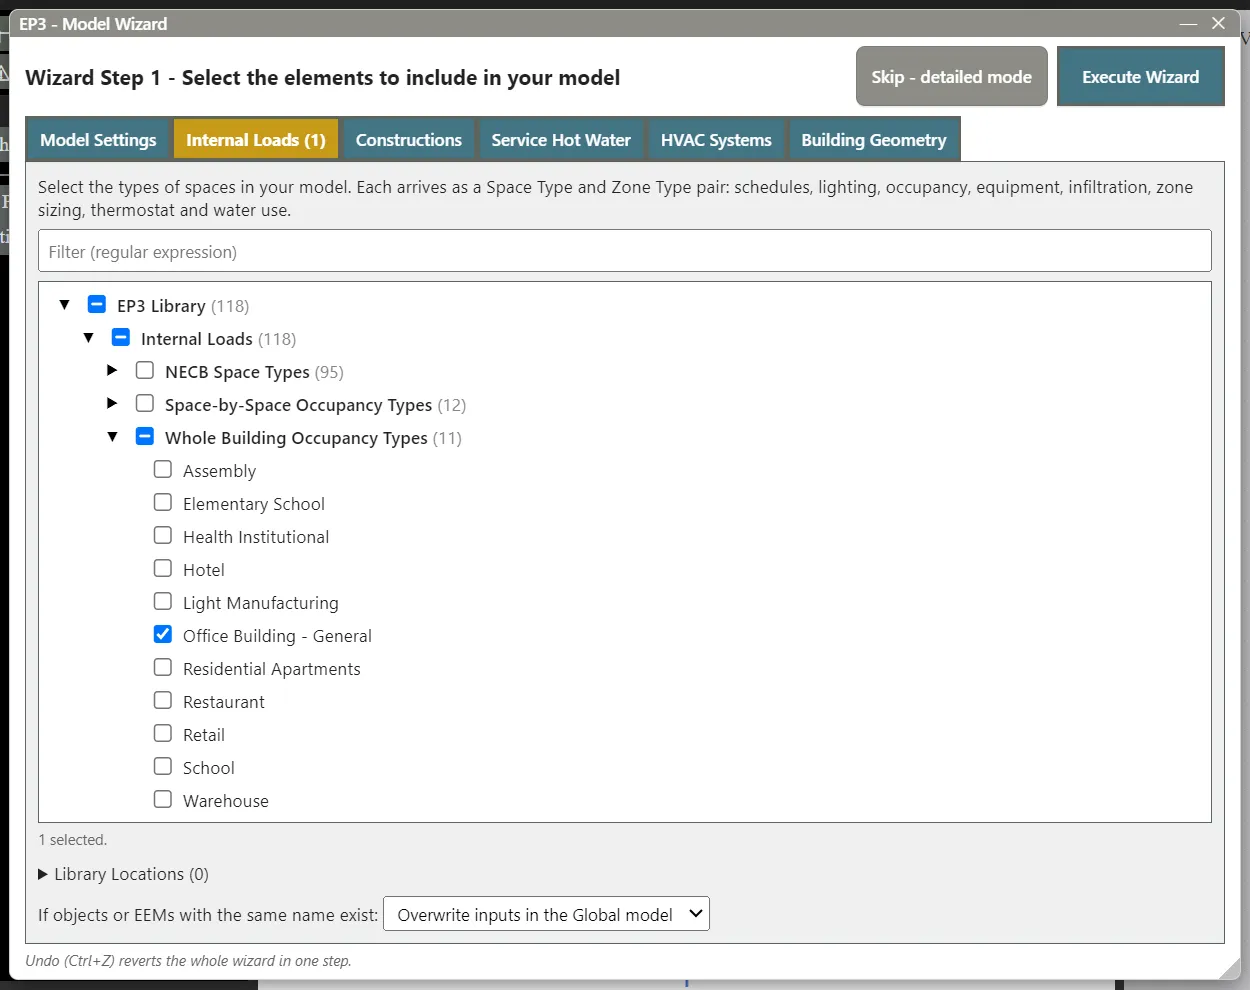
Use this tab to select the types of spaces in your model. Each template arrives as a SpaceType and ZoneType pair with the same name. Checking “Office Building - General,” for example, brings in an “Office Building - General” SpaceType (schedules, lighting, occupancy, equipment, and infiltration) and an “Office Building - General” ZoneType (its Sizing:Zone object, thermostat, and water use). Each space type arrives as one bundle of connected objects, internal loads and zone sizing together.
Many of these templates include WaterUse:Equipment objects for domestic water use (sinks, showers, and similar fixtures appropriate to the space type). This water use appears in results whether or not you select a Service Hot Water system; §6 describes what happens to it without one.
The EP3 Library’s Internal Loads folder holds three files:
- NECB Space Types: the space types of the National Energy Code of Canada for Buildings.
- Space-by-Space Occupancy Types: one type per kind of room (office, conference, corridor, storage, and so on), for a model whose Spaces follow the rooms.
- Whole Building Occupancy Types: one type for a whole building of one use, for a model that does not split out its corridors, stairs, toilets, storage and plant rooms. Its occupant densities are lower than those of the main room type (an office building allows 25.6 m² or 275 ft² per person, an office room 20 m² or 215 ft²), since the people are spread over those other spaces as well.
Internal Loads, Space Types, and Zone Types lists each type’s values and the standards they come from.
Whatever you select here, Execute Wizard also creates a dynamic ZoneList named “All”, if the model does not have one, that always contains every zone in the model.
The space types checked here are offered as suggestions in the Perimeter Space Type and Core Space Type boxes on the Building Geometry tab (§8), so filling in this tab first saves typing.
Internal Loads, Space Types, and Zone Types covers creating and saving your own linked SpaceType/ZoneType templates, the full field set they carry, and the cascading defaults they take part in. Schedules covers the schedules bundled in, and Zone-Level HVAC Equipment and Zone Sizing covers the Sizing:Zone fields that come with each template.
5. Constructions
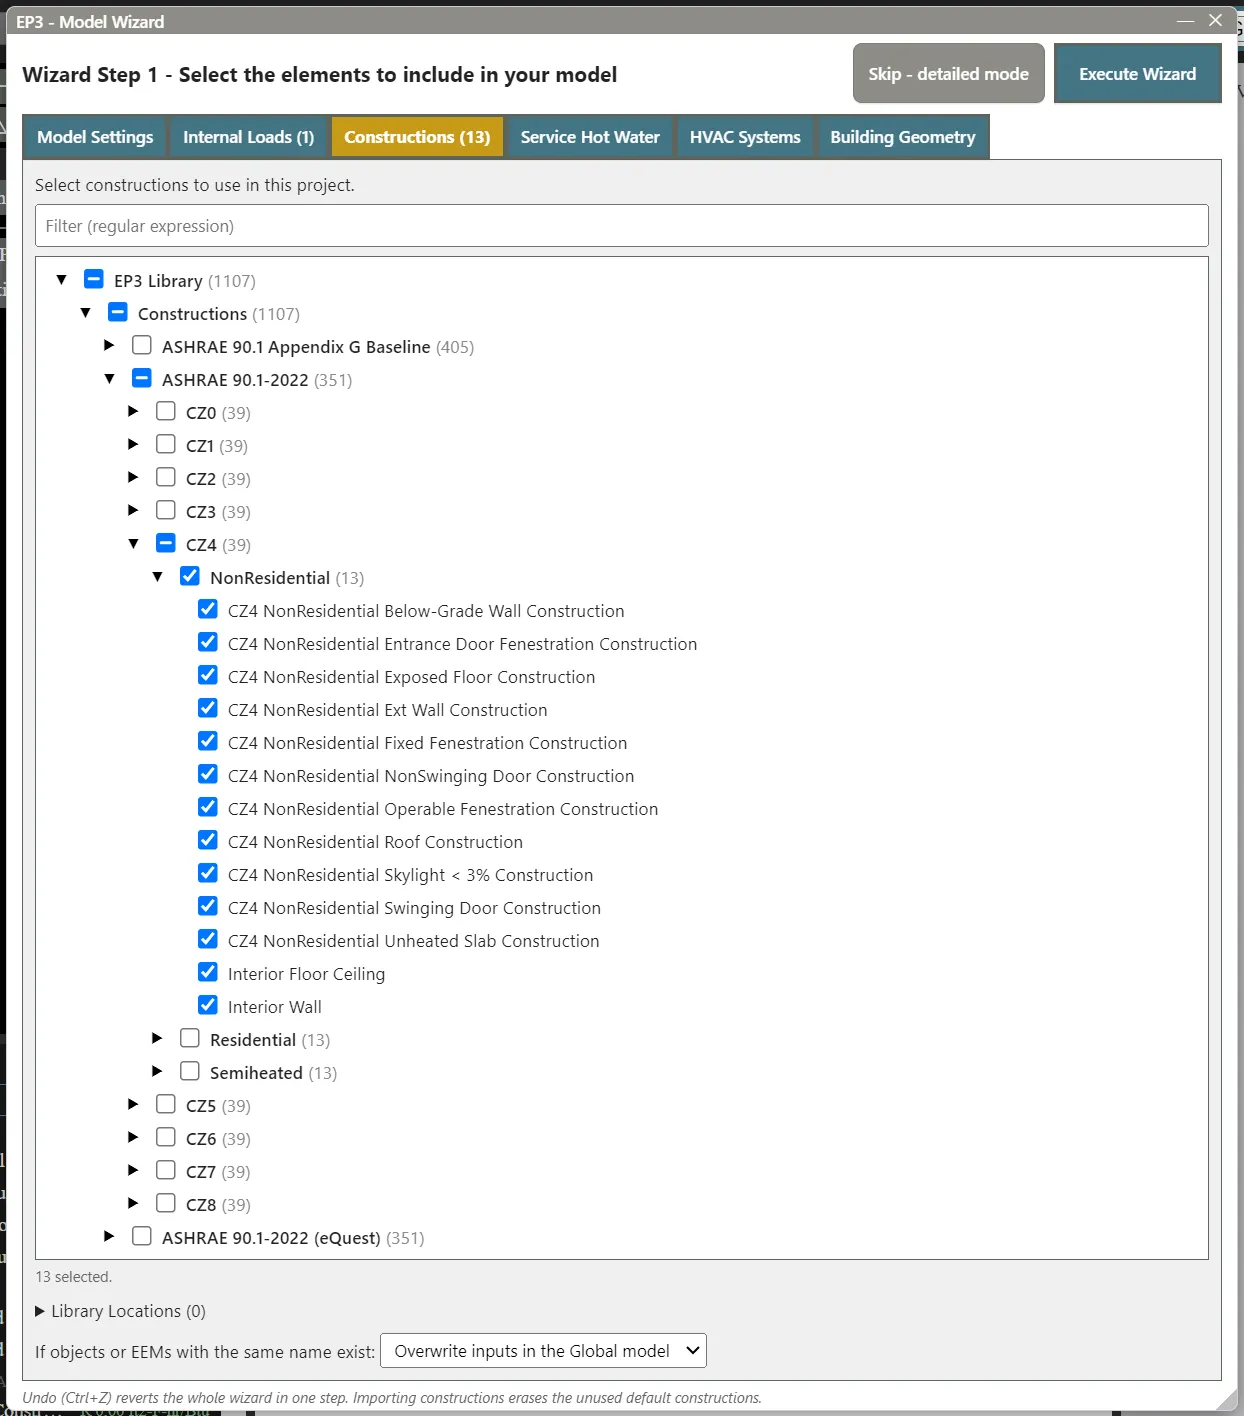
Use this tab to select the constructions for the project. The EP3 Library’s Constructions folder is organized by code baseline:
- ASHRAE 90.1-2022
- ASHRAE 90.1-2022 (eQuest)
- ASHRAE 90.1 Appendix G Baseline
Each is split into climate-zone folders (CZ0 through CZ8), and each climate zone holds three construction set files, NonResidential, Residential, and Semiheated. Check a set to take all its constructions, or expand it to pick some.
Importing constructions first removes the placeholder default constructions that nothing uses yet, then assigns the imported constructions to the model’s default construction slots.
If you select no constructions, EP3 still creates one construction for each required surface type, but these carry no material layers. Their R-value reads as zero in the Constructions panel, and the model cannot be simulated until each one has material layers, from a construction template imported later (§11) or from layers you add by hand. The EP3 Interface and Model Settings covers the Default Constructions surface-type list that these placeholders fill.
Constructions and Materials covers saving your own construction templates and the full assembly and material field set.
6. Service Hot Water
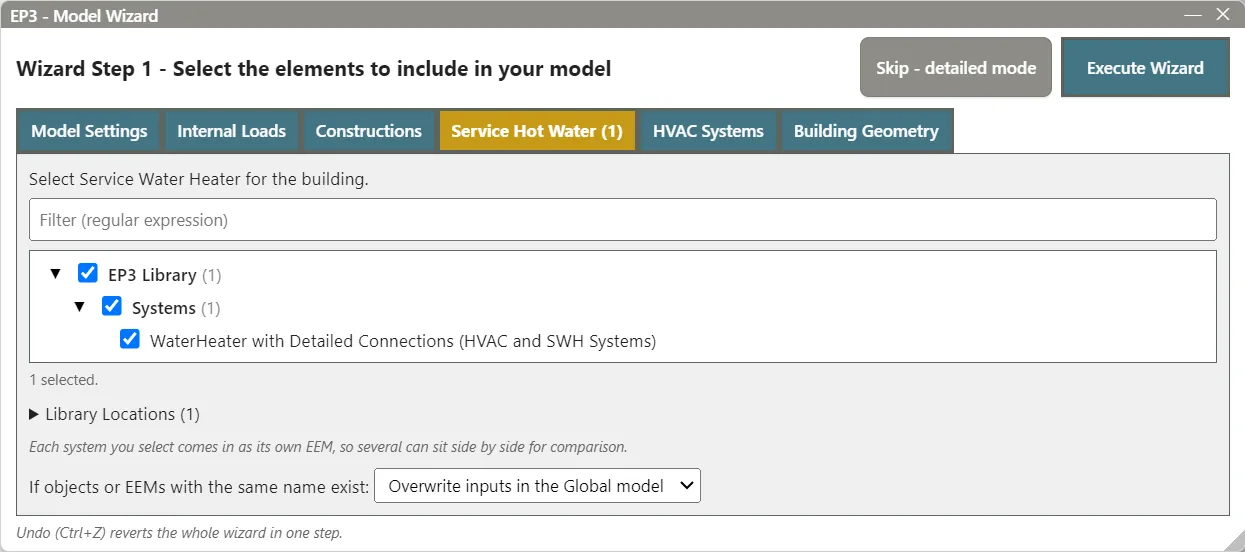
Use this tab to select a service water heating system for the building. The EP3 Library offers one complete system, “WaterHeater with Detailed Connections,” with its piping already built. It is in the HVAC and SWH Systems file, under Systems; since the file offers this tab one system, the tab shows it as one checkbox, WaterHeater with Detailed Connections (HVAC and SWH Systems).
The system is a single electric storage water heater (95% efficient, 60°C or 140°F setpoint, its tank autosized from the peak draw, its standby loss 0.008 W/K per litre of tank) on its own plant loop, serving every WaterUse:Equipment in the model. When the model has no Site:WaterMainsTemperature, the import adds one that takes the cold water temperature from the weather file; without it EnergyPlus would use 10°C (50°F) all year. Service Hot Water and Solar Water Heating lists its objects. How much water the building draws is set by the space types’ WaterUse:Equipment, one per hot water fixture, from LEED’s default fixture uses and baseline flow rates: in an office each person draws 9.65 L (2.55 gal) a weekday at the tap, from lavatory faucets, a kitchen sink and showers, and the hot share of it follows the mains temperature (Service Hot Water and Solar Water Heating).
Each system you import becomes its own Energy Efficiency Measure (EEM), tagged as a service water heating alternative, with the Global EEM as its parent. A service water heating EEM is a building block for the HVAC EEMs that build on it (§7), so it is left out of the Simulate dialog’s list until you turn on its Available for Simulation setting. Energy Efficiency Measures (EEMs) covers what an EEM is and how measures are organized.
Skipping this tab leaves the water use in your model and removes what heats it. The WaterUse:Equipment objects in your space-type templates (§4) generate domestic water use regardless. With no water heater to serve them, results still show a Water Systems end use, but it is the domestic water volume only; none of that water is heated.
7. HVAC Systems
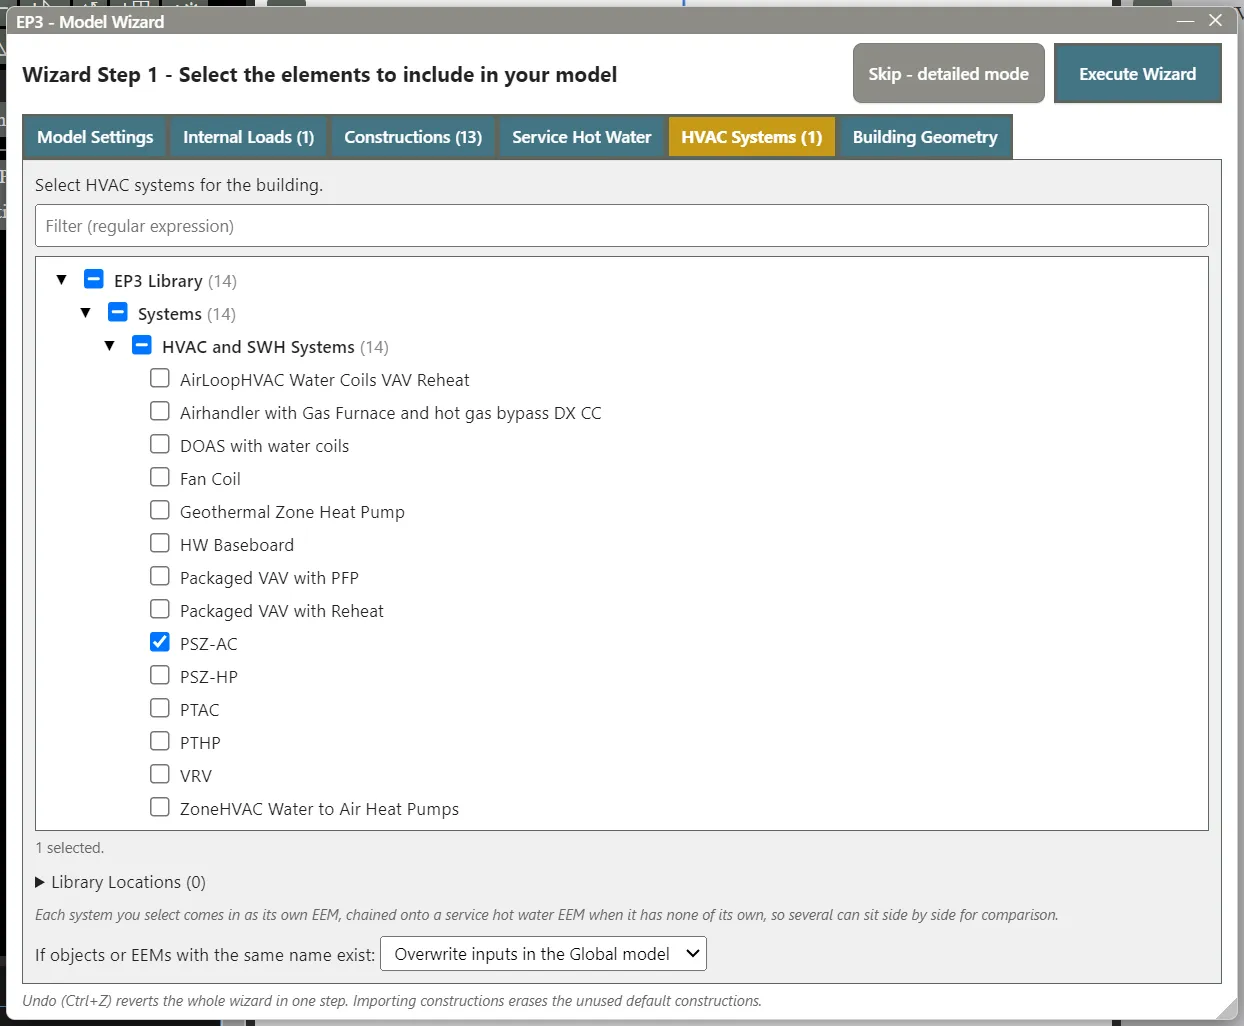
Use this tab to select HVAC systems for the building. The EP3 Library’s HVAC and SWH Systems file, under Systems, offers complete prototype systems: an air handler with gas furnace and hot gas bypass DX cooling, AirLoopHVAC Water Coils VAV Reheat, DOAS with water coils, Fan Coil, Geothermal Zone Heat Pump, HW Baseboard, Packaged VAV (with PFP or reheat), PSZ-AC, PSZ-HP, PTAC, PTHP, VRV, and ZoneHVAC Water to Air Heat Pumps. Each is an EEM of the file.
Each system runs on its own schedules, not the Zone Type’s. The air loop systems (all but DOAS with water coils) run their fans on office hours, weekdays 6:00 to 22:00 and Saturdays 6:00 to 18:00 (FanAvailSched, the DOE reference office HVAC schedule), start them early with an optimum start so the zones they serve reach their occupied setpoints when the building opens, and cycle them at night to hold the setback temperatures. For another building type, edit FanAvailSched to its hours (Controllers and Availability Managers).
Each system template includes the performance curves and schedules its equipment needs (Curve:Biquadratic, Curve:Quadratic, Schedule:Compact, and so on). Performance Curves: Part-Load and Efficiency Behavior covers how those curves work once imported.
Every HVAC system you select is added to the model alongside the others. Each becomes its own EEM, tagged as an HVAC alternative. The system’s objects are stored in the Global model, and its EEM is the alternative that switches them on. In the file, each HVAC system builds on WaterHeater with Detailed Connections, and keeps that parent when the service hot water system is checked in the same run. If it is not checked, a new HVAC EEM uses the model’s service water heating EEM as its parent when the model has one, so an HVAC comparison carries the water heating system along with it, and Global when it has none. Selecting three system types leaves three HVAC EEMs side by side, ready to compare or combine. Systems that share a central plant share it in the model: the Fan Coil and DOAS templates, for example, both use the same hot water and chilled water loops, and importing both adds one coil branch per system to a single set of loops. Energy Efficiency Measures (EEMs) covers system alternatives and combining EEMs.
The HVAC Outliner and Creating HVAC Systems covers template systems and building from individual components, and Zone-Level HVAC Equipment and Zone Sizing covers the zone equipment these templates bring in.
8. Building Geometry
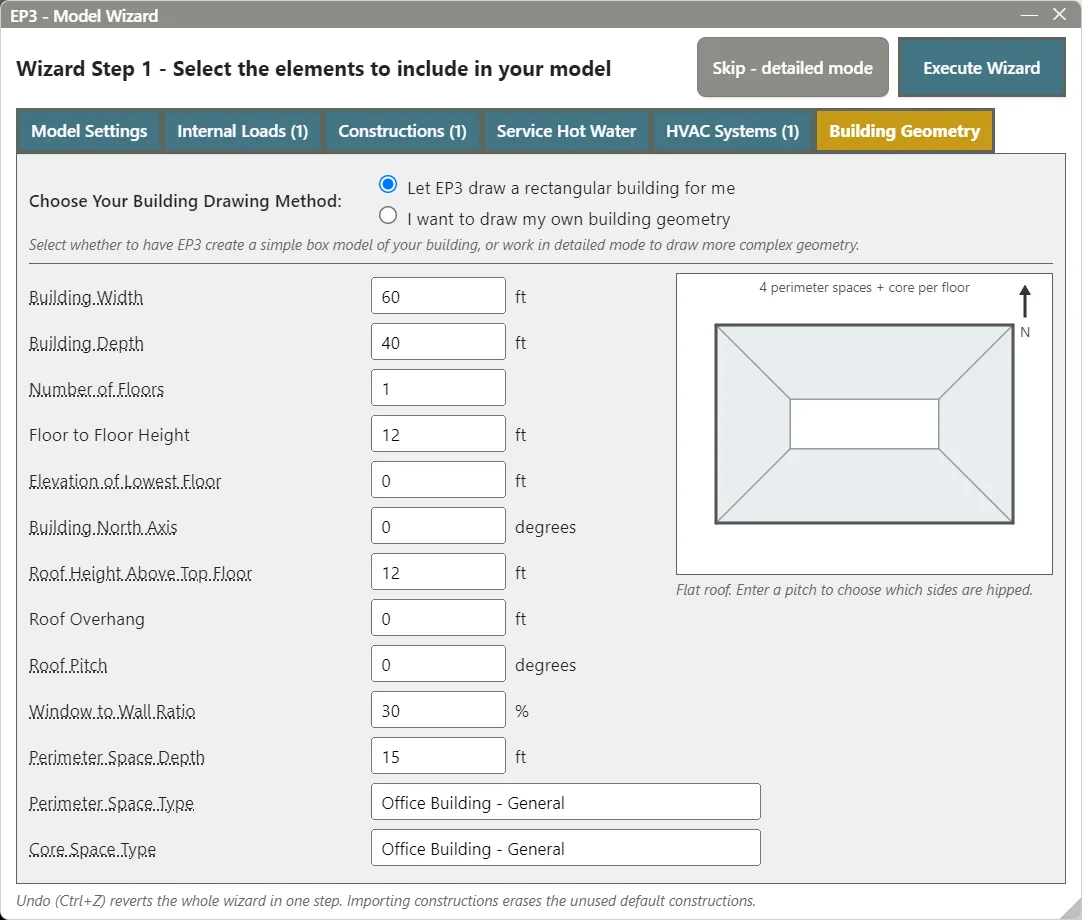
This tab offers two ways to start the building’s geometry, under Choose Your Building Drawing Method:
- Let EP3 draw a rectangular building for me
- I want to draw my own building geometry
The second option draws nothing; the fields below apply only to the first.
When the rectangular building is useful. A construction, internal loads, or HVAC template is built once and reused in any number of models. The rectangular building lets you try a system or object you have not used before without drawing geometry first: a box with a perimeter/core split is representative enough of a real building, and with the templates from the other tabs it gives you a model ready to simulate in a few minutes.
8.1 Fields
All lengths are in the units chosen on the Model Settings tab; switching units converts the values already entered.
- Building Width, Building Depth — the building’s East-West and North-South dimensions.
- Number of Floors — 0 draws no geometry.
- Floor to Floor Height, Elevation of Lowest Floor, Building North Axis
- Top Floor Height (to roof edge) — the top floor’s height from its floor to the roof’s lowest edge; with a flat roof, that is the top floor’s own ceiling height. It follows Floor to Floor Height until you change it. It is not a parapet or a roof thickness: with a flat roof, a value under 2 m (about 6 ft 7 in) or under half the Floor to Floor Height shows a warning that names the height the top floor will get, for example “The top floor will be only 1 m tall (the other floors 4 m)”. Enter 0 with a Roof Pitch above 0 to make the top floor an attic.
- Roof Overhang, Roof Pitch
- Window to Wall Ratio
- Perimeter Space Depth — see §8.2.
- Perimeter Space Type, Core Space Type — the space type for each kind of space. You can type any name; the box suggests the space types checked on the Internal Loads tab and those already in the model.
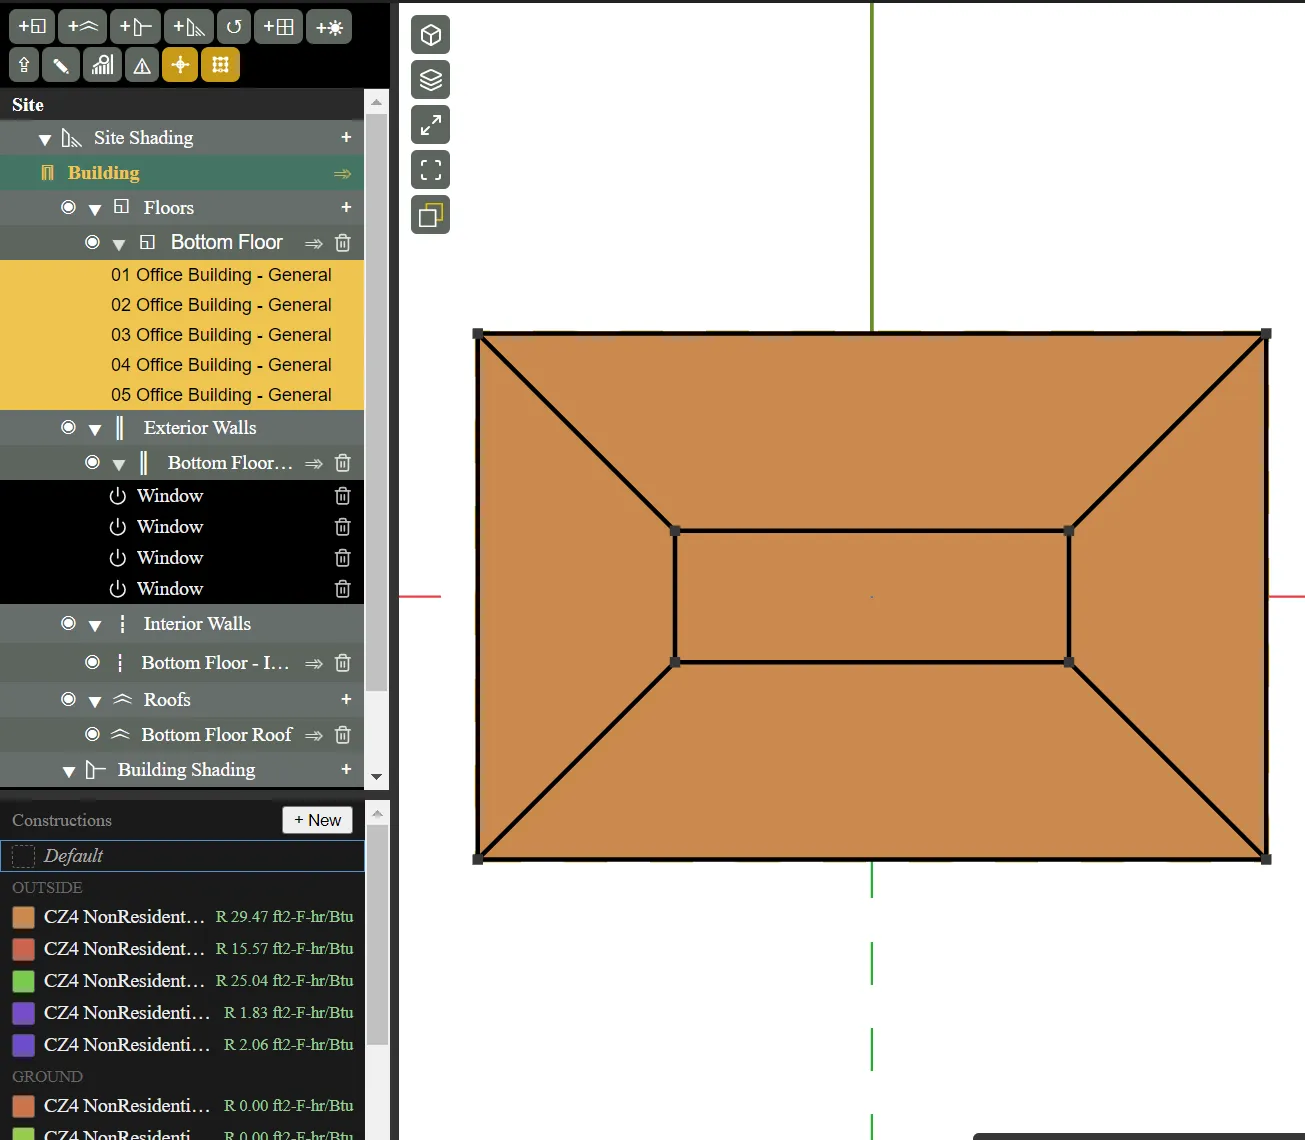
A plan beside the fields shows the footprint, its perimeter/core split, and a north arrow. With a Roof Pitch above 0, clicking a side of the plan switches that side between a hipped end and a gable.
8.2 The perimeter/core split
A Perimeter Space Depth greater than 0 and less than half the smaller of Building Width and Building Depth splits each floor into five spaces: one perimeter space along each side of the building, with the Perimeter Space Type, and one core space in the middle, with the Core Space Type. A depth of 0, or one at or beyond half the smaller dimension, gives one space per floor, with the Perimeter Space Type.
Each space is named with a number and its space type (“01 Office Building - General”). The space type’s lists pick up each space by that name, so the spaces and their zones belong to the right template with no further step.
8.3 Floors, roof, walls, and windows
- Floors. One floor is drawn as a bottom floor, two as a bottom and a top floor, and three add an intermediate floor. More than three floors are modeled with one intermediate floor whose Floor Multiplier stands in for all the middle floors. The intermediate floor sits a whole number of floor-to-floor heights above the bottom floor, the number of floors minus 1, halved and rounded down: 1 for four floors, 2 for five or six, and 3 for seven or eight. The multiplied floor does not touch the floors above and below it, so the surfaces between them use an Adiabatic copy of the interior floor/ceiling construction.
- Roof. A flat roof, or a pitched roof (with the hipped and gabled ends chosen on the plan), with the overhang entered. The roof’s eave sits at the top floor’s elevation plus Top Floor Height (to roof edge).
- Walls. Exterior and interior walls are grown on every floor.
- Windows. One window per exterior wall face, sized by an
OpeningTypeset to the Window to Wall Ratio. Editing thatOpeningTypelater resizes every window that uses it. A ratio of 0, or of 100 or more, adds no windows.
Creating Building Geometry and Spaces and Zones cover drawing geometry by hand and choosing a thermal-block strategy.
9. Utility rates
The Wizard does not set up utility rates. Tariffs are created in the Utility Cost Manager, available at any time; Utility Costs covers it.
10. Zone conditioning equipment
Execute Wizard assigns each HVAC system’s zone equipment (air terminals and zone units, such as the PSZ-AC unit) to every ZoneType the Wizard imported, at Global, so every zone of those space types uses it. When several HVAC systems are imported, each ZoneType lists all of their equipment, and each system’s EEM switches its own equipment on (§7). Zone equipment is exported only when a zone uses it.
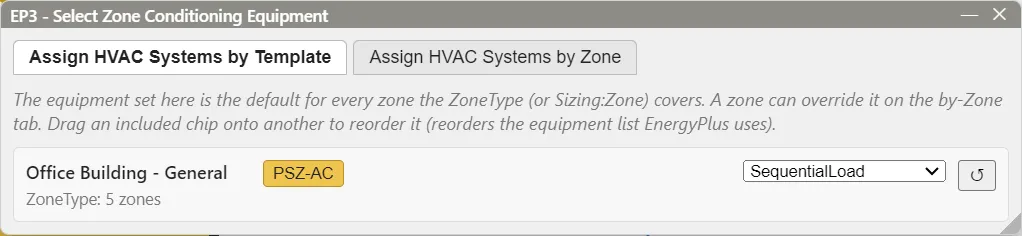
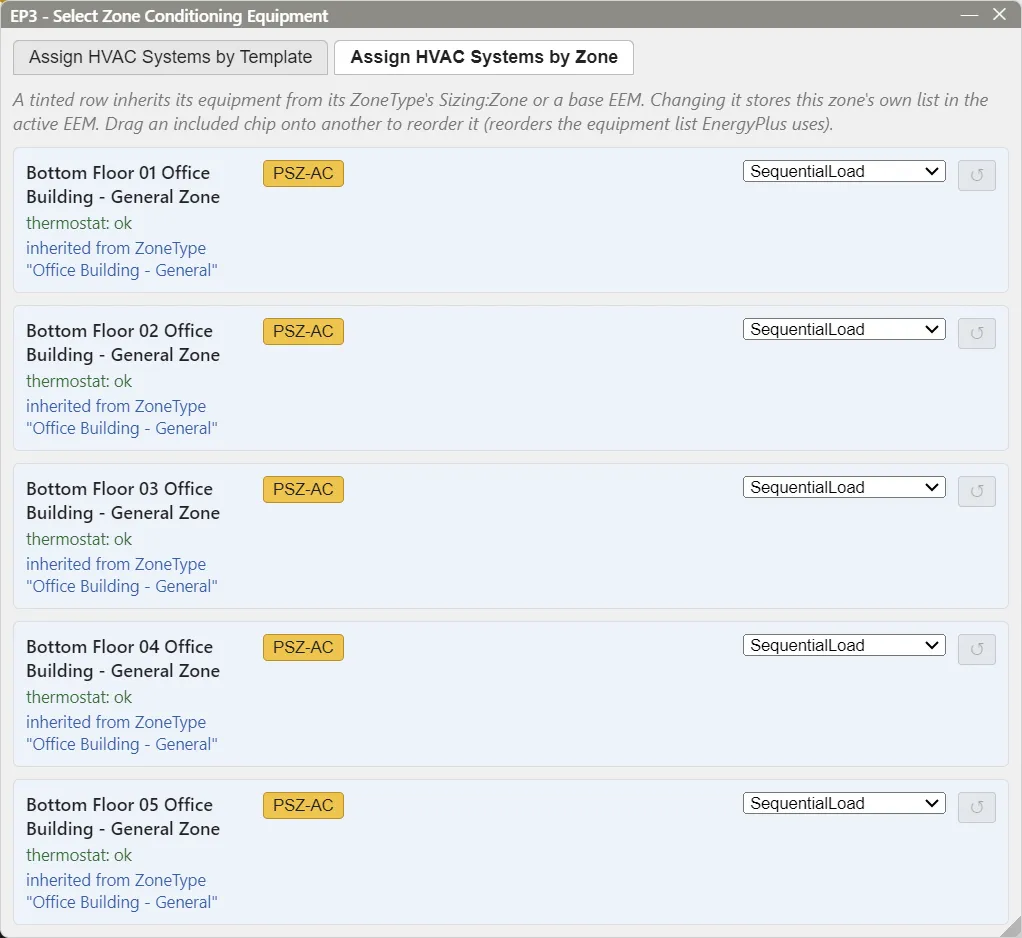
To review or change the assignments, open EP3 - Select Zone Conditioning Equipment with the View Zone HVAC Assignments button in the HVAC Outliner’s toolbar. The dialog has two tabs:
- Assign HVAC Systems by Template — one row per
Sizing:Zoneobject (for a Wizard model, one perZoneType), for assigning equipment to every zone that template covers at once. - Assign HVAC Systems by Zone — one row per zone, for a zone that needs different equipment from its template. Each row shows whether the zone has a thermostat. A tinted row inherits its equipment from its
ZoneTypeor from a parent EEM; changing it stores a list for that zone, and the ↺ button returns the row to the inherited list.
Changes are stored in the active EEM, the one selected in the EEM dropdown of the top toolbar, and EEMs that build on it inherit them.
The dialog flags two conditions that would likely cause a fatal EnergyPlus error: a zone with a thermostat but no Sizing:Zone object, and a zone covered by more than one Sizing:Zone object (usually through membership in more than one ZoneList). A zone with no thermostat shows “no thermostat: equipment not exported.”
10.1 Equipment and load distribution
Each row lists the zone equipment available, as chips. Click a chip to include it (gold) or leave it out (grey). Beside the chips, the Load Distribution Scheme — SequentialLoad, UniformLoad, UniformPLR, or SequentialUniformPLR — controls how a zone’s load is shared when more than one piece of equipment serves it.
When a zone or template has more than one piece of equipment, order matters: EnergyPlus works down the list, calling on each piece to meet whatever load the equipment ahead of it did not. Drag an included chip onto another to reorder the list. Order equipment from least controllable to most controllable, so the equipment best able to modulate its output meets whatever the simpler equipment ahead of it could not.
Zone-Level HVAC Equipment and Zone Sizing covers the equipment objects and Sizing:Zone; Model Troubleshooting and Quality Assurance covers resolving the conditions this dialog flags.
11. Importing templates into an existing model
The same template trees are available after the Wizard, in the Import dialog: click the Import button in the top toolbar and open the Library templates tab. The tabs and options are those described in §3 through §7, without the Model Settings and Building Geometry tabs, and Import runs the import. The same-name option defaults to Keep the existing ones. With an EEM other than Global active, it also offers Overwrite inputs in the ⟨EEM⟩ EEM, which writes the templates’ values into that EEM; objects new to the model are then created in that EEM only, unless Make new objects available in Global is checked. An object a space type or zone type has and the template’s does not is switched off in that EEM instead of deleted, so Global and the other EEMs keep it (Switched off in this EEM (not in the template)). When HVAC systems are checked, Assign HVAC zone equipment to the ZoneTypes chooses where their zone equipment is assigned: At Global, In each system’s new EEM (the default), or None (assign them later). In simplified view, the Import dialog opens on the template library.
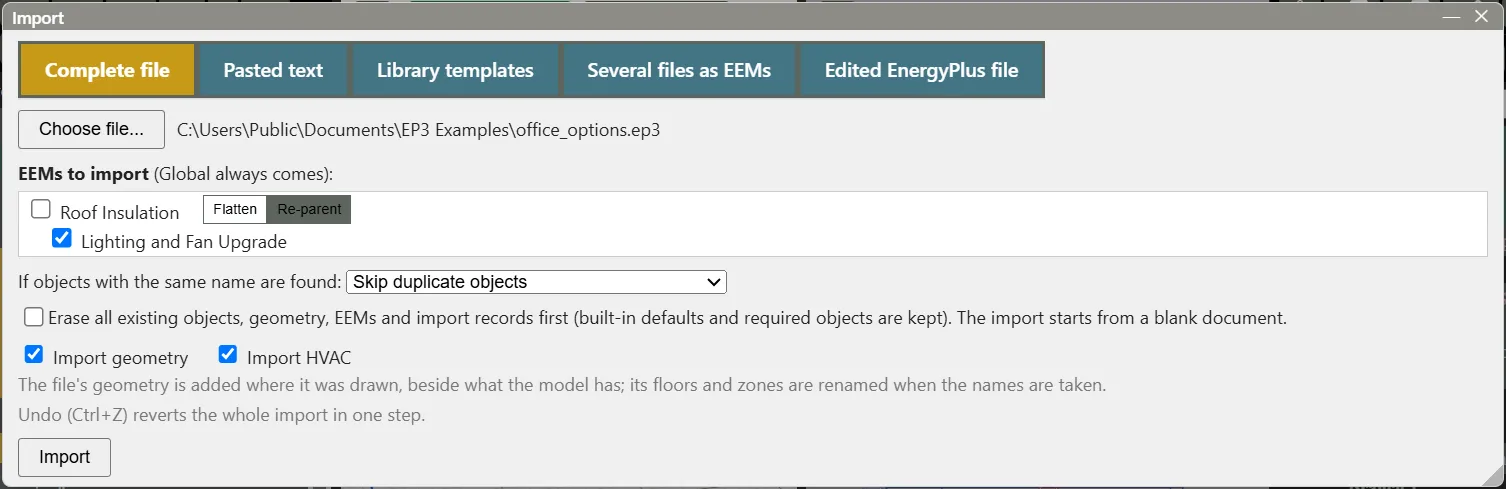
11.1 Importing a whole .ep3 model
To bring in everything another EP3 model holds, open the Complete file tab and pick the .ep3 file. EEMs to import lists the file’s EEMs, all checked; Global always comes. Checking an EEM checks the EEMs it builds on, and an unchecked EEM under a checked one offers Flatten and Re-parent, as an EEM button does in a template tree (§3.1).
The file’s geometry is added beside the model’s, in its original coordinates and under the model’s building; its floors and zones are renamed when their names are taken. Its HVAC systems keep their arrangement and are placed to the right of the model’s in the HVAC diagram. Clear Import geometry or Import HVAC to leave either out. After the import, the dialog shows a report of what happened to each object, which is also kept with the model (The EP3 Interface and Model Settings). Importing EnergyPlus Files covers the Import dialog’s options and the report.
12. A worked example: from the Wizard to a finished simulation
This example carries a model from a new file to a finished simulation using the Wizard and the zone equipment dialog, with no hand-drawn geometry. It is deliberately small, just enough to connect each tab to the next once, with real selections.
12.1 The example building
A single-story, 60 ft × 40 ft rectangular office building in Climate Zone 4A, with a 15 ft deep perimeter wrapped around a core and one packaged single-zone air conditioner per zone.
12.2 Filling in the Wizard
- Model Settings (§2) — choose IP (ft, in, °F), select a weather file for Climate Zone 4A (this example uses
USA_VA_Sterling-Washington.Dulles.Intl.AP.724030_TMY3.epw, installed with EnergyPlus in its WeatherData folder), and set Select Climate Zone to ClimateZone 4A. - Internal Loads (§4) — under Whole Building Occupancy Types, check Office Building - General. It is the only space type this building uses.
- Constructions (§5) — under ASHRAE 90.1-2022 > CZ4, check NonResidential.
- HVAC Systems (§7) — check PSZ-AC, a packaged single-zone air conditioner on each zone, which suits a small building. Its curves and schedules come with it. This example selects no service hot water system, so the PSZ-AC EEM’s parent is Global (§6, §7).
- Building Geometry (§8) — choose Let EP3 draw a rectangular building for me, then set Building Width 60 ft, Building Depth 40 ft, Number of Floors 1, Floor to Floor Height 12 ft, Top Floor Height (to roof edge) 12 ft (it follows the Floor to Floor Height), Perimeter Space Depth 15 ft (well under half the 40 ft depth, so the perimeter/core split applies), and both Perimeter Space Type and Core Space Type to Office Building - General. Leave every other field at its default.
Click Execute Wizard. The status bar reports the number of template files, objects, and EEMs added, followed by “Building drawn.” The import is listed in Model Settings > Import Details (The EP3 Interface and Model Settings).
12.3 Checking the equipment and simulating
- In the HVAC Outliner’s toolbar, click View Zone HVAC Assignments. On Assign HVAC Systems by Template, the Office Building - General row covers all five zones, and its PSZ-AC chip is gold: the Wizard assigned it. The by-Zone tab shows each zone inheriting PSZ-AC.
- Click Simulate in the top toolbar, check PSZ-AC and clear Global, click Simulate, and choose a folder for the run.
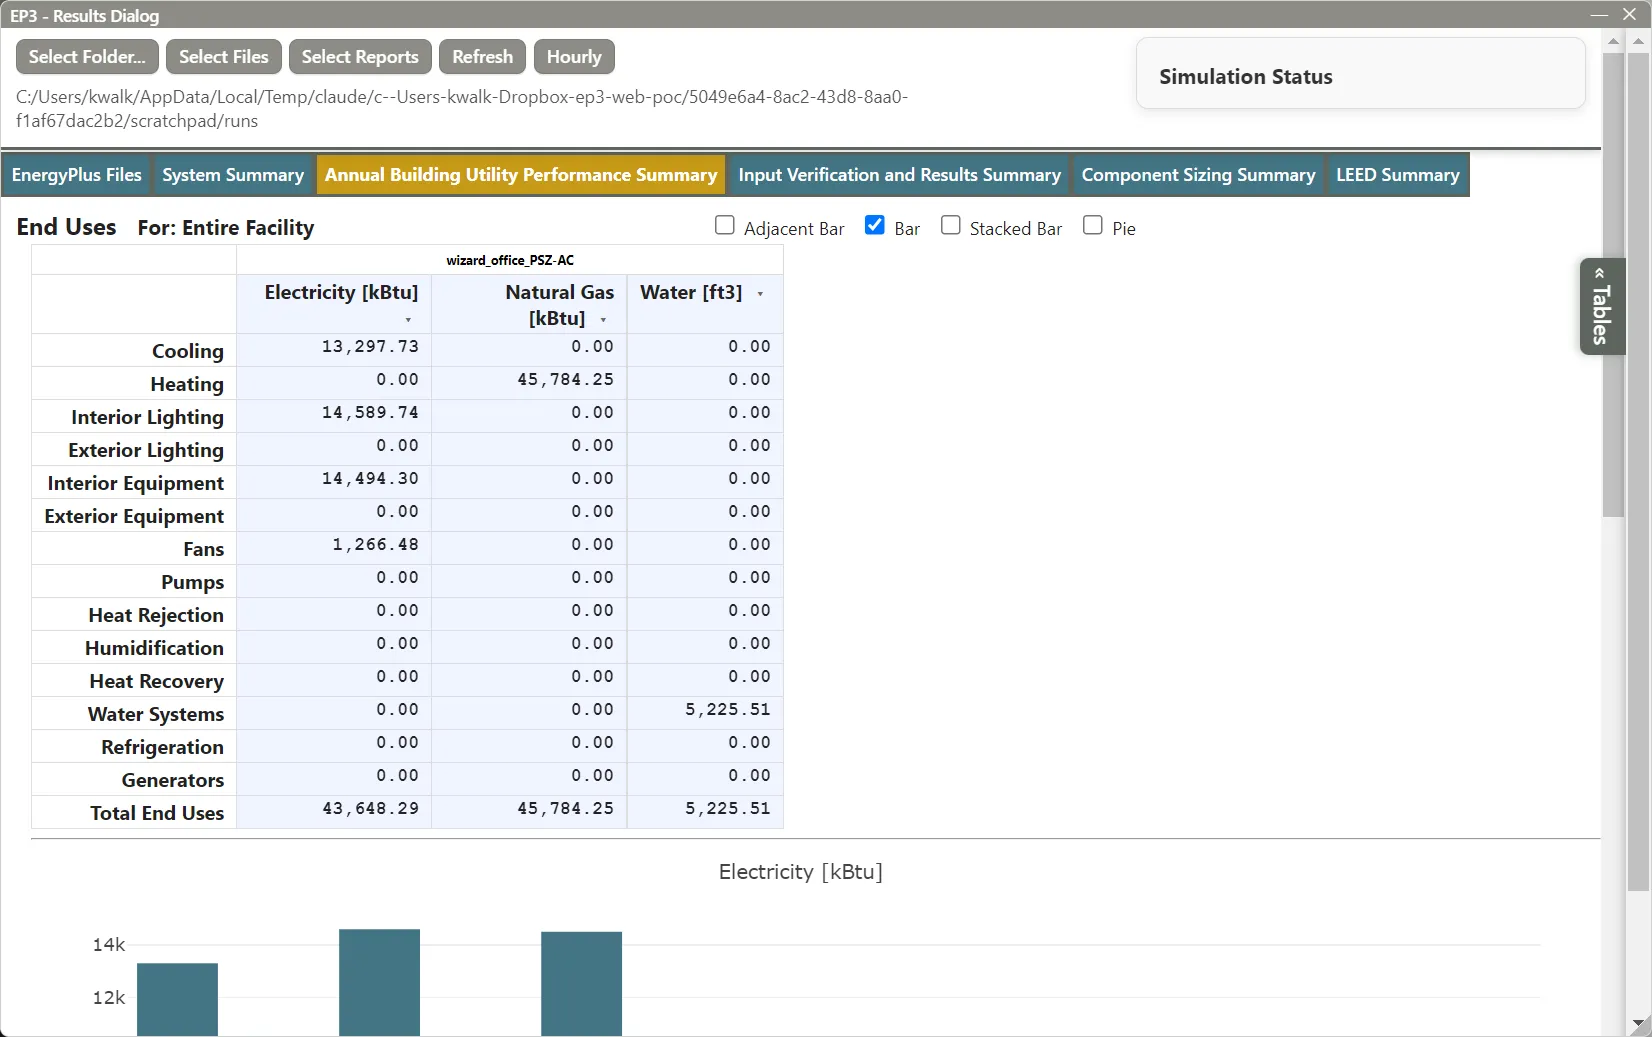
Running Simulations and Viewing and Interpreting Results cover both steps in full. In this example the run completes with no severe errors. Click View Results and open the Annual Building Utility Performance Summary tab. Its End Uses table shows the result for the five zones (01 to 04 the perimeter, 05 the core, all Office Building - General), with the loads and schedules from the Internal Loads tab, conditioned by PSZ-AC units, against the Climate Zone 4A weather: cooling, interior lighting, interior equipment, and fan electricity, and heating natural gas, broken out by end use.
The table also shows a Water Systems end use, although this example selected no service hot water system. That is expected: the WaterUse:Equipment objects in Office Building - General generate domestic water use regardless, and with no water heater in the model the figure is the domestic water volume only; none of it is heated.
This handbook is also built into EP3 (Help), where its EnergyPlus links open the EnergyPlus Reference. Technical specifications · Book a demo