The EP3 Interface and Model Settings
This chapter maps the EP3 interface: the main window and its two sides, the top toolbar, the dialogs reached from it, and the settings stored with a model and with your EP3 installation. It covers where each piece is and what it is for; later chapters cover importing, validating, simulating, and viewing results in depth.
1. The main window
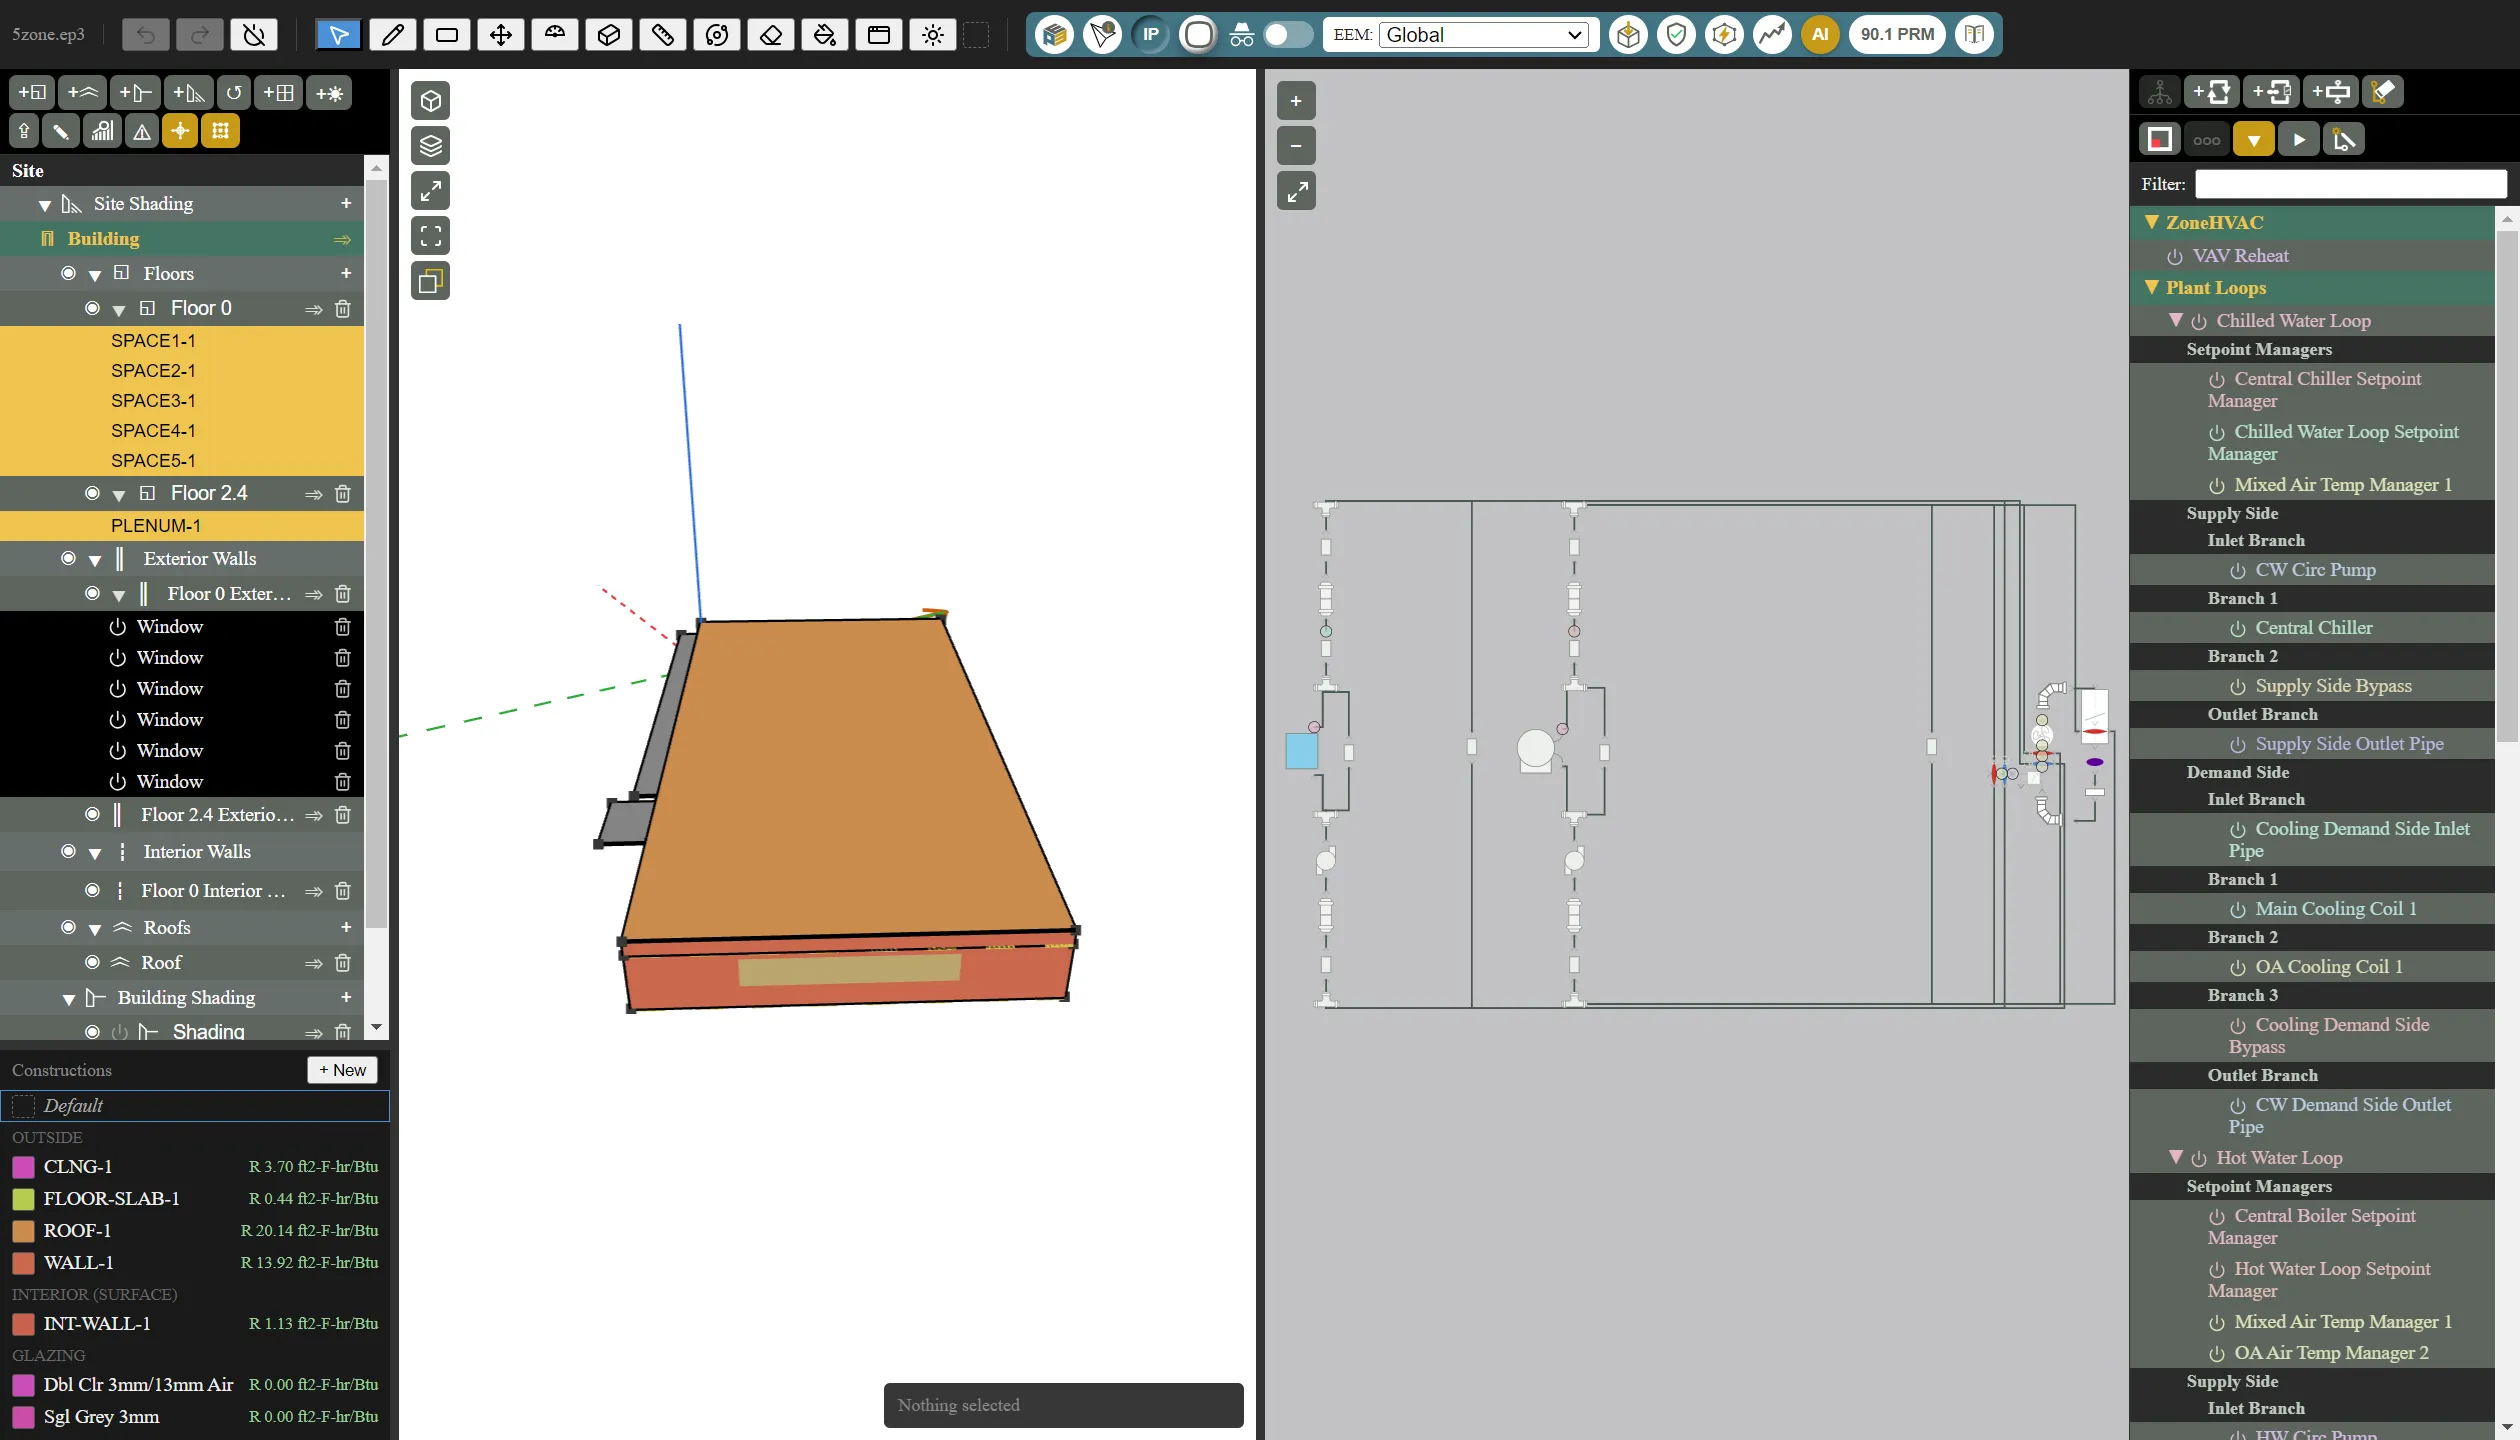
EP3 opens a window with two sides, side by side (you can have more than one window open: §10):
- The building geometry side, on the left: the Building Geometry Outliner with its toolbar, the Constructions panel below it, and the 3D view.
- The HVAC side, on the right: the HVAC diagram and the HVAC Outliner with its toolbars.
Both sides are visible at once, so you can select a zone in the 3D view and see its equipment in the HVAC diagram without switching views. Drag the bar between the sides to give either more room; dragging it fully to one side hides the other side, and dragging it back restores it. The bar between the Building Geometry Outliner and the 3D view sets the outliner’s width, and the bar above the Constructions panel sets that panel’s height.
A row of controls runs across the top of the window (§2). Dialogs open as floating windows over the main window and can be moved, resized, and minimized; the last dialog you clicked is on top. Each dialog reopens where you left it, at the size you left it, in later sessions too. Atlas, EP3’s AI assistant, opens docked at the right edge of the window (§9).
The window’s menu bar holds file and editing commands:
- File — New (Ctrl+N, which also opens the Model Wizard), New Window (Ctrl+Shift+N, §10), Open… (Ctrl+O), Save (Ctrl+S), Save As… (Ctrl+Shift+S), Export epJSON…, Import EnergyPlus…, Combine Loads into Space/Zone Types… (Internal Loads, Space Types, and Zone Types), EnergyPlus Version… (EnergyPlus Versions), and Settings… (Ctrl+,).
- Edit — Undo (Ctrl+Z), Redo (Ctrl+Y), and the standard clipboard commands.
- View — reload, zoom, and full screen.
- Help — EP3 Handbook (F1), EnergyPlus Reference (§9.1) and Licence and computers… (§11).
A model is saved as an .ep3 file. The file name, with an asterisk when there are unsaved changes, appears at the left end of the top toolbar.
Autosave. While a model has unsaved changes, EP3 keeps a backup of it every few minutes (5 by default). The backup is kept on your computer, in EP3’s application folder, not beside the model. Saving the model, or choosing Don’t Save when you close it, deletes the backup. If EP3 closes without either (a crash or a power cut), the next time you open the file EP3 tells you there is an autosave with changes that were never saved and offers Open Autosave, Open Saved File (which deletes the backup), Show Both (the autosave opens in a second window) or Cancel. An untitled model’s backup is offered when EP3 next starts. Autosave is turned on or off, and its interval set, under Autosave in File > Settings….
2. The top toolbar
The top toolbar has three groups.
History and visibility. Undo and Redo, then the Objects that are off in this EEM toggle. With it off (the default), objects excluded from the active EEM are hidden in the 3D view, the HVAC diagram, and both outliners; with it on (highlighted), they are shown. Energy Efficiency Measures (EEMs) covers excluding objects from an EEM.
Drawing tools. Select, Line, Rectangle, Move, Rotate (Q), Push/Pull, Tape Measure, Orbit, Erase, Paint (B), Window Rectangle (W), and Daylight Sensor (D). The swatch after the tools shows the construction the Paint tool will apply. Creating Building Geometry covers the drawing tools.
Model controls, left to right:
- EP3 — opens the main object dialog (§3).
- Selected Object — opens the Selected Object dialog (§4).
- SI / IP — switches every displayed value between SI and IP units. Values are stored in SI; this changes only how they are shown and entered.
- Simplified / complex view — switches the dialogs between a reduced set of object types and fields (simplified, the button pressed in) and every type and field (complex). See §3.4.
- Incognito — replaces object and node names with generic names in the exported EnergyPlus file, the simulation, Atlas, and the saved file, so a model can be shared (with an AI service, for example) without its names. Switching it on asks for confirmation and explains what it does not hide: building geometry, HVAC systems, custom schedules, and referenced data such as
Schedule:Filepaths can still identify a project. While it is on, names are read-only, and saving also writes a companion file with the real names. - EEM — selects the active Energy Efficiency Measure: the alternative that edits are made in and that the views show. Global is the base model. Energy Efficiency Measures (EEMs) covers EEMs.
- Import — imports EnergyPlus files (
.idf,.expidf, or.epJSON), a whole EP3 model (.ep3), pasted text, or templates from the library. The Model Wizard covers templates and.ep3files, and Importing EnergyPlus Files covers the rest of the Import dialog. - Validate — checks the model for common issues, such as spaces that are not enclosed and missing constructions. Model Troubleshooting and Quality Assurance covers validation.
- Simulate — exports the chosen EEMs and runs EnergyPlus on each. Running Simulations
- View Results — opens the Results dialog. Viewing and Interpreting Results
- AI — opens Atlas. The EP3 AI Assistant
- ASHRAE 90.1 performance path (the balance scale) — generates ASHRAE 90.1 Appendix G Proposed and Baseline EEMs from an EEM and simulates them. A PRM Report button (the balance scale with a page behind it) appears beside it once the generator has reported messages for any EEM or a Baseline EEM exists; it opens the generator’s messages and documentation (ASHRAE 90.1 Performance Rating Method). The same button runs the Energy Cost Budget Method, which builds a Proposed and a Budget (§9 of that chapter).
- EP3 Handbook — opens this handbook (§9).

3. The main object dialog
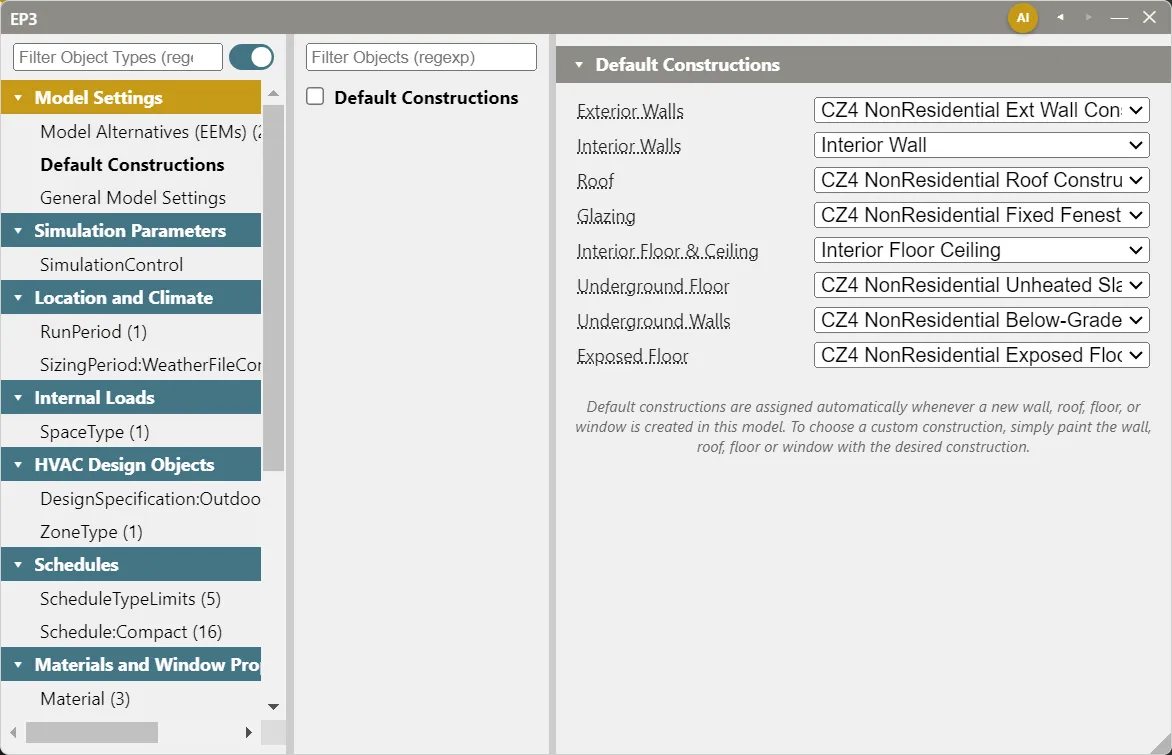
The EP3 button opens the main object dialog, titled EP3. It is a three-column browser:
- Column 1 lists object types, arranged in groups (Simulation Parameters, Location and Climate, Internal Loads, HVAC Design Objects, Schedules, and so on).
- Column 2 lists the objects of the type selected in Column 1.
- Column 3 shows the fields of the object selected in Column 2.
Drag the bars between the columns to resize them.
Column 1 lists the object types that have no dedicated editor elsewhere in EP3. An AirLoopHVAC or PlantLoop is absent, for example: loops are edited from the HVAC diagram and the HVAC Outliner (§6). A Zone is listed, under Zones and Building Segments, because its fields (Ceiling Height, Floor Area, and so on) are edited here even though its spaces are drawn in the 3D view. Column 1 also holds the Model Settings group, which is EP3 data rather than EnergyPlus objects (§7); it has a gold header, and every group of EnergyPlus objects has a teal header.
3.1 Column 1: finding an object type
The Filter Object Types box narrows Column 1 to matching group and type names as you type; it accepts a regular expression. Ctrl+H moves to this box.
The switch beside it chooses between every object type the dialog can edit and only the types that have at least one object in the model. Ctrl+L toggles it. With every type shown, a type with no objects in the model is listed in red. The count after a type name is the number of objects of that type.
3.2 Column 2: working with objects
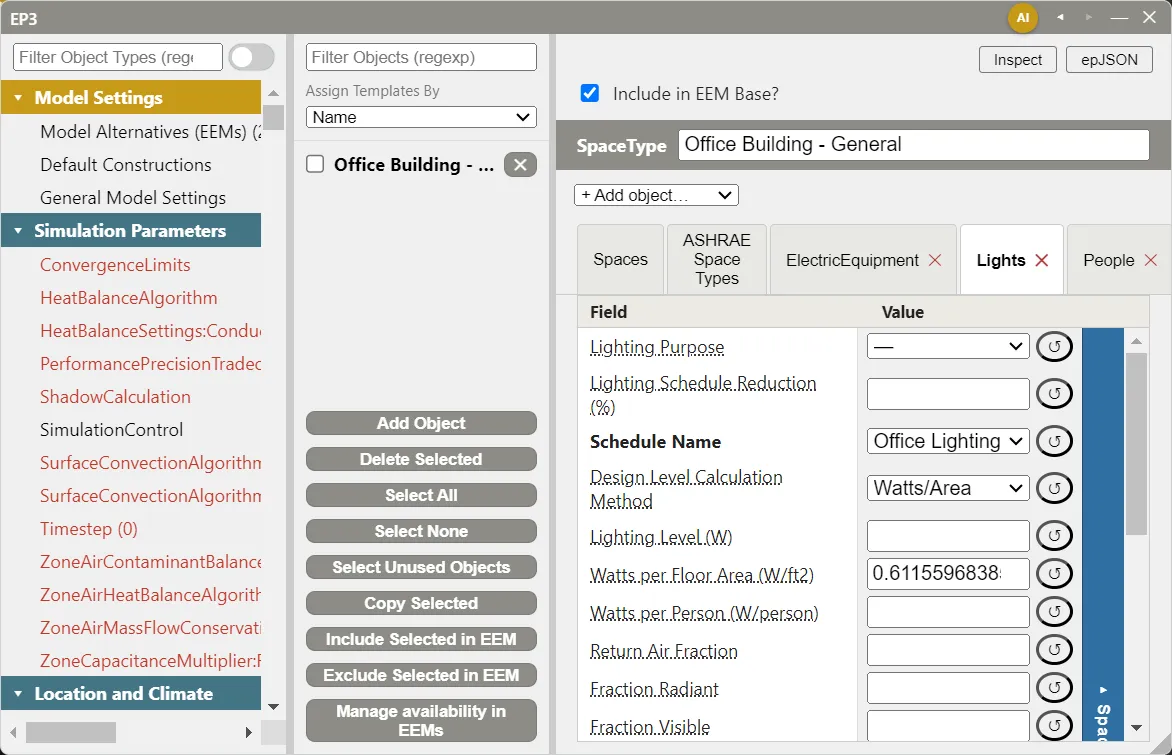
Column 2 lists the objects of the selected type, each with a checkbox, and below the list a row of buttons:
- Add Object — creates a new object of this type.
- Delete Selected — deletes every checked object that is visible in the list, skipping any that another object still references.
- Select All, Select None — check every visible object, or clear every check.
- Select Unused Objects — checks the visible objects that nothing else references.
- Copy Selected — duplicates every checked, visible object.
- Include Selected in EEM, Exclude Selected in EEM — switch the checked objects on or off in the active EEM.
- Manage availability in EEMs — sets each checked object on, off, or inherited in every EEM at once.
Energy Efficiency Measures (EEMs) covers including and excluding objects. Some object types add buttons to this set: Model Alternatives (EEMs) has a copy button and up/down arrows for ordering, and SpaceType and ZoneType have an Assign Templates By choice above the list.
Column 2 has its own Filter Objects box, which narrows the list by name. The bulk buttons act only on the objects currently visible, so filtering first and then clicking Select All checks only the matches.
3.3 Column 3: editing an object
Column 3 shows the selected object’s fields. Its parts, top to bottom:
- Inspect shows the object’s complete stored record, and epJSON shows the epJSON the object produces in the active EEM, or the reason it is not exported.
- Include in EEM ⟨EEM name⟩? switches this object on or off in the active EEM.
- The object’s type and name.
- The fields. A required field’s label is bold; every other label is underlined with dots, and hovering over it shows the field’s description from EnergyPlus. An optional field with no value entered, in the active EEM or any EEM it builds on, shows its EnergyPlus default on a gray-blue background (a new
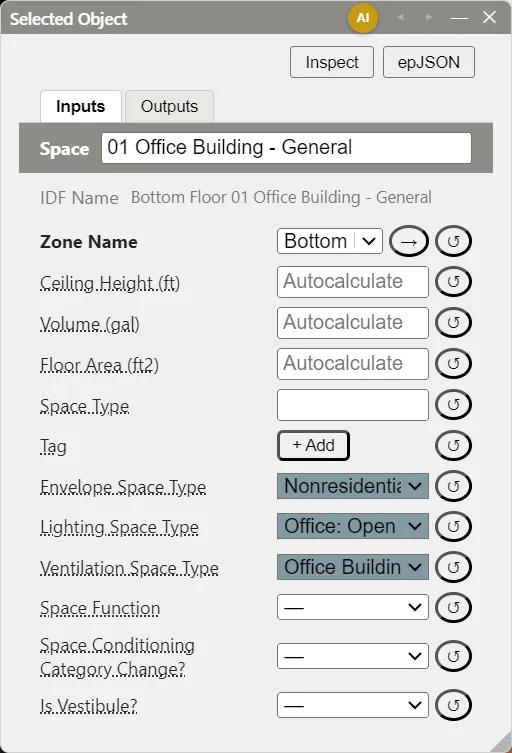
Timestepshows 6); the default is not stored, and the export leaves the field out so EnergyPlus applies it. Each field has a ↺ button that clears the value entered in the active EEM, returning the field to its inherited or default value. A reference field is a dropdown of the objects it can name. In the Selected Object dialog, the reference fields of a surface, window, or Space (Zone Name, Space Name, Building Surface Name, Outside Boundary Condition Object, and a window’s Opening Type) also have a → button that opens the referenced object; other reference fields have none. - Where an object chooses a calculation method, the dialog shows only the fields that method uses: Lights’ Design Level Calculation Method, for example, shows Watts per Floor Area for
Watts/Areaand hides the other two. The method field and the fields it controls share a label tint, and the fields not in use are left out of the export.
An object that owns other objects shows one tab per owned object. A SpaceType, for example, has tabs for its ElectricEquipment, Lights, People, and ZoneInfiltration:DesignFlowRate objects, each with its fields and an ✕ that removes it, plus an + Add object… menu for adding another. Two more tabs belong to templates: Spaces lists the spaces using this SpaceType, and ASHRAE Space Types holds the space classifications the ASHRAE 90.1 PRM generator uses. A blue bar along the right edge of the field list opens a column for values that differ by space. Internal Loads, Space Types, and Zone Types covers templates and per-space values.
The gold AI button in the dialog’s title bar asks Atlas about the object shown, or about the objects checked in Column 2. The ◂ and ▸ buttons beside it go back and forward through the objects you have opened.
3.4 Simplified and complex view
The view button in the top toolbar switches the dialogs between simplified and complex view. Simplified view shows the object types and fields on a list; Column 1 lists only those types, and some (Lights, People, equipment, thermostats, Sizing:Zone) appear only on the tabs of their SpaceType or ZoneType. It always shows a required field that has no default, and it always hides node fields and other wiring that EP3 fills in. Complex view shows everything.
Only the display changes: the model, its export, validation, and Atlas see every field in both views. The setting is saved with the model. A model built with the Model Wizard starts in simplified view; any other model starts in complex view.
EP3’s list of simplified-view types and fields can be replaced by a company’s own: put a file named simplified_view_fields.json at the top of a Library Locations folder (§8), and EP3 uses it in place of its own list.
4. The Selected Object dialog
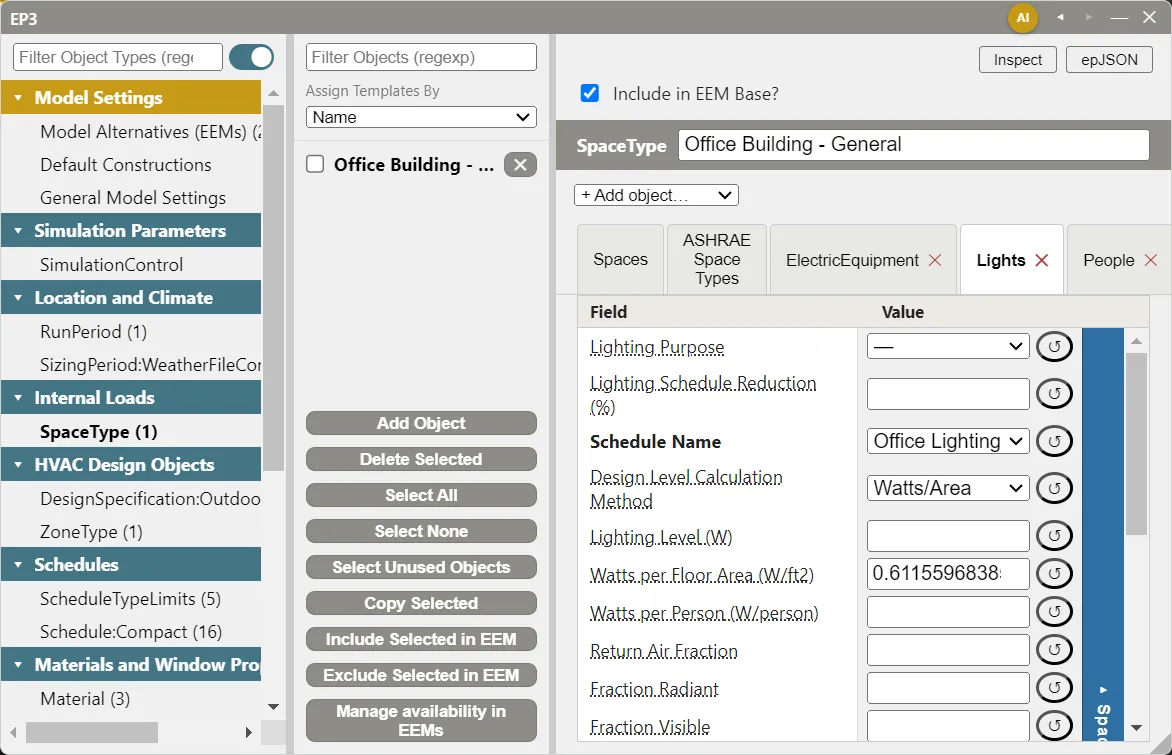
The Selected Object button opens a smaller floating dialog, titled Selected Object. It shows the fields of whatever is selected in the 3D view, the HVAC diagram, or either outliner, without Columns 1 and 2. It is meant to stay open while you work, following each object you click. When nothing is selected, it shrinks to its title bar to leave room.
Double-clicking an object in either outliner selects it and opens it in this dialog. The dialog has an epJSON button, an Inputs tab with the fields, and an Outputs tab for choosing the output variables of the object and of the objects it contains (Running Simulations). On the Inputs tab, epJSON shows the epJSON the object produces in the active EEM, or the reason it is not exported; on the Outputs tab it shows the Output:Variable and EnergyManagementSystem:Sensor objects the export writes for the object whose sub-tab is open. Its title bar has the same AI, ◂, and ▸ buttons as the main object dialog.
5. The building geometry side
5.1 The Building Geometry Outliner
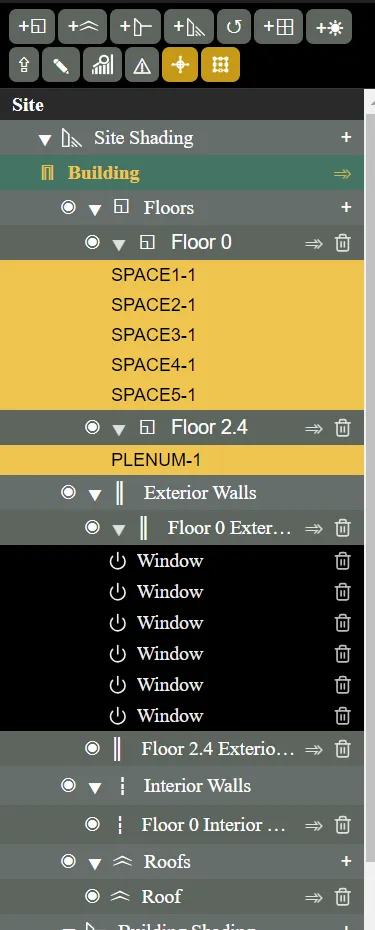
The Building Geometry Outliner is a tree of the model’s geometry: Site Shading, then the Building, broken down into Floors (with each floor’s spaces listed under it), Exterior Walls (with each wall group’s windows), Interior Walls, Roofs, and Building Shading, and then Floor Plans and Elevations for background drawings.
- Click a row to select it; double-click to open it in the Selected Object dialog. Double-clicking a floor, wall group, or roof also enters it for drawing.
- The ⇒ button on a floor, wall group, or roof enters it; the one on the Building returns to the whole site.
- The eye button hides or shows a row in the 3D view, and the power button on a window or shading object includes or excludes it in the active EEM.
- Space names can be edited in place.
- In a model with no Building, the Building row has a + that makes the Building from a map or an outline file; once the Building has geometry, the row has Add more buildings +. The + on Site Shading can also add neighbouring buildings from the map (Buildings and Surroundings from Maps).
The outliner’s toolbar holds Add Floor, Add Roof, Add Building Shading, Add Site Shading, Refresh Surface Matching (Manual mode only), Add Windows By Exposure, Auto-Create Daylight Sensors, the button that generates walls for every floor, Draw Mode, View Building Data, Unexpected Adjacency, and the floor grid’s show and snap switches. Creating Building Geometry covers each.
5.2 The Constructions panel
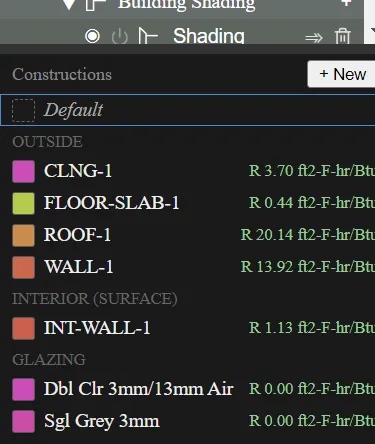
The Constructions panel, below the outliner, lists the model’s constructions, grouped by where they apply (Outside, Ground, Interior, Glazing, and so on), each with its color in the 3D view and its R-value. Clicking a construction selects it and makes it the Paint tool’s construction; double-clicking opens it in the Selected Object dialog. Painting with Default clears a painted construction, so the surface uses the default again. + New creates a construction. Constructions and Materials covers constructions.
5.3 The 3D view
The 3D view shows the building. The Mode button at its top switches the model between Automatic, where EP3 keeps the walls, roofs and constructions current as you draw floors (the default for a new model), and Manual, where you generate them yourself (Creating Building Geometry). Its view toolbar holds View Iso, View Top (Shift+T), Zoom Extents, Toggle X-ray (V), and Isolate active context (Shift+R). Messages from tools and imports appear in the lower left.
6. The HVAC side
6.1 The HVAC diagram
The HVAC diagram draws the model’s loops: each PlantLoop and CondenserLoop with its supply and demand sides, each AirLoopHVAC with its outdoor air system and zone connections, and the components on each branch. Its +, −, and zoom extents buttons control the view. Selecting a component in the diagram selects it everywhere, so its fields appear in the Selected Object dialog. Air Loops, Branches, and Nodes and Central Plant Equipment and Plant Loops cover building and editing loops in the diagram.
6.2 The HVAC Outliner
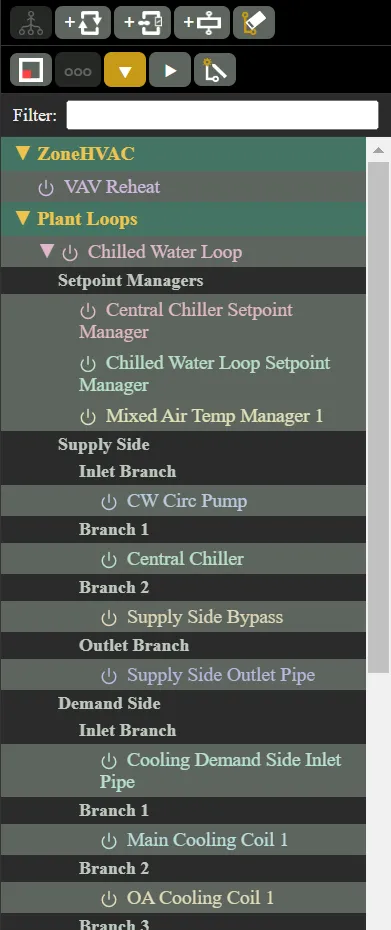
The HVAC Outliner lists the HVAC objects in five sections:
- ZoneHVAC — zone equipment, such as terminal units, fan coils, and baseboards.
- Plant Loops — each loop with its setpoint managers, then its supply side and demand side, each broken into branches and the components on each branch.
- Air Loops — each
AirLoopHVAC, organized the same way. - Setpoint Managers — every setpoint manager in the model. A setpoint manager can control nodes on more than one loop, or on none yet, so all of them are listed here as well as under the loops they control.
- Unassigned Equipment — equipment that is on no loop.
The Filter box narrows every section to matching names. Its toolbars hold Add Plant Loop, Add AirLoopHVAC, Add HVAC Component, Erase Branch, View Zone HVAC Assignments, Expand All, Collapse All, and Draw Branch Connections. The HVAC Outliner and Creating HVAC Systems covers each.
Availability managers are edited from the dialog of the object they control: an air loop’s or plant loop’s dialog lists its availability managers. Controllers and Availability Managers covers them.
7. Model settings
The Model Settings group, at the top of the main object dialog’s Column 1, holds settings saved with the model. It has five entries.
7.1 Model Alternatives (EEMs)
The model’s Energy Efficiency Measures, also selectable from the EEM dropdown in the top toolbar. Energy Efficiency Measures (EEMs) covers creating and organizing them.
7.2 Default Constructions
Assigns a construction to each of nine surface types: Exterior Walls, Interior Walls, Roof, Glazing, Interior Floor & Ceiling, Underground Floor, Underground Walls, Exposed Floor, and Doors, each chosen from the constructions in the model. A wall, roof, floor, or window takes its type’s default construction when it is created. Doors is for opaque doors, such as those Windows from Elevations makes from door colours; it is blank until you choose one, and a glass door takes Glazing. A Space Type or a Space can set its own construction for any of these, including Doors. Importing an EnergyPlus file fills these defaults from its surfaces (Importing EnergyPlus Files). To give a surface a different construction, paint it with that construction. Constructions and Materials covers constructions and painting.
The ASHRAE 90.1 PRM generator assigns baseline constructions separately, by climate zone, when it builds a baseline model; these defaults do not affect it.
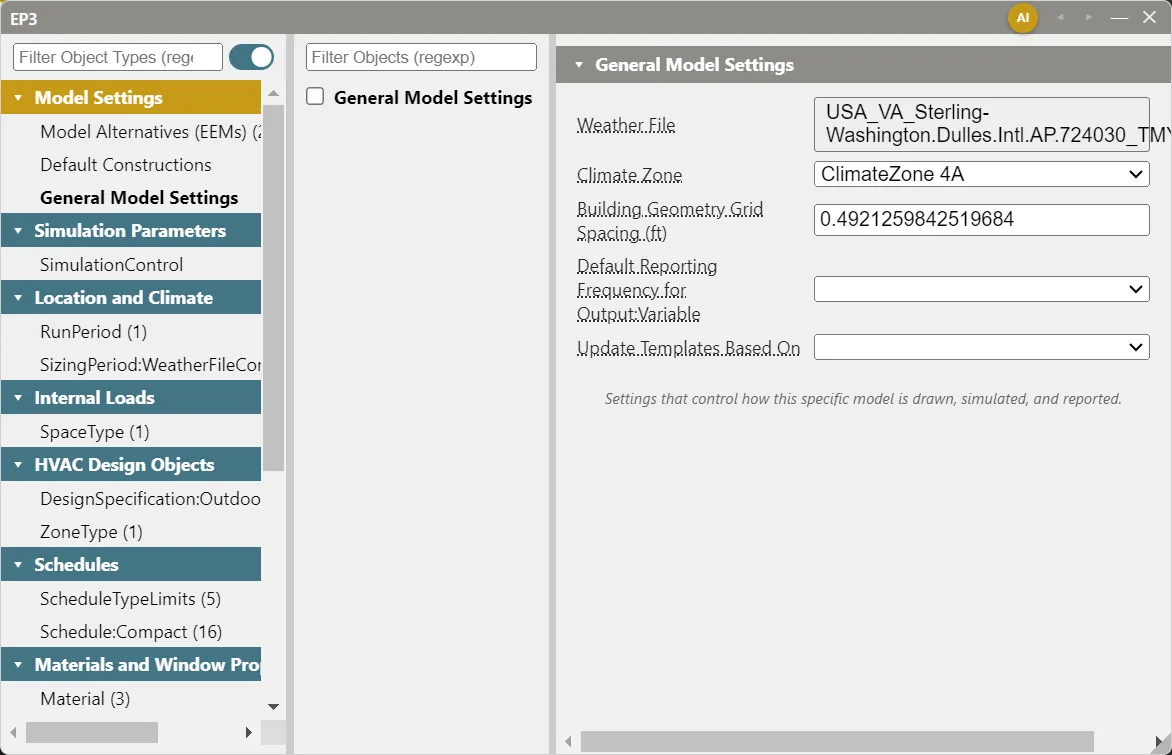
7.3 General Model Settings
- Weather File and Climate Zone — the model’s weather file and ASHRAE climate zone, which follows the weather file’s
.statunless you pick one. Weather, Climate, and Design Conditions covers both. - Building Geometry Grid Spacing — the spacing of the floor grid that points snap to while drawing, when grid snapping is on (Creating Building Geometry). It affects points picked from then on.
- Default Reporting Frequency for Output:Variable — the reporting frequency used by every
Output:Variablethat has not been given one of its own. Viewing and Interpreting Results - Energy Flow outputs — whether every export requests the outputs the Results dialog’s Energy Flow tab reads. It is on by default. The outputs enlarge the result files, more so on models with many zones; turn the setting off when you do not need the tab. Viewing and Interpreting Results
- Update Templates Based On (Name / Selected Template) — how spaces and zones are matched to their
SpaceTypeandZoneTypetemplates. In Name mode, a template claims every space or zone whose name matches its naming pattern, so renaming a space can change, or clear, its template. In Selected Template mode, each space and zone is assigned its template by hand, independent of its name. New models start in Selected Template; a model saved in Name mode keeps it. The same setting appears as Assign Templates By above theSpaceTypeandZoneTypelists. Internal Loads, Space Types, and Zone Types covers both modes.
7.4 Import Details
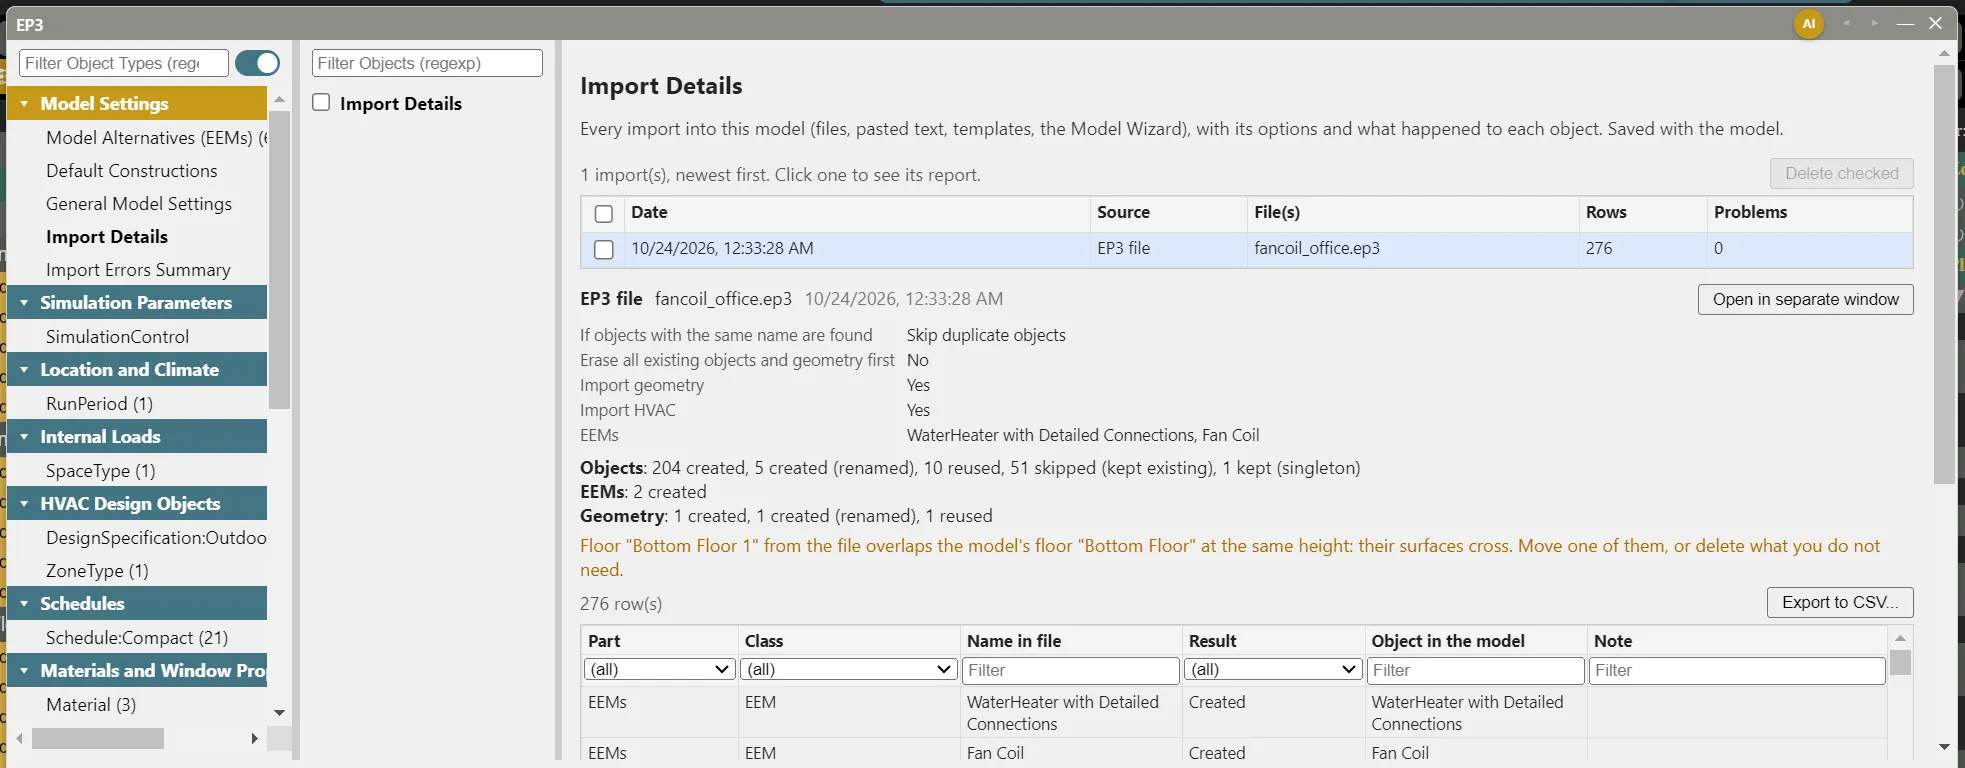
Every import into the model is recorded here and saved with it: EnergyPlus files, pasted text, .ep3 files, templates from the library, and the Model Wizard. The list shows each import’s Date, Source, File(s), Rows, and Problems, newest first. Click an import to see its report: the options it ran with, a count of results for each part (Objects, EEMs, Geometry, and so on), its notes and problems, and a table with one row per object (Class, Name in file, Result, Object in the model, Note). Each column has a filter; Export to CSV… saves the rows the filters show, and Open in separate window shows the report in a window of its own. Delete checked removes the checked imports from the list. Undoing an import removes its entry. Importing EnergyPlus Files covers reading the report.
7.5 Import Errors Summary
One table, across every import into the model, of what did not come in as it was in the file: errors, objects not imported or not supported, and parts that could not be applied. It has the same column filters and Export to CSV… button as an import’s report.
8. Installation settings
A few settings belong to your EP3 installation rather than to a model, so they carry over to every model:
- EnergyPlus Installations — where each EnergyPlus version is installed, one folder per version, in File > Settings…. EP3 needs the installation of the model’s version to simulate, and the installation of an IDF file’s version to read it. EP3 finds the usual install folders itself; the Simulate dialog shows the folder for the model’s version with a Set… (or Change…) button. EnergyPlus Versions covers them.
- Library Locations — the folders of your own templates. Any
.ep3file in them is a template. One list serves every template tab of the Model Wizard and of the Import dialog’s Library templates tab, and is managed from any of them. The Model Wizard covers them. - Weather files — under Library Locations in File > Settings…, the folders that hold your
.epwfiles. Select Weather File starts in the first one, and EP3 looks in them for a model’s weather file when it is not where the model saved it (Weather, Climate, and Design Conditions). - Map Lookups — Allow map lookups, in File > Settings…, off by default. It lets the map tools request map pictures, building outlines and heights, and address searches from the map services (Buildings and Surroundings from Maps).
- Autosave — on or off, and how many minutes apart the backups are, in File > Settings… (§1).
- Last run folder — the folder simulations were last run into, offered first the next time.
- EP3 License — your account, licence and activated computers, shown by Licence and computers… in Settings (§11).
- AI provider keys — the keys and model choices for Atlas, set in Atlas’s settings. The EP3 AI Assistant
9. Atlas and the handbook
Atlas, EP3’s AI assistant, opens from the AI button in the top toolbar, or from the AI button in a dialog’s title bar, which starts a conversation about that dialog’s object. It docks at the right edge of the window. An Off / Help / Analysis / Full switch in its header, saved with each model, controls what it can do: Help answers questions from this handbook without seeing the model, Analysis also reads the model and its results and explains errors and unmet hours, and Full also proposes changes and asks to run simulations. Atlas runs on a cloud AI provider under your own account, or on a model on your own computer. When a screenshot from the handbook helps, Atlas shows it in the conversation with a link to its section. The EP3 AI Assistant covers Atlas.
This handbook opens from the EP3 Handbook button at the right end of the top toolbar, from Help > EP3 Handbook, or with F1. It opens in a floating window with the chapter list on the left; the open chapter’s sections are listed under its title. Type in Search the handbook to find sections by keyword, click a figure to enlarge it, and use Back to return to where you were after following a link. Below the chapters, the Tutorials section lists step-by-step walkthroughs of complete jobs; each shows its level and duration, and its download links save the files it works from (Tutorials).
9.1 The EnergyPlus Reference
Help > EnergyPlus Reference opens the EnergyPlus Input Output Reference and Engineering Reference inside EP3. Both are the EnergyPlus 26.2 documentation, installed with EP3: they open without an internet connection, whichever EnergyPlus version a model runs.
You can also open the reference at the object or field you are working on:
- The ? on a group header in column 1 of the main object dialog opens that group’s page of the Input Output Reference.
- The ? beside the Inspect and epJSON buttons in column 3, and the ? beside the epJSON button of the Selected Object dialog, open the documentation of the selected object. Where an EP3 object writes several EnergyPlus objects, the ? shows a menu of them: the object’s type, the equipment and slot choices of a composite, and the parts it owns, such as sizing, controllers, availability managers and setpoint managers. Pick one to open its page. An object shown below another’s fields, such as an air loop’s Sizing:System or an availability manager, has a ? of its own in its header bar.
- Double-clicking a field name opens the page of the object the field belongs to, at that field, or at the object when the reference has no entry for the field. A field of an air loop’s Sizing:System opens the Sizing:System entry, and a field in a unit’s fan tab opens the fan’s entry, rather than the loop’s or the unit’s.
In the reference window, the contents drawer on the left lists each guide’s chapters and sections; drag its edge to resize it, or hide it with its toggle. Input Output and Engineering switch between the guides, and each keeps its place and its Back and Forward history. Type in the search box to find objects, fields, output variables and sections; results show what each is and where it sits, and an exact object name comes first. Find (Ctrl+F) marks a word on the open page, with Next and Previous. The links in this handbook to EnergyPlus objects and calculations open the reference at the matching page.
10. Several windows and the window limit
EP3 can have several windows open at once, each with its own model. Each window’s title is EP3 - ⟨file name⟩, which is also its name on the Windows taskbar, so you can tell them apart. Each window is separate: its unsaved changes, undo history and active EEM belong to it alone.
- File > New Window (Ctrl+Shift+N) opens a new window.
- File > Open… asks where to open the file when the current window already has a model (a saved file, or unsaved changes): New Window keeps the current model open beside it, and This Window closes the current model first, asking whether to save its changes. A window with nothing in it takes the file itself.
- Double-clicking an
.ep3file in Windows opens it in EP3 the same way: a window with nothing in it takes the file, otherwise EP3 asks New Window or This Window.
Your licence sets how many windows you can have open at once: 1 on a trial, 3 on a professional licence unless your licence says otherwise, and 3 per person on a floating licence, where each person’s windows are counted on their own and all of one person’s windows use one seat (§11). When opening another window would go over the limit, EP3 shows an alert:
Your licence allows 3 EP3 windows at once. Close one of them to open another.
With a limit of 1 the second sentence reads “Close this window to open another.” When you were opening a file, the alert also offers Open it in this window, which loads the file in the current window in place of its model, after the usual question about unsaved changes. Closing a window frees its place at once. If two computers race for the last place, the window that is refused shows the connecting screen, Your licence allows N EP3 windows at once, with a spinner, and tries again every few seconds until a place is free.
Signing in on another computer moves you there. EP3 on the first computer shows EP3 is open on another computer, and its windows stop; choosing Use EP3 here on that computer closes EP3 on the other one.
11. Your licence and computers
The Licence and computers dialog shows who is signed in, what licence they hold, and where it is activated. Open it from Help > Licence and computers…, from the Licence and computers… button under EP3 License in Settings, or by clicking the Trial: N days left badge that appears beside the file name once a trial has 7 days or fewer to run.
It shows:
- Signed in as — the email address of your EP3 account.
- Licence — Trial, Professional licence or Floating licence, with its end date. A trial reads “Ends on ⟨date⟩ (N days left)”; a professional licence reads “Valid until ⟨date⟩”, or “No end date”. A floating licence also shows the name it is licensed to and its number of seats, which is how many people can use EP3 at the same time, from any of their computers.
- Computers, for a trial or professional licence — “N of M computers in use”, each computer by name with the date it was last used, and This computer marked on the one you are using. A floating licence has no list, because each person signs in as themselves on any computer.
- How many computers you can still release: “You can release up to 2 computers in any 30 days; N left.”
- How to buy, renew or change a licence: email [email protected].
- Sign out, which asks about unsaved changes, signs you out and returns the window to the sign-in screen.
Moving to another computer. A trial or professional licence is activated on a limited number of computers, usually one. Opening EP3 on one beyond the limit shows Your licence is already on another computer (or on N computers), with the computers it is activated on, each with a Release button. Releasing one frees its place for this computer, and that computer’s open EP3 session ends. You can release up to 2 computers in any 30 days; after that the dialog says “You have used all 2 releases allowed in 30 days. To change computers now, contact [email protected].” You can also release a computer ahead of time from this dialog: click Release beside it, then Release it to confirm. This computer has no Release button, because EP3 would stop working in this window and getting this computer back would use up another release; to move your licence, open EP3 on the other computer and release this one when it asks.
The trial. The first time you sign in with no licence, a free 30-day trial starts by itself, on one computer and with one window. A trial starts once per person and once per computer: a computer that has had a trial cannot start another under a different account, even after the first one has ended.
When a screen stops you. EP3 shows one of these screens instead of the model:
- Your EP3 trial has ended, or Your EP3 licence has ended, with the end date and a Buy or renew button that opens an email to [email protected]. Your files stay on your computer, but EP3 does not open them until the licence is renewed. For a floating licence, ask whoever manages it to renew it.
- A free trial has already been used on this computer — “Each computer gets one free trial, so another can’t start here, whoever signs in.” To use EP3 on it, buy a licence by emailing [email protected].
- Your licence is already on another computer — the computer limit, described above.
- All N seats are in use, for a floating licence — EP3 tries again every few seconds and opens as soon as a seat is free, and Retry now tries at once. A floating session with no activity for 60 minutes ends and gives its seat back; when you return and a seat is free, EP3 reopens your model.
- EP3 is busy with licensed users right now, for a trial — “Your trial gives way to licensed users while EP3 is this busy.” EP3 tries again every few seconds, and the trial starts once there is room.
- No active EP3 plan — the account has no licence. Contact [email protected], then press Check again.
- Your licence allows N EP3 windows at once — the window limit (§10).
This handbook is also built into EP3 (Help), where its EnergyPlus links open the EnergyPlus Reference. Technical specifications · Book a demo