Importing EnergyPlus Files
1. Overview
The Import button in the top toolbar, or File > Import EnergyPlus…, opens the Import dialog. Its tabs choose what to bring in:
- Complete file (.idf, .expidf, .epJSON or .ep3) — a model built in another EnergyPlus tool, one of EnergyPlus’s example files, an
.expidfproduced by expandingHVACTemplateobjects, or a whole EP3 model (§2, §5). - Pasted text — a few objects of IDF or epJSON text (§6).
- Library templates — space types, constructions, and HVAC and service hot water systems from your Library Locations. The Model Wizard covers the template tabs, and its §11 covers importing them into an existing model. In simplified view the dialog opens on this tab.
- Several files as EEMs — EnergyPlus files that are variants of one building, combined into one model with one EEM per file (§7).
- Edited EnergyPlus file — an IDF or epJSON exported from this model and then edited somewhere else, such as by an AI assistant or another program, merged back into the model (§8).
Every import is one undo step: Undo (Ctrl+Z) reverses all of it. Each import is recorded with the model, with a report of what happened to every object in the file (§9).
Importing design days from a .ddy file is covered in Weather, Climate, and Design Conditions, and turning HVACTemplate objects into editable systems in The HVAC Outliner and Creating HVAC Systems.
2. Importing a complete file
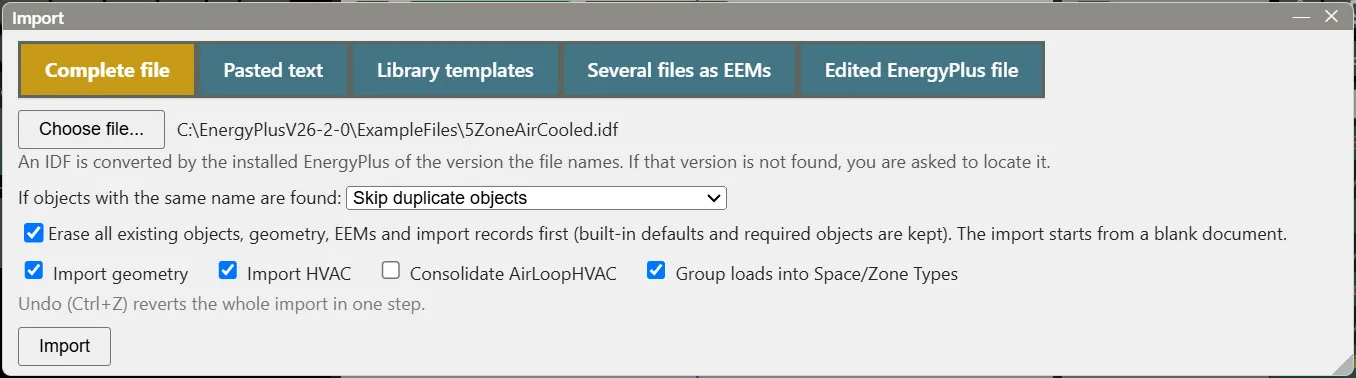
Open the Complete file tab, click Choose file…, set the options (§3), and click Import. The report appears below the button when the import finishes.
EP3 reads epJSON directly. An .idf or .expidf file is first converted to epJSON by the EnergyPlus installation of the version the file names, so a 24.1 IDF needs EnergyPlus 24.1 installed; when it is missing, EP3 asks you to locate it. When an IDF is chosen the dialog says so below the file name. EnergyPlus installations are set in The EP3 Interface and Model Settings.
EP3 imports files from EnergyPlus 23.1 to 26.2 (EnergyPlus Versions):
- An older file is converted to EP3’s current inputs as it is imported, and the report says so. The model stays in its version.
- A file that needs a newer version than the model’s, because it uses an object type, a field or a choice the model’s version doesn’t have, asks whether to change the model to that version first. Cancel import imports nothing.
- 26.2 Definition and Instance loads and construction assignment sets are imported as ordinary loads and surface constructions, so they never need a newer version.
- A file older than 23.1 or newer than 26.2 is refused. Update an older one with EnergyPlus’s IDFVersionUpdater (Auxiliary Programs: Using Older Version Input Files), and save a newer one for 26.2 or older.
3. Import options
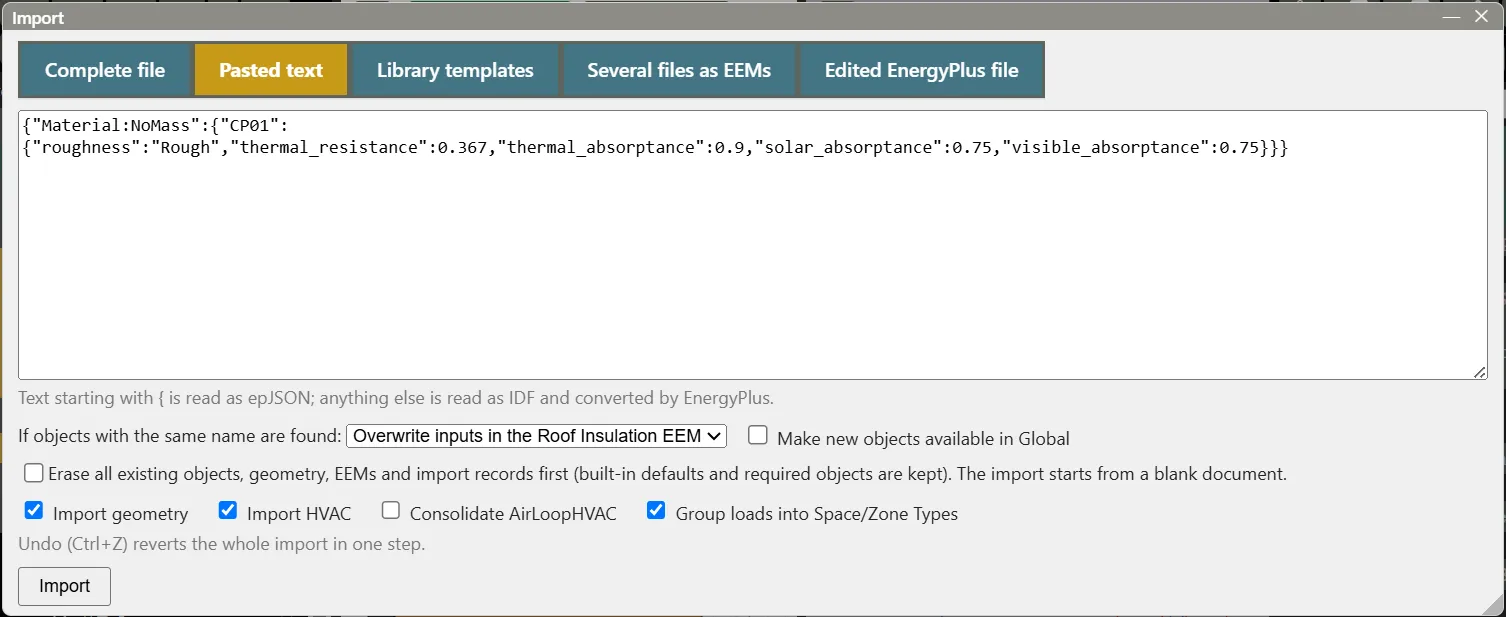
The same options apply to a complete file and to pasted text.
| Option | Default | Effect |
|---|---|---|
| If objects with the same name are found: | Skip duplicate objects | What happens when the model already has an object of the same type and name (§3.1). |
| Erase all existing objects, geometry, EEMs and import records first | On for a complete file, off for pasted text | Deletes the model’s objects, geometry, EEMs and import records before importing, so the import starts from a blank document. Built-in defaults and required objects are kept. |
| Import geometry | On | Off: the file’s zones, Spaces, and surfaces are left out, and its references to zones and Spaces are matched by name to the model’s. A name the model does not have is left blank, with a note in the report. |
| Import HVAC | On | Off: loops and their structure, zone equipment, all HVAC equipment (water heaters included), controllers, and setpoint and availability managers are left out. Thermostats, Sizing:Zone, and water use still come in. |
| Consolidate AirLoopHVAC | Off | Air loops that are the same system serving different zones become one loop serving them all (§4.3). Available only with Import HVAC on. |
| Group loads into Space/Zone Types | On | After the import, the Combine dialog opens with a first guess at SpaceType/ZoneType pairs for the imported loads (§4.4). |
Each object an option leaves out has a Left out (import option) row in the report.
3.1 Objects with the same name
An incoming object matches an existing one when both have the same type and the same name, ignoring case. An object with no match is created under its file name whatever the option. For a match:
| Choice | Result |
|---|---|
| Skip duplicate objects | The model’s object is kept as it is, and the file’s is not imported. The file’s references to that name point to the model’s object. |
| Create a new object with a numbered name | The file’s object is created under its name with a number added: Office Lights becomes Office Lights 1, or the next free number. |
| Overwrite inputs in the Global model | The model’s object keeps its name and connections, and its Global values are replaced with the file’s. |
| Overwrite inputs in the ⟨EEM⟩ EEM | Offered when an EEM other than Global is active. The file’s values are written into that EEM only; Global and the other EEMs keep theirs. |
With Overwrite inputs in the ⟨EEM⟩ EEM, a Make new objects available in Global checkbox appears. Unchecked (the default), objects new to the model are created switched off at Global and on in the active EEM, so the import changes only that EEM. Checked, new objects are created in Global. Energy Efficiency Measures (EEMs) covers EEM values and switching objects on and off.
Some objects are handled differently:
- Built-in defaults such as the
Always Onschedule and theScheduleTypeLimitsobjects are never changed. A file object with the same name and the same values uses the default; one with different values is created asAlways On 1. - Unique objects such as
SimulationControl: Skip keeps the model’s, and the overwrite choices write the file’s values onto it. Create new cannot make a second one (reported Not imported), except that it writes the file’s values onto aSimulationControlthat is still EP3’s default, or after Erase all existing objects, geometry, EEMs and import records first. The model’sBuildingtakes the file’s north axis and settings only with Overwrite inputs in the Global model; a model with no building gets the file’s. - Curves and tables share one name space in EnergyPlus. A curve whose name a curve of another type already holds, in the file or the model, is created with a number added.
- Zones with a taken name are reused by Skip and the overwrite choices, so the file’s Spaces join the model’s zone. Create new makes
<zone name> 1. - Constructions with a taken name follow the same choices when the file’s surfaces decide their expected outside boundary (§4.1). Skip, and Overwrite inputs in an EEM, leave the model’s construction as it is. Create a new object with a numbered name and Overwrite inputs in the Global model set the boundary on the new or overwritten construction.
- Plant loops with a taken name: Skip keeps the model’s loop and imports nothing of the file’s, and Create new makes a new loop. Overwrite inputs in the Global model adds the file’s parallel branches to the model’s loop when both loops’ inlet and outlet branches hold the same components, and otherwise creates a new, numbered loop. A component already on another loop of the model is never moved; a numbered copy is made.
4. What an import builds
4.1 Geometry
Each Space in the file becomes an EP3 Space, and a zone with surfaces that name no Space becomes a single Space of that zone. Spaces whose floors sit at the same height go on one floor. The floor is named after its zones when their names all start with the floor’s name (zones 1st 02 Office Zone and 1st 05 Retail Zone give the floor 1st; Bottom Floor 01 Office Zone gives Bottom Floor), and otherwise Floor and the height in metres (Floor 0, Floor 2.4). When floors would share a name this way, each takes all the words its zones share (Typical Bottom, Typical Middle). Floors are always added, never merged with the model’s. Several floor surfaces of one Space become one Space outline. Walls go to the floor’s exterior or interior wall groups, other surfaces above the floor to the roof, and shading surfaces to building or site shading. A Space with no floor surface is not imported.
An interzone pair, such as a ceiling and the plenum floor above it, becomes one shared face, reported Shared with another surface. Windows and doors become windows on their host surface. A door or window in an interior wall, which the file writes once for each side with each naming the other, becomes one door or window on the shared face, reported Shared with another surface; each side keeps its name and is written again at export. Surfaces, windows, and doors keep the file’s names (on a shared face, each zone’s side keeps its own); a name the model already uses for a surface gets “ 2” added, and a surface the file does not name gets an automatic name (Creating Building Geometry). Shading:Overhang and Shading:Fin objects become the overhang and fins of the window they name (Windows, Shading, and Daylighting), and Daylighting:Controls become daylight sensors (Windows, Shading, and Daylighting). Shading surfaces (Shading:Building:Detailed, Shading:Zone:Detailed and Shading:Site:Detailed) are grouped by the start of their names: EP3 names a shading group’s surfaces “<group> 1”, “<group> 2” and so on, so a file EP3 wrote comes back with the same Building Shading and Site Shading groups. In another file, surfaces that share the start of their name once a trailing number or a face word (North, Roof, Top …) is removed, such as “Tree_1”, “Tree_2” and “Tree_3”, become one group named “Tree”, provided at least two share it. The rest go to a plain “Shading” group (building) or “Site Shading” group (site). The import report has a line for each group, for example “3 shading surfaces grouped as ‘Tree’”. Each shading surface’s transmittance schedule and ShadingProperty:Reflectance object become the shading properties of its group (Creating Building Geometry): the group takes the most common value, a surface that differs keeps its own, and surfaces with the same reflectance values share one reusable object. When you import with Overwrite inputs in the ⟨EEM⟩ EEM, these values are set in that EEM and not in Global. A surface whose construction the file does not hold is imported without one and reported Imported without a construction, and so is a floor whose construction is a glazing construction: it takes its collection’s construction, and the note says why. A wall or roof with a glazing construction becomes a glazed face (Creating Building Geometry); give its collection a construction for the frame.
A file EP3 exported comes back as EP3 made it. A glazed face’s glass, written as windows named “<surface> EP3-GLAZING”, glazes its surface again instead of becoming windows, and the surface’s own construction becomes its collection’s when the collection has none. A window EP3 wrote in pieces (“<window>”, “<window> EP3-PART-2”, …) becomes one window again, unless an overhang or fin names one of the pieces; a reference to any piece reaches the joined window.
Zone multipliers come back as a Floor Multiplier and what is left for each zone. First, each ZoneGroup is applied: every zone of its ZoneList is multiplied by the group’s multiplier, as EnergyPlus does, and the ZoneGroup is not kept (its ZoneList is). A floor then gets the largest whole number that divides all of its zones’ multipliers, and each zone keeps its multiplier divided by the floor’s: zones at 5, 5 and 5 give the floor 5 and no zone multipliers; 5, 5 and 10 give the floor 5 and the last zone 2; 4 and 6 give the floor 2 and the zones 2 and 3; 2 and 3 stay on the zones. Each zone is therefore simulated with the same multiplier as in the file. A ZoneGroup whose ZoneList holds zones already in the model, rather than zones from the file, is kept as it is, and the report says so. Floors that form the stack EP3 makes for a multiplier (a bottom floor, a middle floor with the multiplier at the usual storey, and a top floor, all with the same plan, Space names, Space Types, windows and constructions, or two or three such plain floors) are linked (Creating Building Geometry), provided linking them changes nothing in the export. A file EP3 exported from a linked stack therefore comes back linked.
Expected outside boundary of constructions. Each imported construction takes its Expected Outside Boundary Condition from the surfaces the file gives it; only the file’s surfaces count, not the model’s. Adiabatic and Ground override the boundary EP3 works out from the geometry, so a construction is marked Adiabatic or Ground only when every surface the file gives it has that boundary, and those surfaces then inherit it from the construction. Surface (interior) and Outdoors are advisory: they flag a mismatch in Model Validation’s Unexpected Construction Types check and decide which default slots the construction can fill, and a construction is marked with one of them when at least 80% of its surface area in the file has that boundary. A surface with a different boundary keeps it as its own setting. GroundFCfactorMethod comes from F-factor and C-factor construction types. A construction that does not reach these shares is left unmarked. With Skip duplicate objects, and with Overwrite inputs in the ⟨EEM⟩ EEM, an existing construction is not changed. Create a new object with a numbered name and Overwrite inputs in the Global model set it (§3.1). An adiabatic construction keeps its name, so a file EP3 exported comes back unchanged. When a construction’s surfaces are a mix of adiabatic and other boundaries, the other surfaces keep the construction and the adiabatic ones take a copy of it with a number added.
Construction defaults. Once the surfaces are built, the import moves the constructions they were painted with into defaults. A whole-model import (Erase all existing objects, geometry, EEMs and import records first, or a model with no Spaces) sets each default construction slot in Model Settings > Default Constructions to the construction with the most area in that slot, provided the slot accepts it. A Space Type’s construction slots (when Group loads into Space/Zone Types applies, §4.4) and a Space’s slots take the construction that more than half of the slot’s area uses, when it differs from what they would inherit. A surface whose construction still differs from what it inherits keeps it assigned directly. Each step is kept only when the export is unchanged, and otherwise each surface keeps its own construction. An import into a model that already has Spaces leaves the model defaults as they are. Windows and doors keep the constructions of their Opening Types. Default Constructions lists the slots. The report’s Construction Defaults rows say what was set (a row for Model defaults, for each Space Type and Space, and for Surface constructions: “1 surface takes its construction from the defaults”, “3 surfaces keep their own construction”), and what was left: “The file was imported into a model that already had Spaces, so its model defaults are unchanged”, or “Setting it would change the exported model, so each surface keeps its own construction”.
Construction assignment sets. A file for EnergyPlus 26.2 can hold ConstructionAssignmentSet objects. A surface, window, or InternalMass with no construction of its own takes its Space’s set, then the Building’s. The sets are not kept: the report notes how many surfaces took a construction from a set, and names any that no set could resolve, which keep a blank construction. EP3 uses the construction fields of the Space and the Space Type instead.
Loads, thermostats, and Sizing:Zone objects come in as loose objects aimed at their zones and Spaces (Internal Loads, Space Types, and Zone Types), unless they are grouped (§4.4). The report’s Geometry part lists each as Linked to its zone or Space.
4.2 HVAC
Plant loops, condenser loops (imported as plant loops), and air loops are rebuilt from their branches, connectors, and node names into EP3’s loops, with their sizing, operation schemes, controllers, and setpoint and availability managers. Node names are not kept: EP3 generates them at export (Air Loops, Branches, and Nodes). A loop that cannot be rebuilt is left out whole, with the reason in its row.
New loops are drawn in the HVAC diagram to the right of the model’s. Plant loops that share equipment (a chilled water loop and the condenser loop of its chiller) are drawn as a group, and air loops follow them. Zone equipment and other objects on no loop are placed after everything else. Organize in the HVAC Outliner’s toolbar closes any gaps afterward (The HVAC Outliner and Creating HVAC Systems).
4.3 Zone equipment and consolidation
Each zone’s ZoneHVAC:EquipmentList becomes its equipment assignment, in the file’s cooling sequence (Zone-Level HVAC Equipment and Zone Sizing).
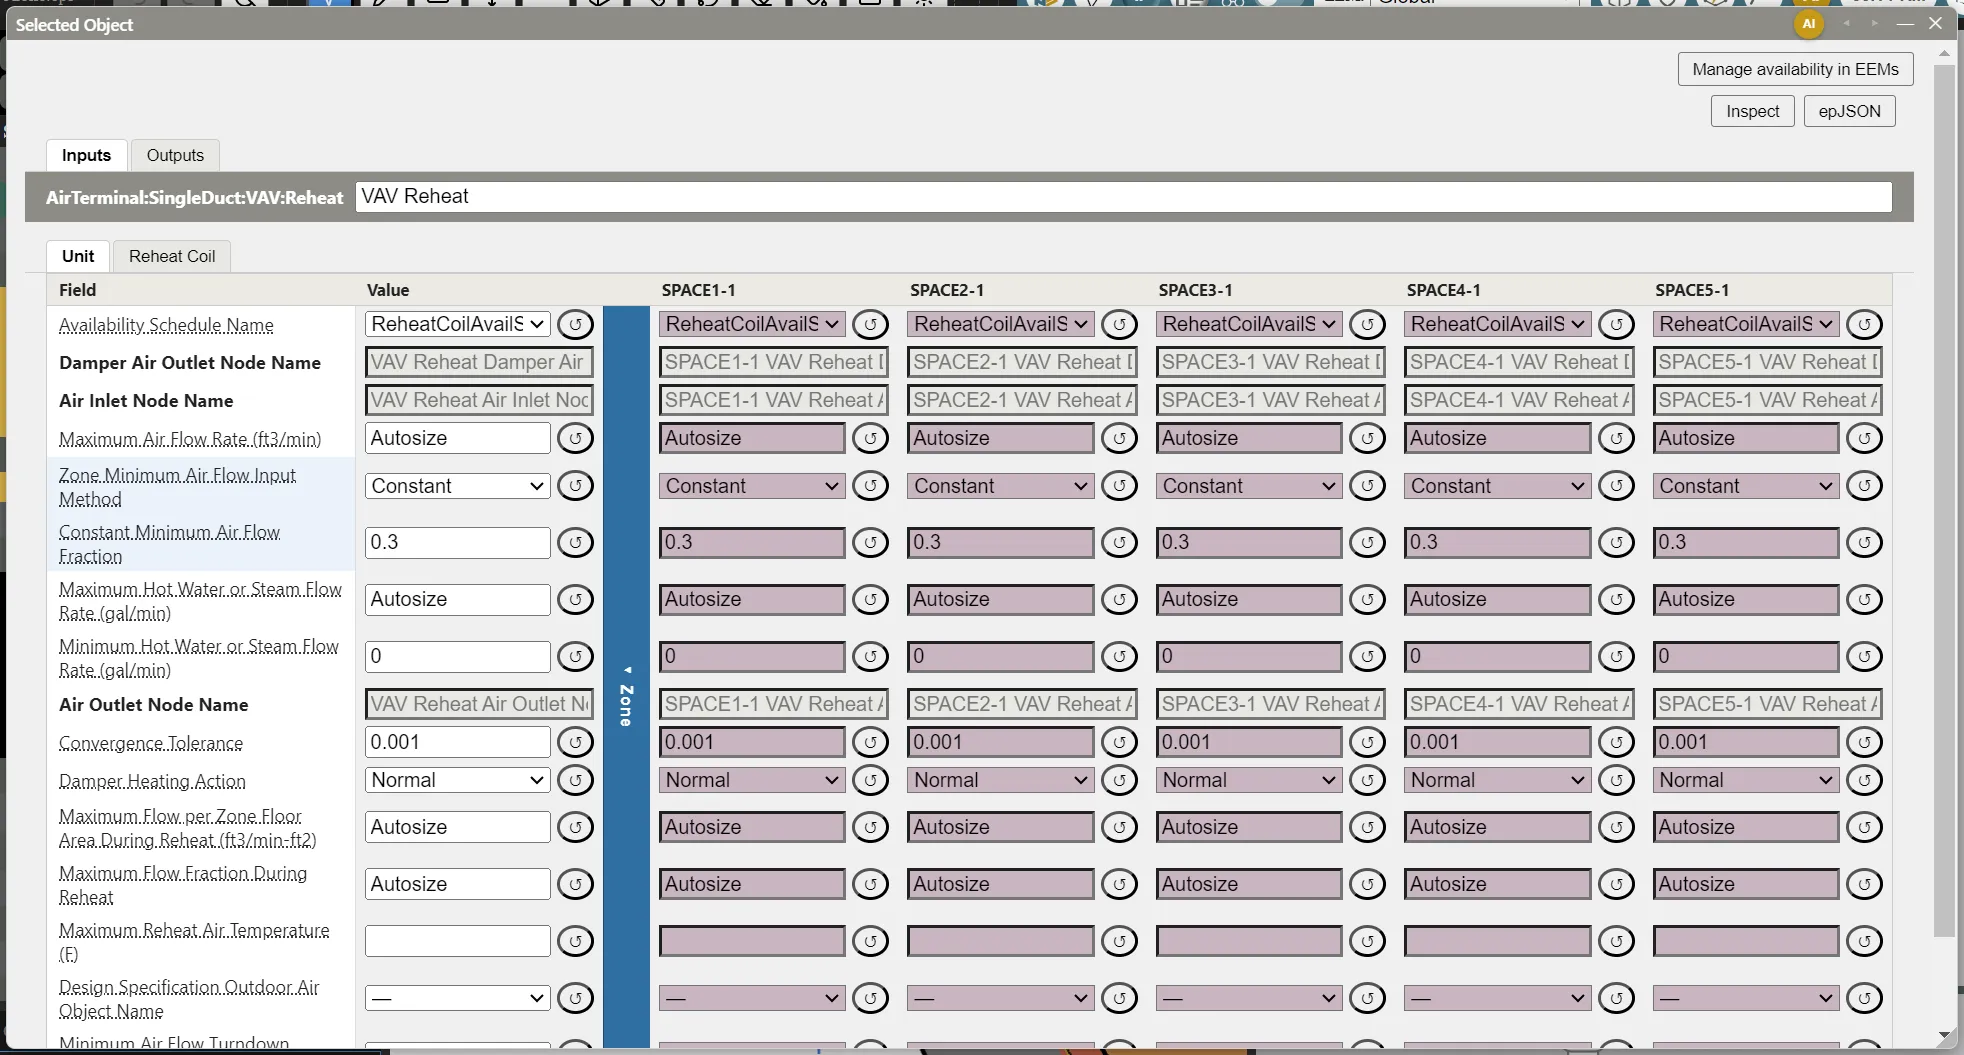
An EnergyPlus file holds one zone unit or terminal per zone, and EP3 always consolidates them: objects of one type that serve different zones become one object assigned to all of those zones, exported as one copy per zone (Zone-Level HVAC Equipment and Zone Sizing). The first object is kept and named by the words the members’ names share once the zone name is dropped, so SPACE1-1 VAV Reheat through SPACE5-1 VAV Reheat become VAV Reheat. A member’s value that differs from the kept object’s is stored as that zone’s value, in the blue drawer bar of the object’s dialog (Zone-Level HVAC Equipment and Zone Sizing). A member that leaves blank a field the kept object sets stays a separate object. The report’s Zone equipment part lists each merged object as Consolidated, pointing to the object kept.
Consolidate AirLoopHVAC does the same for air loops: loops with the same branch layout, components, and settings that serve different zones become one replicated loop (Air Loops, Branches, and Nodes). Node names never prevent a merge. The Consolidate button in the HVAC Outliner’s toolbar runs both consolidations on a model at any time.
4.4 Grouping loads into Space/Zone Types
With Group loads into Space/Zone Types, the file is imported with its loads loose, and the Combine loads into Space and Zone Types dialog opens over the model (Internal Loads, Space Types, and Zone Types). Its first guess groups Spaces that have the same loads, in zones with the same zone objects, into SpaceType/ZoneType pairs. Absolute levels become levels per floor area (a Lights Lighting Level in W becomes Watts per Floor Area), so Spaces of different sizes with the same density group together and each Space keeps the same total load. You regroup and approve each step, then click Approve and Combine on the Review step; the combine checks that every EEM’s export is unchanged. Each zone’s water use flow is kept to the last digit, so zones whose flows differ only slightly keep their own values. When the check finds the export would change, nothing is changed and the message shows where the two versions first differ. Cancel Grouping keeps the import as it came in, and the dialog can be opened later from File > Combine Loads into Space/Zone Types….
5. Importing a whole .ep3 model
Choosing an .ep3 file brings in the other model’s objects, geometry, HVAC systems, and the EEMs checked under EEMs to import (The Model Wizard covers choosing them). The same-name choices, Erase all existing objects, geometry, EEMs and import records first, Import geometry, and Import HVAC work as in §3; Consolidate AirLoopHVAC and Group loads into Space/Zone Types are not offered.
The file’s geometry is always added, never matched to the model’s. It keeps its coordinates and goes under the model’s building; its floors and zones are renamed when their names are taken. Surface matching then runs, so walls and floors that touch the model’s become interior surfaces. The file’s HVAC systems keep their arrangement and are placed as one block to the right of the model’s in the HVAC diagram.
The report’s notes alert you to:
- a floor of the file that overlaps a floor of the model at the same height (move one, or delete what you do not need);
- a building rotation that differs from the model’s (the file’s geometry takes the model’s rotation);
- background drawings left out because their floor or building did not come in;
- an EnergyPlus version that differs from the model’s, and whether the model took the file’s version;
- a file saved in incognito mode, whose objects arrive under their stand-in names.
With Overwrite inputs in the Global model or Erase all existing objects, geometry, EEMs and import records first, the model also takes the file’s Model Settings and EnergyPlus version. With the other choices the model keeps its version, and a file that needs a newer one asks first (EnergyPlus Versions). Either overwrite choice writes the file’s Building onto the model’s. An object a space type or zone type has in the model and the file’s does not is deleted by Overwrite inputs in the Global model and switched off in the active EEM by Overwrite inputs in the ⟨EEM⟩ EEM, as for templates (The Model Wizard). Overwrite inputs in the ⟨EEM⟩ EEM sets the file’s weather file on that EEM. The other file’s import history is not brought along.
6. Pasting text
Pasted text imports a few objects without a file: objects copied from another file, an example from the Input Output Reference, or design days from a .ddy file. Text starting with { is read as epJSON; anything else is read as IDF and converted by the installed EnergyPlus. IDF text with no Version object is converted by EnergyPlus 26.2. The options are those of §3.
Pasting this IDF line and clicking Import creates one Material:NoMass named CP01, with a thermal resistance of 0.367 m²·K/W (0.367 × 5.678 = 2.08 h·ft²·°F/Btu):
Material:NoMass,CP01,Rough,0.3670000,0.9000000,0.7500000,0.7500000;The same object as epJSON, which needs no conversion:
{"Material:NoMass": {"CP01": {"roughness": "Rough", "thermal_resistance": 0.367, "thermal_absorptance": 0.9, "solar_absorptance": 0.75, "visible_absorptance": 0.75}}}7. Several files as EEMs
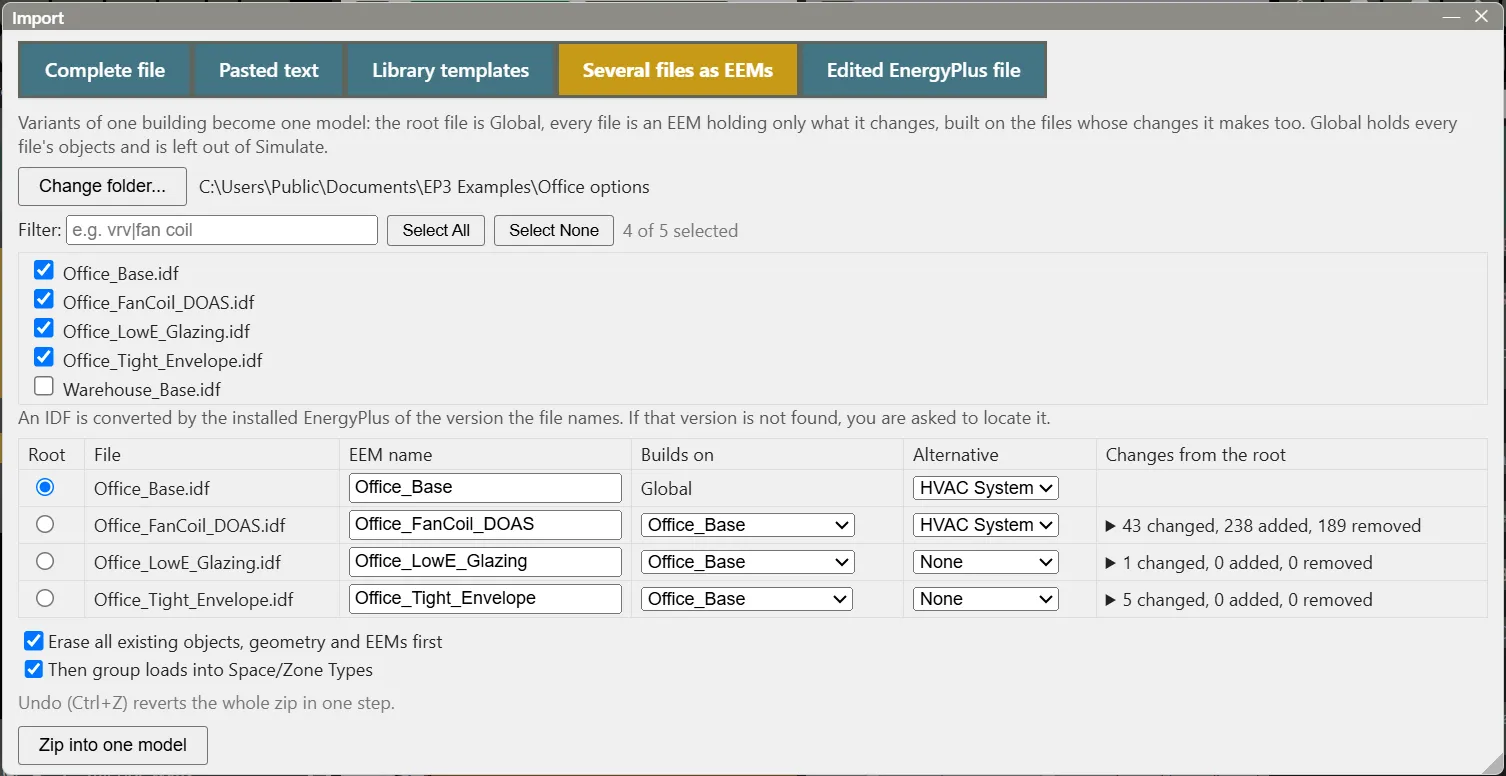
Several files as EEMs turns EnergyPlus files that are variants of one building (design options, or the cases of a parametric run) into one model. Click Choose folder… and pick the folder that holds the files; the next time, the dialog opens on the same folder. Its .idf, .expidf and .epJSON files are listed with a checkbox each: tick the files to zip. Type in Filter to narrow the list (a regular expression that ignores case, such as vrv|fan coil); Select All and Select None act on the files the filter shows. The table lists each ticked file with Root, File, EEM name, Builds on, Alternative, and Changes from the root (the numbers of objects changed, added, and removed; click them to list each object, with the changed fields’ values in the root and in the file).
- The Root file supplies Global’s values. EP3 proposes the file that differs least from the others; choose another with its radio button.
- Each file’s EEM is named after the file; type another name under EEM name. A name another EEM already has, or Global, gets a number (a file named Global.idf becomes the EEM “Global 1”), and the dialog shows the name it will use.
- Every file, the root included, becomes an EEM that stores only what its file changes. Builds on proposes, for each file, the file whose changes it also makes; choose another from the list, or Global. Any choice gives each EEM its file’s contents; the proposal stores the fewest values.
- Alternative tags a file’s EEM as an HVAC System or SWH System alternative (the EEM’s Alternative Category). EP3 proposes HVAC System for a file that replaces the root’s HVAC equipment with other equipment, SWH System when that equipment is all service water heating, and None for a file that only changes values or adds equipment; change it from the list. A tagged EEM still simulates as its file.
- Global holds every file’s objects and is left out of Simulate.
- Erase all existing objects, geometry and EEMs first is on by default. Turn it off to zip the files into the current model: its objects and EEMs stay, and the root file is imported over them.
- Then group loads into Space/Zone Types is on by default: once the files are zipped, the Combine dialog opens over the model, comparing every EEM (§4.4).
Changed HVAC values are stored in the file’s EEM. A file whose HVAC connections differ (a second boiler, an added Controller:MechanicalVentilation, another terminal type) has its branches merged into the root’s loops in its EEM, so the model keeps one set of loops. Two files with the same system share one set of equipment. Surfaces are matched by name: a changed construction, a missing window, or a missing zone is stored in the EEM, and other geometry differences are listed under Not brought in, as is equipment for zones the root’s file does not have, and a schedule or curve a file names without its values. Group loads into Space/Zone Types is on by default here.
Click Zip into one model. With Erase all on, this replaces the model and its EEMs; Global is left active. A line at the top of the result names the root file and the EEMs created, and counts what was not brought in. The table that follows lists each EEM with the EEM it builds on, its HVAC, and the number of values it stores. The root file’s EEM usually stores nothing, since Global already holds its values; it stores a value only where another file added something the root lacks (that object switched off) or where the root differs from Global in a model you zipped into with Erase all off. Each file’s import report is kept in Import Details (§9).
8. Edited EnergyPlus file
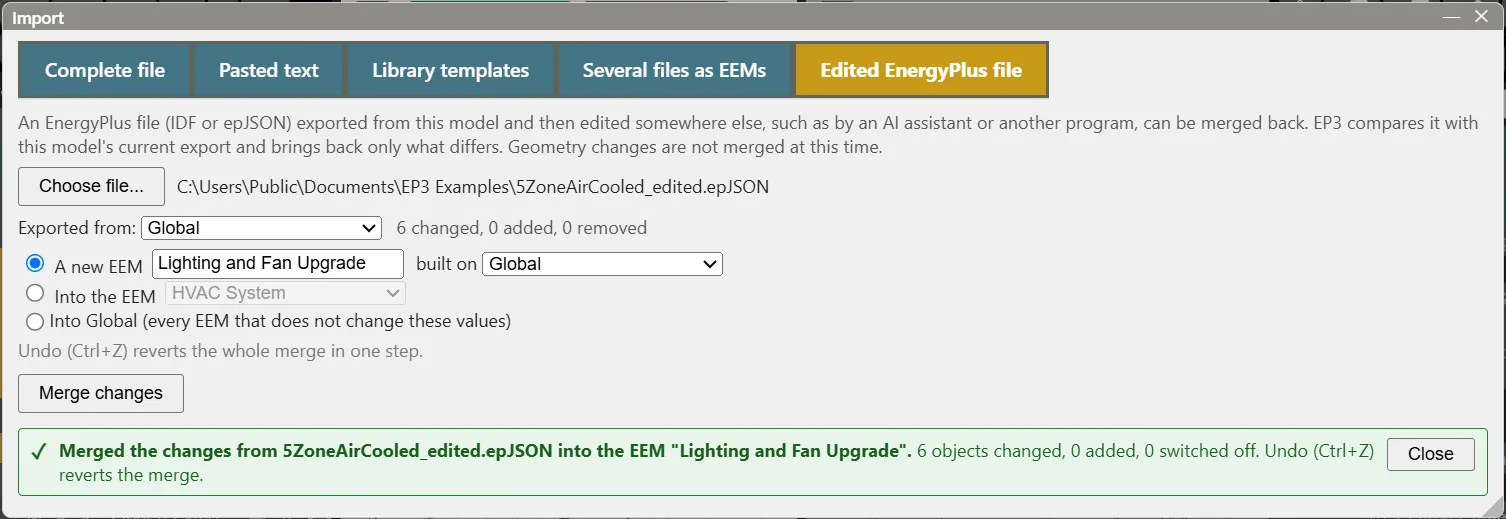
Edited EnergyPlus file merges back an IDF or epJSON exported from this model and then edited somewhere else, such as by an AI assistant or another program. Export an EEM with File > Export epJSON… (Running Simulations), edit the file, then choose it here with Choose file…. EP3 compares the file with this model’s current export and brings back only what differs. Geometry changes are not merged at this time.
- Exported from: EP3 picks the EEM the file differs from least; change it if the file came from another. The line beside it counts the objects changed, added, and removed.
- Choose where the changes go: A new EEM (named after the file) built on any EEM, Into the EEM you choose, or Into Global (every EEM that does not change these values).
Click Merge changes. Only the edits are stored: changed values, added objects, removed objects (switched off in the destination), and changed constructions or removed windows. A value edited the same way in every zone’s copy of a consolidated object comes back onto that object, and an edit to one Space’s or zone’s copy of a template’s object comes back as that Space’s or zone’s value. Changed HVAC connections are merged into the model’s loops. A line at the top of the result names the file and where its changes went, with the counts; it is amber when some edits could not come back. Those edits, such as moved vertices, new surfaces, or changes to objects EP3 generates at export, are listed under Not brought back. A view factor to ground typed as the number EnergyPlus would calculate for the surface counts as unchanged.
9. The import report
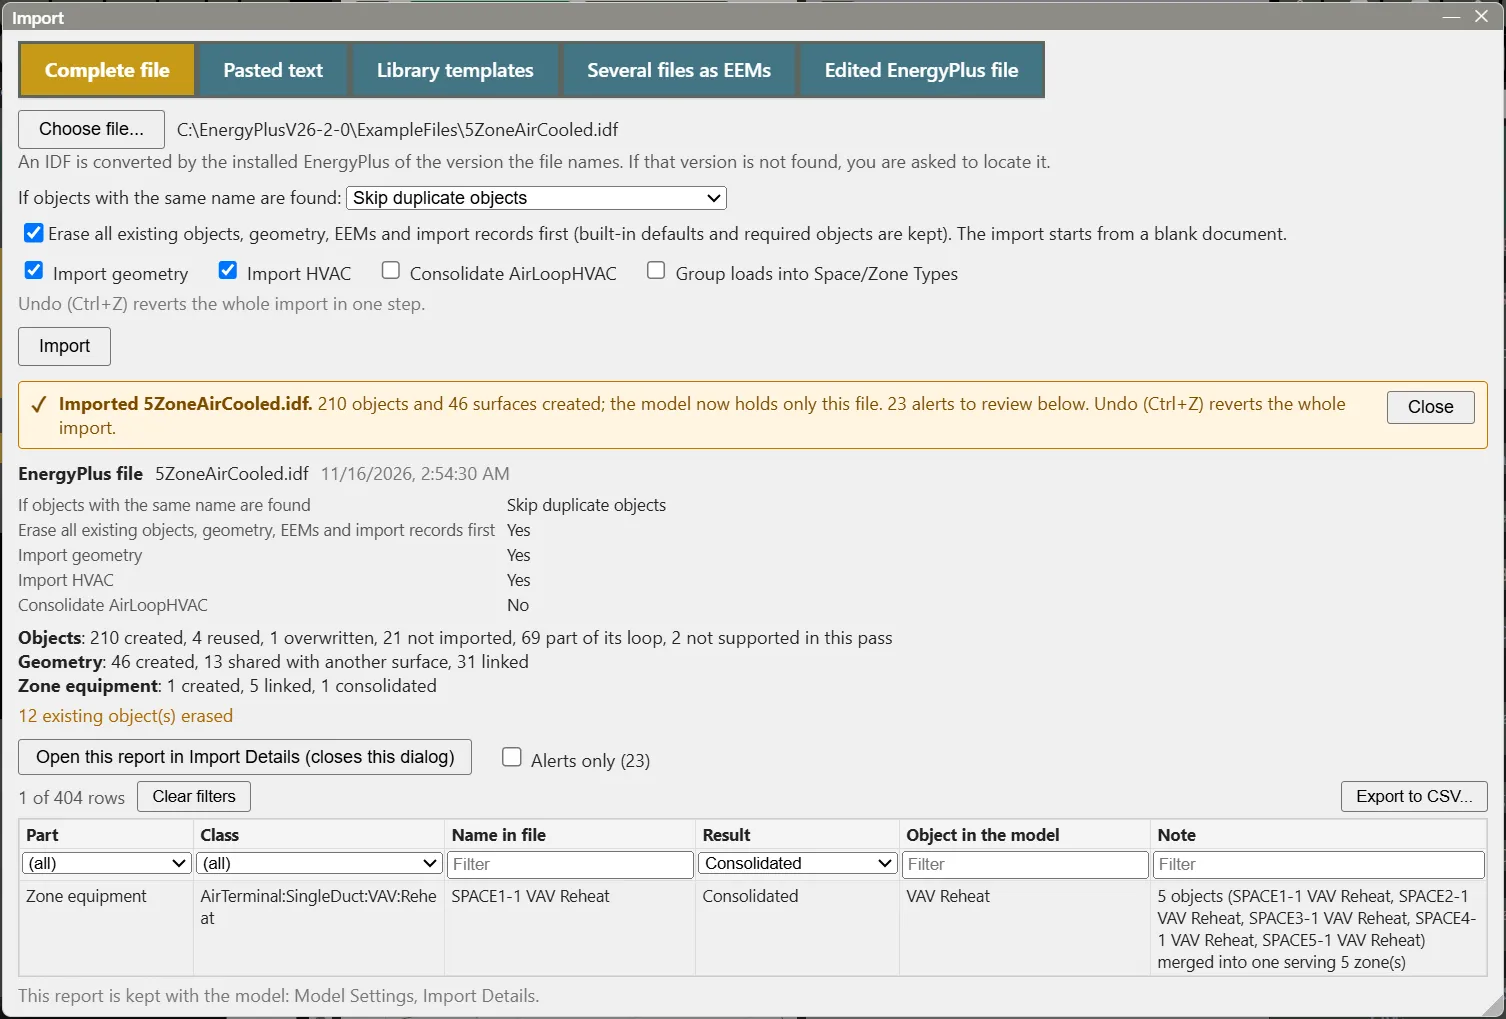
After a file or text import, a line at the top of the result says what was imported, with the number of objects and surfaces created and of alerts to review; it is green when there are no alerts and amber when there are. Close shuts the dialog. Below it the dialog shows the import’s report; templates, zips, merges, and the Model Wizard record one too. Every report is kept with the model under Model Settings > Import Details, and Model Settings > Import Errors Summary lists every problem across all imports (The EP3 Interface and Model Settings, §7.5). Undoing an import removes its report.
The report shows the options the import ran with, a count of results for each part (Objects, Geometry, Zone matching, Zone equipment, Air loop consolidation, Daylighting, and for an .ep3 file EEMs), its notes, and any part that could not be applied (that part is undone; the rest of the import stays). The table has one row per object, with Part, Class, Name in file, Result, Object in the model (its current name), and Note. Each column has a filter, and Export to CSV… saves the rows the filters show. Open in separate window keeps the report open beside the model.
| Result | Meaning |
|---|---|
| Created, Created (renamed) | A new object, under the file’s name or a numbered one (the note gives the reason). |
| Reused, Skipped (kept existing), Kept (singleton) | The model’s object was used and left as it was. |
| Overwritten | The model’s object took the file’s values, in Global or the active EEM. |
| Appended to existing | The file’s parallel branches were added to the model’s loop of the same name. |
| Part of its loop | A branch, connector, list, or Sizing:Plant that became part of a loop’s structure. |
| Consolidated | Merged into a shared zone object or air loop (§4.3). |
| Linked, Shared with another surface | A load or thermostat tied to its zone or Space; one face of an interzone pair. |
| Left out (import option) | Left out by Import geometry or Import HVAC. |
| Not imported, Not supported in this pass, Imported without a construction, Error | Not brought in as it was in the file; the note gives the reason. These rows are highlighted and appear in Import Errors Summary. |
10. What is not imported
- Object types EP3 does not model are reported Not supported in this pass. A component on a loop branch that EP3 has no type for is left off its branch and named in the loop’s row; the rest of the loop is imported.
- AirflowNetwork is switched off in this release. Every
AirflowNetwork:*object is reported Not supported in this pass with the note “AirflowNetwork is not supported in this version” (Infiltration, Natural Ventilation, and Airflow Networks). ConstructionAssignmentSetobjects are applied to the surfaces and then dropped (§4.1).ZoneGroupobjects are applied to their zones’ multipliers and then dropped (§4.1); theirZoneLists are kept.- Objects EP3 writes at export, such as
OutdoorAir:NodeList, andOutput:Variableobjects on nodes that an imported setpoint manager or NodeReport already reports, are not imported; the note names what writes them. - Unused objects: an
AvailabilityManagerAssignmentListthat no loop names is reported Not imported, since EnergyPlus never reads it. - EMS is supported with basic name checking only.
EnergyManagementSystem:*objects are imported, and the object or node anEnergyManagementSystem:Sensor,:Actuator, or:InternalVariablenames is linked, so the export writes it under EP3’s name for that object or node and warns about a name that matches nothing. Program text is not rewritten; it uses the sensor, actuator, and variable names, which are kept.
A file from an established tool can still hold errors, such as duplicate surfaces or interior walls with an outdoor boundary condition. Review the report, then run Validate (Model Troubleshooting and Quality Assurance) and a simulation before relying on an imported model. Atlas, in Analysis mode, reads the model and can explain what it finds (The EP3 AI Assistant).
11. Worked example: importing 5ZoneAirCooled
5ZoneAirCooled.idf, in the ExampleFiles folder of the EnergyPlus installation, is a one-story building of five zones (SPACE1-1 to SPACE5-1) under a return plenum (PLENUM-1). One VAV air loop, VAV Sys 1, serves the zones through AirTerminal:SingleDuct:VAV:Reheat terminals, with a Chiller:Electric (Central Chiller) on the Chilled Water Loop and a Boiler:HotWater (Central Boiler) on the Hot Water Loop.
- Start a new model with File > New and close the Model Wizard.
- Click Import, open the Complete file tab, click Choose file…, and pick
5ZoneAirCooled.idf. If EP3 asks you to locate EnergyPlus, choose its installation folder. - Leave the options at their defaults and click Import.
The report’s Geometry part shows two floors: Floor 0, holding the five zones with a 2.4 m (2.4 / 0.3048 = 7.9 ft) ceiling height, and Floor 2.4, holding the plenum, whose five floor surfaces make one Space. Each zone’s ceiling and the plenum floor above it, and each wall between two zones, is one shared face. The new building takes the file’s north axis of 30°.
In the HVAC Outliner, the five reheat terminals are one VAV Reheat terminal serving all five zones, and the merged terminals are reported Consolidated. The file’s terminals differ only in their node and reheat coil names, which EP3 derives for each zone at export, so the zone columns of the terminal’s blue drawer bar are empty. The air loop, the Chilled Water Loop, and the Hot Water Loop appear in the HVAC diagram.
This handbook is also built into EP3 (Help), where its EnergyPlus links open the EnergyPlus Reference. Technical specifications · Book a demo