Windows, Shading, and Daylighting
1. Overview
Creating Building Geometry covers placing windows and doors: Add Windows By Exposure, the Window Rectangle tool, and copying windows between floors. This chapter covers what shapes an opening’s behavior after it is placed: standardizing its size and construction with an OpeningType, fixed exterior shading (insets, overhangs, and fins), movable shading and switchable glazing, and the daylight sensors that drive daylight-responsive lighting control.
The glazing constructions windows use (layers, WindowMaterial:SimpleGlazingSystem, and the rest) are covered in Constructions and Materials. The shading materials a WindowShadingControl uses (WindowMaterial:Shade, WindowMaterial:Blind, WindowMaterial:Screen) are covered here, in §4.
2. The window dialog
Double-click a window in the Building Geometry Outliner (or select it in the 3D view) to open it in the Selected Object dialog. It is exported as a FenestrationSurface:Detailed, and its fields include:
- Name — the window’s name, such as “Floor 1 Lobby Window 2”, which it is exported under; edit it to rename the window (Creating Building Geometry).
- Surface Type —
Window,GlassDoor, orDoor. EP3 sets it from the window’s shape and construction; for a glazed window you can chooseWindoworGlassDoor(§2.4). A window or door with an opaque construction is exported as a door. - Construction Name — the window’s construction. Choosing one from the list does what painting the window does (Creating Building Geometry), and ↺ resets it to inherit.
- Building Surface Name — the wall or roof surface it sits in, which EP3 sets from the geometry.
- Frame and Divider Name, Multiplier, View Factor to Ground.
- Opening Type — the
OpeningTypethe window follows (§2.1), which can differ by EEM; its → button opens it. - Size — Width, Height, and Sill Height (§2.1).
- Shading — the window’s inset, overhang, and fins (§3).
2.1 Standardizing windows with an OpeningType
An OpeningType is a template for windows and doors: construction, frame and divider, size and sill height, and fixed shading. Assign the same OpeningType to every window that should match; editing the OpeningType updates every window that uses it. Windows from Elevations gives the windows it makes from CAD or image elevations shared OpeningTypes (Floors and Windows from CAD Drawings). OpeningType objects are under Materials and Window Properties in the main object dialog. Add Windows By Exposure and the Model Wizard create one set to the window-to-wall ratio (“Size By %”). Deleting an OpeningType that windows use asks whether to delete those windows too, in every EEM; if you agree, the windows and the type are deleted together, and one undo restores them. Delete its n windows… in the object dialog deletes only the windows.
| Field | Purpose |
|---|---|
| Construction Name | The construction every window using this type gets. |
| Frame and Divider Name | A WindowProperty:FrameAndDivider (frame width, projection, conductance), for rectangular exterior windows and glass doors. |
| Calculation Method | Distance or Percent of Wall Size (§2.2). The dialog shows only the size fields the method uses. |
| Width, Height, Sill Height | The size and sill height, with Distance. Sill height does not apply to windows in roofs or on sloped surfaces. |
| % of Wall Width, % of Wall Height, Sill Height as % of Wall Height | The size as a share of the wall, with Percent of Wall Size; best for rectangular walls. Sill Height as % of Wall Height defaults to Autocalculate, which centers the window vertically on the wall. |
| Auto Center | Whether the window is centered across the wall. |
| Use Inset, Use Overhang, Use Fins | The fixed shading every window using this type gets (§3). |
A field left blank leaves that property of the window alone.
While a window follows an OpeningType, the type sets its construction and the dimensions it specifies, and the window is refit when its wall changes. A resize keeps the center of the window’s lower edge in place, so a window grows or shrinks to both sides.
In the window’s Size section, a dimension the type sets is shown as inherited. A value you type is the window’s own: it overrides the type’s value in the active EEM and in the EEMs built on it, and ↺ removes it in the active EEM. A note below the fields names the dimensions the window overrides. Choosing an OpeningType removes the window’s own values, in the active EEM, for the dimensions the new type sets; a value typed afterwards overrides the type again. At Global, a value typed for a window without an OpeningType resizes the drawn window. In any other EEM, a value typed for any window is that EEM’s size, inherited by the EEMs built on it. A window’s position along the wall is shared by every EEM, so outside Global it is resized about the center of its lower edge. Sill Height is measured from the bottom of the wall, and is shown only for windows in walls.
An edit, move, copy, or paste that would take a window past the edge of its wall, or onto another window that is on in the same EEM, is refused, and the status bar names the EEM and the window’s size there. Windows that are never on in the same EEM do not conflict. A change that creates a conflict indirectly, such as an EEM’s parents, an OpeningType’s size, or a window switched back on, is made, and the status bar names the windows and the EEM. A new EEM, such as one an HVAC template adds, starts with the conflicts of the EEM it is built on, and the status bar does not report those again. Model Validation lists every such conflict under Window Overlaps and Edges.
With several windows selected, the Size section sizes them together. A value they share is shown, and one they differ on is blank. A typed value applies to every selected window as one undo step; if any of them would be refused, none changes.
The Move tool’s Shift+corner resize changes only the dimensions the type leaves free or the window overrides; with the sill set by the type, a window moves only sideways. Outside Global, a resize or a vertical move is stored as that EEM’s size or sill height, and a sideways move moves the window in every EEM. The 3D view flashes a window resized in an EEM (Energy Efficiency Measures (EEMs)), and the EEM’s page lists the window sizes it sets (Energy Efficiency Measures (EEMs)). To size a window entirely by hand, clear its Opening Type at Global; in another EEM, ↺ on Opening Type makes the window inherit its parent’s type.
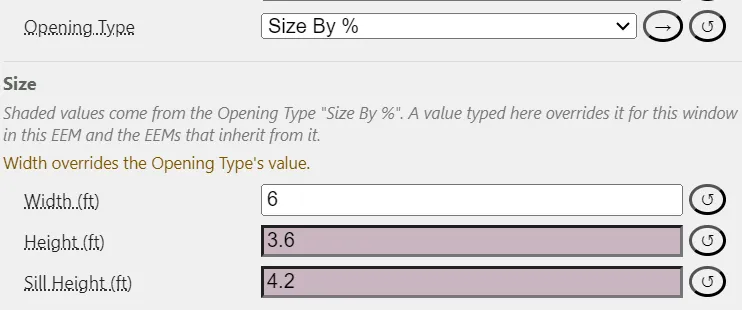
Only standard rectangular windows can use an OpeningType; triangular windows and windows whose outline follows the wall are sized individually. On a wall whose top is not level, such as a gable end, a percentage OpeningType takes its percentages of the whole wall, the gable included, and keeps the window in the wall’s rectangular part, below the eave. A window too tall for that part is made wider to keep its area, up to the wall’s full width; past that it fills the rectangular part.
2.2 Worked example: Percent of Wall Size
A wall face is 4 m wide and 3 m tall. An OpeningType set to Percent of Wall Size with % of Wall Width = 60 and % of Wall Height = 40, and Sill Height as % of Wall Height left at Autocalculate, gives:
- Width = 4 m × 0.60 = 2.4 m
- Height = 3 m × 0.40 = 1.2 m
- Sill height (centered) = (3 m − 1.2 m) ÷ 2 = 0.9 m
A window on another wall using the same OpeningType is sized from that wall’s width and height: the percentages are shared, and the dimensions are not.
2.3 Windows with more than four corners
A window drawn to a custom shape, or made from a face (Creating Building Geometry), can have any number of corners. EnergyPlus takes windows of three or four, so EP3 splits a larger one when it exports: into horizontal bands at each corner, each band a rectangle with a triangle at either side where its edges slope, and stacked rectangles of the same width joined. The first piece keeps the window’s name and the others are “EP3-PART-2”, “EP3-PART-3”, and so on; importing the file back joins the pieces into one window again, unless an overhang or fin names one of them. Slivers too thin to model (under 0.1 m across or 0.05 m²) are dropped. An interior window’s matching window in the neighbouring Space is split the same way, piece for piece.
Objects that name the window follow the split:
- A list of windows, such as a
WindowShadingControl’s, names every piece. - An object that names one window, such as a
WindowProperty:StormWindow, is written once per piece. - Overhangs, fins, light shelves, and tubular daylighting devices are placed from one window’s shape, so they can’t use a split window: their window lists don’t offer one, and EP3 refuses the choice. One that names a split window anyway, from an import or because its window was reshaped, is left out of the export.
- A window’s name typed as text, such as an EMS actuator or an output variable key, reaches only the first piece.
Model Validation’s Split Windows section lists each split window and what names it (Model Troubleshooting and Quality Assurance). The Results dialog, the time-series viewer, View Building Data, and ETTV show the window as one: energies and flows are summed over its pieces, and other values are weighted by the pieces’ areas (Viewing and Interpreting Results).
2.4 Surface Type: Window, GlassDoor, and Door
A window’s Surface Type sets the type of FenestrationSurface:Detailed it is exported as. EP3 sets it automatically:
- A window with an opaque construction is a
Door, and so is a door that Windows from Elevations makes from a door colour, which takes the Doors default construction (Model Settings). The row showsDoorand cannot be edited. - A window with a glazing construction is a
GlassDoorwhen its bottom is within 10 cm (4 in) of the bottom of its wall, it is 1.9 to 2.7 m (about 6 ft 3 in to 8 ft 10 in) tall, and it is 0.6 to 2.6 m (about 2 ft to 8 ft 6 in) wide. Single and double doors fit these ranges. Any other glazed window is aWindow.
The row shows the value in use, in the default-value tint when it is automatic. The Surface Type From row under it says where it comes from: “Automatic: GlassDoor (a door-sized opening at the bottom of its wall)”, “Set here; automatic would be Window”, or “Door: the construction is opaque”. To override it, choose Window or GlassDoor; ↺ goes back to automatic. A floor-to-ceiling window that meets the ranges is a GlassDoor unless you choose Window.
The choice belongs to the active EEM, like the window’s construction and OpeningType, and the EEMs built on it follow it. The automatic value is worked out on the window as each EEM sizes it, so an EEM that lowers a window to the floor and makes it door-tall exports a GlassDoor in that EEM. An imported EnergyPlus file keeps each window’s Window or GlassDoor type; it is stored as an override only where it differs from the automatic value.
A GlassDoor is fenestration: it counts as glazing in every calculation that measures windows, such as the window-to-wall ratio, the Performance Rating Method’s vertical fenestration, and daylighting. An opaque Door does not. A new glass door is named “<Space> Door n”, and a window named “<Space> Window n” keeps that name if it becomes a glass door.
3. Fixed exterior shading
Three kinds of fixed shading can be attached to an exterior window or door: an inset (the window set back into the wall), an overhang, and a pair of fins. Each is switched on with Use Inset, Use Overhang, or Use Fins, and needs a depth above 0.
They can be set on an OpeningType, for every window that uses it, and on a window, in its Shading section. A window’s value overrides its type’s field by field, so a window’s Use Overhang = No removes the overhang its type gives it. A blank field on the window follows the type. Every shading field can also differ by EEM.
Overhangs and fins are exported as EnergyPlus’s Shading:Overhang and Shading:Fin objects (or their :Projection forms, §3.1), which EnergyPlus places from the window, so they follow the window’s size in every EEM. They need a rectangular window that is not on a flat roof. An inset is exported as one Shading:Building:Detailed per window edge, projecting outward from the wall by the inset depth, and works on any window shape. Interior windows get no shading. The shading is drawn in the 3D view, and clicking it selects its window.
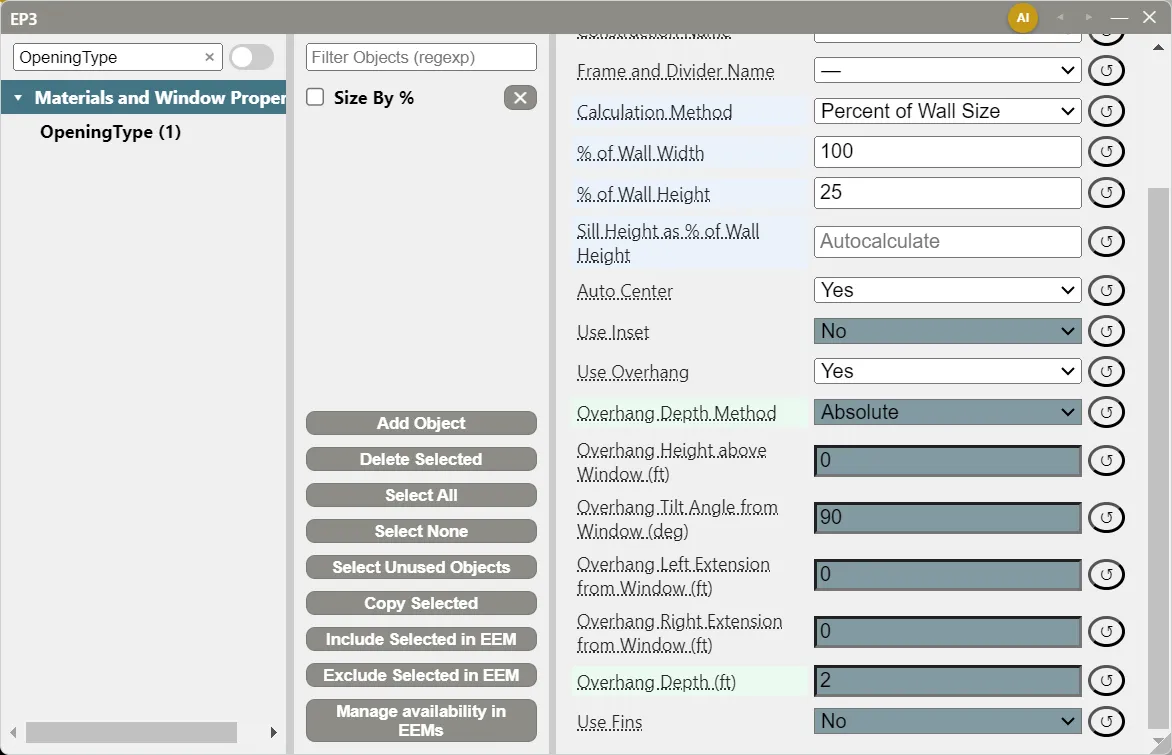
3.1 Overhangs
With Use Overhang set to Yes:
| Field | Meaning |
|---|---|
| Overhang Depth Method | Absolute (a depth) or Fraction of Window Height (a depth as a share of the window’s height, exported as Shading:Overhang:Projection). |
| Overhang Height above Window | The gap between the top of the window and the overhang; 0 puts it at the head. |
| Overhang Tilt Angle from Window | 90° (the default) projects straight out. |
| Overhang Left Extension from Window, Overhang Right Extension from Window | How far the overhang extends past each side of the window. |
| Overhang Depth, or the depth fraction | How far the overhang projects. |
The overhang is always opaque.
Worked example: sizing an overhang to shade a window at solar noon on the summer solstice. At solar noon on the summer solstice, the solar altitude at latitude L is approximately:
altitude ≈ 90° − L + 23.45°
For a building at 41.9°N (Chicago):
altitude ≈ 90° − 41.9° + 23.45° = 71.55°
With the overhang at the window head (Overhang Height above Window = 0), the depth whose shadow just reaches the sill of a 1.5 m tall window is:
depth = window height ÷ tan(altitude) = 1.5 m ÷ tan(71.55°) = 1.5 ÷ 2.997 = 0.50 m
Checked in IP: 1.5 m = 4.92 ft, and 4.92 ft ÷ 2.997 = 1.64 ft = 0.50 m. With Fraction of Window Height, the same overhang is 0.50 ÷ 1.5 = 0.333, and it stays at a third of the height if the window’s size changes in an EEM. At the winter solstice the sun is much lower (altitude ≈ 90° − 41.9° − 23.45° = 24.65°), so the same overhang shades only the top of the window and admits winter sun.
The solar altitude relation is from ASHRAE Handbook—Fundamentals’ solar position chapter; the Input Output Reference documents how EnergyPlus builds the overhang from these fields.
3.2 Fins
With Use Fins set to Yes, a left and a right fin each have an extension from the window, a distance above the top and below the bottom of the window, a tilt angle (90° by default), and a depth; the Fin Depth Method chooses an absolute depth or a fraction of the window’s width (Shading:Fin:Projection). A fin whose depth is 0 is left out, so a single fin needs only one side’s depth.
3.3 Insets
With Use Inset set to Yes, the Inset Depth sets how far the window sits back from the wall’s outer face. The four reveal surfaces (top, bottom, left, and right) are exported as building shading.
3.4 Shading properties as paints
A shading collection, or a single face of one, can name a transmittance schedule (how much light a tree, screen or louvre lets through over the year) and a reflectance object (a ShadingProperty:Reflectance, which holds the reflectance of the surface and, optionally, a glazed fraction). The 3D view shows them so you can tell them apart at a glance:
- A reflectance object is a colour. Each object keeps the same colour in every session.
- A transmittance schedule is a pattern (hatch, cross-hatch, dots, stripes, chevrons or checks, in a fixed spacing and weight), drawn semi-transparently over the face. A face with both shows the colour with the pattern over it. A face with neither keeps its normal look.
The Palette button in the view toolbar turns these colours and patterns on and off.
Under the constructions in the Constructions panel, a Shading properties list has an entry for every schedule and reflectance object that any shading collection or face uses, each with its colour or pattern. An entry appears as soon as something selects the object, and goes when nothing does. Click an entry, then use the Paint tool:
- Click a shading face to give it that property as its own, overriding its collection’s. Faces in the selection are painted together.
- With a shading collection selected in the Outliner, click one of its faces to give the property to the whole collection. Faces that have their own value keep it.
- Clear removes the property you pick it for: a face goes back to its collection’s value, and a collection has none. None makes a face have no schedule (opaque) or no reflectance object even when its collection has one.
Paint belongs to the active EEM, so a different EEM can paint other values without changing Global. Painting a wall, a roof, a window or a roof overhang face with a shading paint changes nothing, and the status bar says that shading paints go on shading faces and shading collections only. Picking a construction in the panel switches back to painting constructions.
4. Movable shading and switchable glazing
WindowShadingControl controls shading that responds to a schedule or a condition (blinds, shades, screens) and switchable glazing. Create one in the main object dialog: select WindowShadingControl in Column 1 (under Zones and Building Segments; switch Column 1 to every object type if the model has none yet) and click Add Object.
4.1 What it applies to
A WindowShadingControl names a Zone Name and, in its Fenestration Surface Name list (+ Add adds a row), the windows it controls. The window list offers each window by its name (for example, “Floor 1 Lobby Window 2”). The Input Output Reference documents each field.
4.2 Shading Type: what is controlled
| Shading Type | Material |
|---|---|
| InteriorShade, ExteriorShade, BetweenGlassShade | WindowMaterial:Shade |
| InteriorBlind, ExteriorBlind, BetweenGlassBlind | WindowMaterial:Blind |
| ExteriorScreen | WindowMaterial:Screen |
| SwitchableGlazing | A second, switched-state glazing construction |
Point Construction with Shading Name at a glazing construction that includes the shade, blind, screen, or switched layer, or point Shading Device Material Name at the shading material and EnergyPlus pairs it with the window’s construction; when both are entered, Construction with Shading Name is used. Switchable glazing needs Construction with Shading Name: the switched state is a whole glazing construction, built like any other (Constructions and Materials).
The shading materials are created in the main object dialog, under Materials and Window Properties:
WindowMaterial:Shade— a single uniform layer. Solar Transmittance, Solar Reflectance, Visible Transmittance, Visible Reflectance, Infrared Hemispherical Emissivity, and Infrared Transmittance are required with no default (they come from manufacturer data), as are Thickness and Conductivity. Shade to Glass Distance defaults to 0.05 m. The Top, Bottom, Left-Side, and Right-Side Opening Multiplier fields (0.5 each) set how much air circulates around the shade’s edges; Airflow Permeability (0) sets how much passes through the fabric.WindowMaterial:Blind— slat geometry with optical properties: Slat Orientation (Horizontal or Vertical), Slat Width and Slat Separation (required), Slat Thickness, and Slat Conductivity (221 W/m·K, aluminum). Front and back beam and diffuse solar and visible transmittance and reflectance are required and independent: a slat’s finish usually scatters more light than it passes directly. Slat Angle (45°) is the fixed angle underFixedSlatAngleand the resting angle underBlockBeamSolar; Minimum Slat Angle and Maximum Slat Angle (0° and 180°) bound the angle EnergyPlus may choose (§4.4). Blind to Glass Distance is 0.05 m, and the opening multipliers are 0.5, 0, 0.5, and 0.5 (top, bottom, left, right), since a blind’s bottom edge normally rests on the sill.WindowMaterial:Screen— Reflected Beam Transmittance Accounting Method (ModelAsDiffuseby default, orDoNotModelorModelAsDirectBeam) sets how beam sun reflected off the weave is treated. Diffuse Solar Reflectance and Diffuse Visible Reflectance are required; Thermal Hemispherical Emissivity and Conductivity default to 0.9 and 221 W/m·K. Screen Material Spacing and Screen Material Diameter (both required) set the weave’s openness. Screen to Glass Distance defaults to 0.025 m, and the opening multipliers default to 0, since a screen is normally mounted flush with the frame.
4.3 Shading Control Type: what triggers it
| Purpose | Control types |
|---|---|
| Always on or off, or by schedule | AlwaysOn, AlwaysOff, OnIfScheduleAllows |
| Reduce cooling from solar gain | OnIfHighSolarOnWindow, OnIfHighHorizontalSolar, OnIfHighOutdoorAirTemperature, OnIfHighZoneCooling, and their combined-condition forms |
| Reduce heating (movable insulation) | OnNightIfHeatingAndOffDay, OnNightIfLowOutdoorTempAndOffDay, OnNightIfLowInsideTempAndOffDay |
| Reduce heating and cooling | OnNightIfHeatingAndOnDayIfCooling, OnNightAndOnDayIfCoolingAndHighSolarOnWindow |
| Glare and daylight | OnIfHighGlare, MeetDaylightIlluminanceSetpoint, OnIfHighSolarOrHighLuminanceTillSunset (and its TillMidnight and TillNextMorning forms) |
Most setpoint-driven types need Setpoint (W/m² for solar, W for cooling or heating, °C for temperature), and the two-condition types also need Setpoint 2. OnIfScheduleAllows needs Shading Control Is Scheduled = Yes and a Schedule Name: a schedule value of 0 keeps the shading off, and 1 lets the control type decide. OnIfHighGlare needs Glare Control Is Active = Yes. The Input Output Reference gives each control type’s exact trigger.
4.4 Slat angle control for blinds
For a blind, Type of Slat Angle Control for Blinds chooses FixedSlatAngle (the default), ScheduledSlatAngle (with a Slat Angle Schedule Name, in degrees from 0 to 180), or BlockBeamSolar (EnergyPlus finds the angle that blocks direct sun at each time step).
4.5 Daylighting and several controls in a zone
When the zone’s spaces have daylighting controls (§5) and the shading control should respond to them, choose the space’s Daylighting:Controls in Daylighting Control Object Name; EP3 names each space’s controls “⟨space⟩ Daylighting Controls.”
When a zone has more than one WindowShadingControl (different shading on different windows, or windows that deploy in order), Shading Control Sequence Number sets the order, starting at 1. Multiple Surface Control Type decides whether a control’s windows deploy together (Group, which glare control uses to deploy the whole group) or one after another (Sequential, the default).
5. Daylight sensors and daylighting controls
A daylight sensor marks a point where daylight illuminance is evaluated, for daylight-responsive lighting control. Sensors are drawn on a floor plan and belong to the Space they stand in; EP3 exports each sensor as a Daylighting:ReferencePoint and gives each Space that has sensors one Daylighting:Controls.
5.1 Placing sensors
- By hand: enter a floor, choose the Daylight Sensor tool (D) in the top toolbar, and click inside a Space.
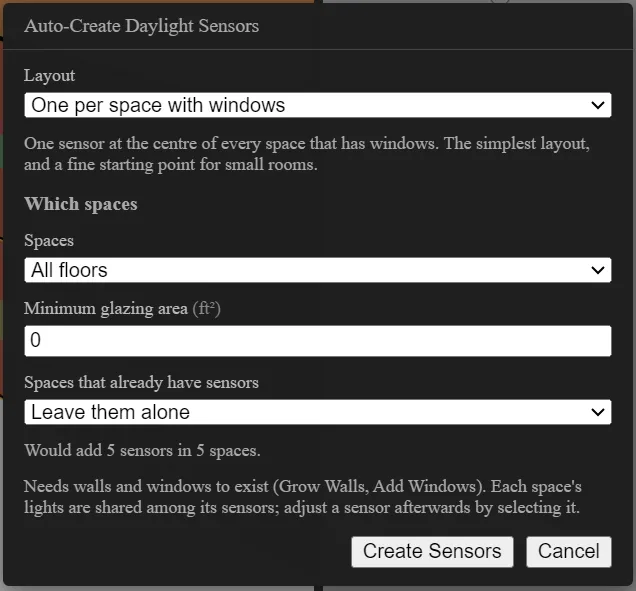
- Automatically: click Auto-Create Daylight Sensors in the Building Geometry Outliner’s toolbar. Choose a Layout: One per space with windows (one sensor at the center of each space with windows), Primary sidelit zone, per orientation, Every X along glazed walls, or Grid in the daylit area. The sidelit zones follow the sidelighting definitions of ASHRAE 90.1, IECC C405, and Title 24: the primary zone is one window-head height deep along the glazing and 0.6 m (2 ft) past each side of it, and the secondary zone is the next strip of the same depth. Choose Which spaces (all floors, the active floor, or the selected spaces), an optional minimum glazing area, and what to do with Spaces that already have sensors: Leave them alone, Replace their sensors, or Turn their sensors off in the active EEM. The dialog reports how many sensors it would add before you click Create Sensors. It needs walls and windows to exist. A glass door counts as a window here, because it is vertical fenestration; an opaque door is skipped.
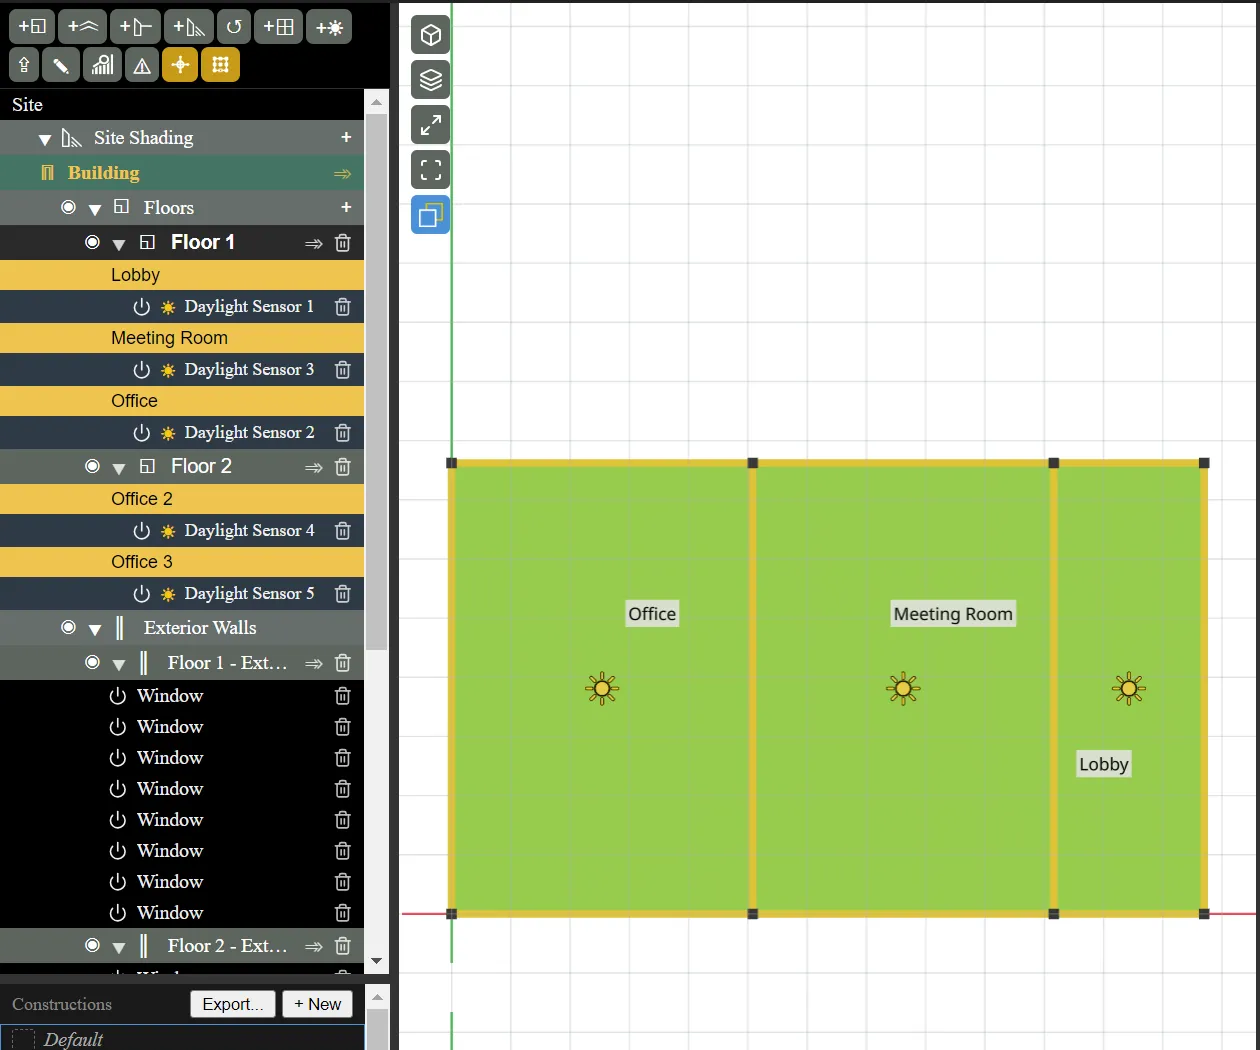
Sensors appear in the Building Geometry Outliner under their Space, with a power button to turn each on or off in the active EEM. A sensor outside every Space is drawn red and is not exported. Move and copy sensors with the Move tool, like geometry.
5.2 Sensor settings
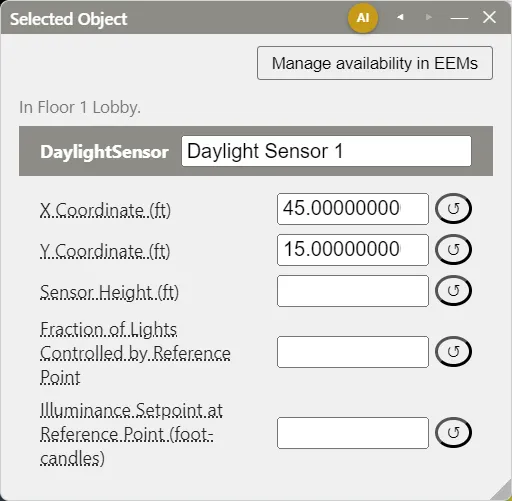
Select a sensor to open it in the Selected Object dialog: its X Coordinate and Y Coordinate, Sensor Height (0.8 m, or 2.6 ft, by default), Fraction of Lights Controlled by Reference Point, and Illuminance Setpoint at Reference Point (500 lux, or about 46 foot-candles). The dialog names the Space the sensor is in. Selecting several sensors edits them together.
A sensor with no fraction of its own shares the remainder: the sensors in a Space that set a fraction keep it, and the rest split 1 minus that total equally. If a Space’s fractions add up to more than 1, the dialog and the export warn.
5.3 The Space’s daylighting controls
Once a Space has a sensor, its Selected Object dialog has a Daylighting section with the settings its sensors share, the fields of its Daylighting:Controls: Daylighting Method (SplitFlux or DElight), Availability Schedule Name, Lighting Control Type (Continuous, ContinuousOff, or Stepped), the minimum input power and light output fractions for dimming, the number of steps for stepped control, and the glare settings. There is no separate object to create or connect. If a Space’s last sensor is deleted, its settings are kept for the next one.
Daylighting is calculated by EnergyPlus from the exported windows and shading, including the overhangs, fins, and insets of §3.
This handbook is also built into EP3 (Help), where its EnergyPlus links open the EnergyPlus Reference. Technical specifications · Book a demo