Go from an empty EP3 window to simulation results in one sitting. The Model Wizard builds a small two-storey office in Chicago with internal loads, ASHRAE 90.1 constructions and a packaged air conditioner on every zone. You then look at the building in 3D, run Model Validation, simulate with EnergyPlus, and read the annual end uses, the unmet hours and a time-series chart. The finished model is saved as an .ep3 file that other tutorials start from.
What you need
- EP3 3.0 with EnergyPlus 26.2 installed. EP3 finds the usual install folders itself, and the Simulate dialog shows the folder it found.
- The Chicago O’Hare weather file. Go to https://energyplus.net/weather, choose North and Central America > USA > IL, and download USA_IL_Chicago-OHare.Intl.AP.725300_TMY3. Unzip it into a project folder, for example
C:\Projects\FirstOffice. The zip holds the.epwweather file, a.ddyfile and a.statfile. Keep all three together: EP3 reads the climate zone from the.statfile. - About 35 minutes.
- The screenshots use SI units (m, °C), the Wizard’s default.
Set up the model with the Model Wizard
The Model Wizard opens when EP3 starts without a file, and each time you choose File > New. Each tab handles one part of the model. Work through them in order.
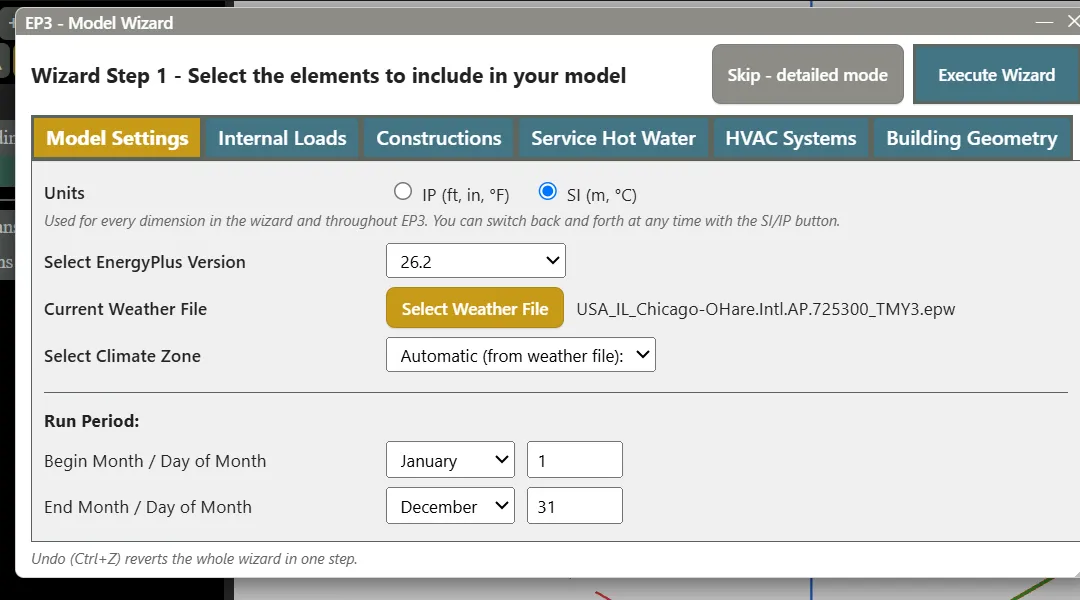
- On Model Settings, choose SI (m, °C) for Units.
- Click Select Weather File and choose
USA_IL_Chicago-OHare.Intl.AP.725300_TMY3.epw. - Leave Select Climate Zone at Automatic (from weather file). Chicago is climate zone 5A. Leave Run Period at January 1 to December 31.
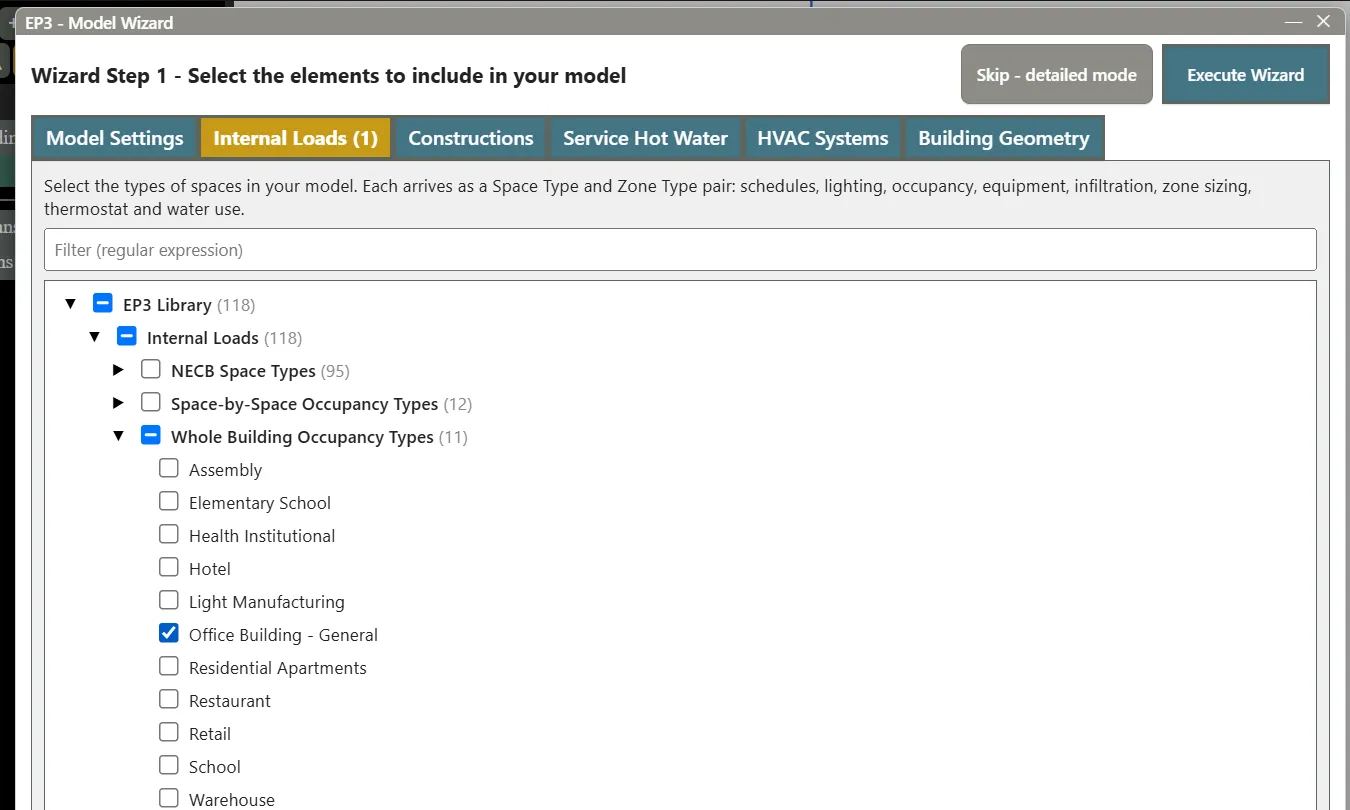
- On Internal Loads, expand EP3 Library > Internal Loads > Whole Building Occupancy Types.
- Tick Office Building - General. The tab label now reads Internal Loads (1).
This brings in a matching Space Type and Zone Type: the schedules, lighting, people, equipment, infiltration, zone sizing and thermostat for a typical office.
- On Constructions, expand EP3 Library > Constructions > ASHRAE 90.1-2022 > CZ5.
- Tick NonResidential. The tab label reads Constructions (13).
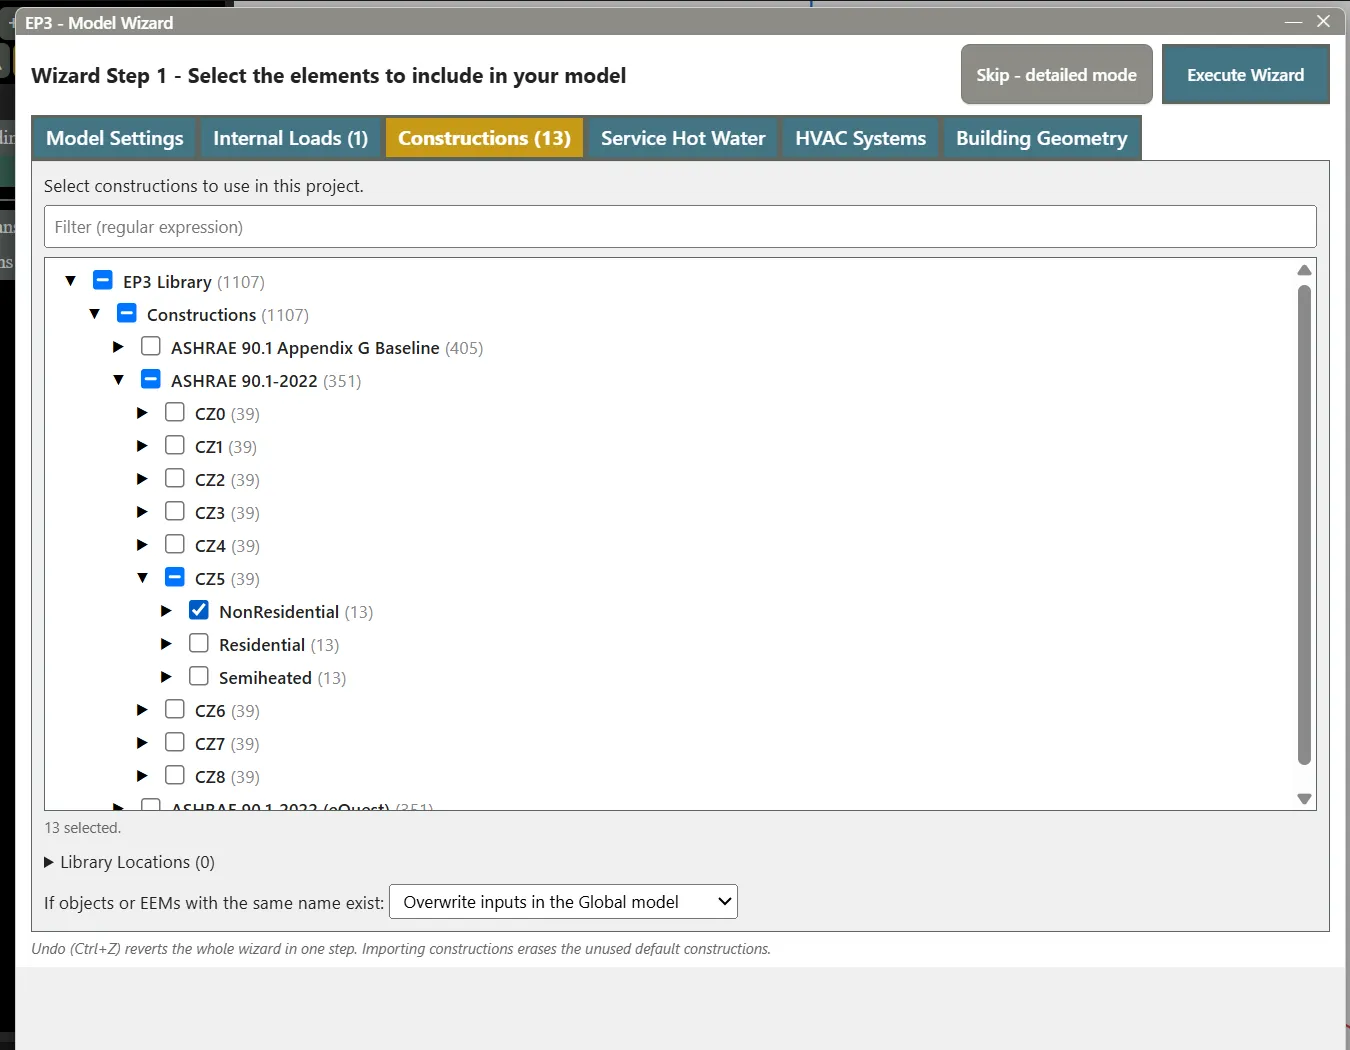
Note: If you pick no constructions, EP3 still creates one construction for each surface type, but they have no material layers and the model cannot be simulated. Always pick a set.
- Leave Service Hot Water empty. This first model has no water heater, so the Water Systems end use in the results is the water volume only.
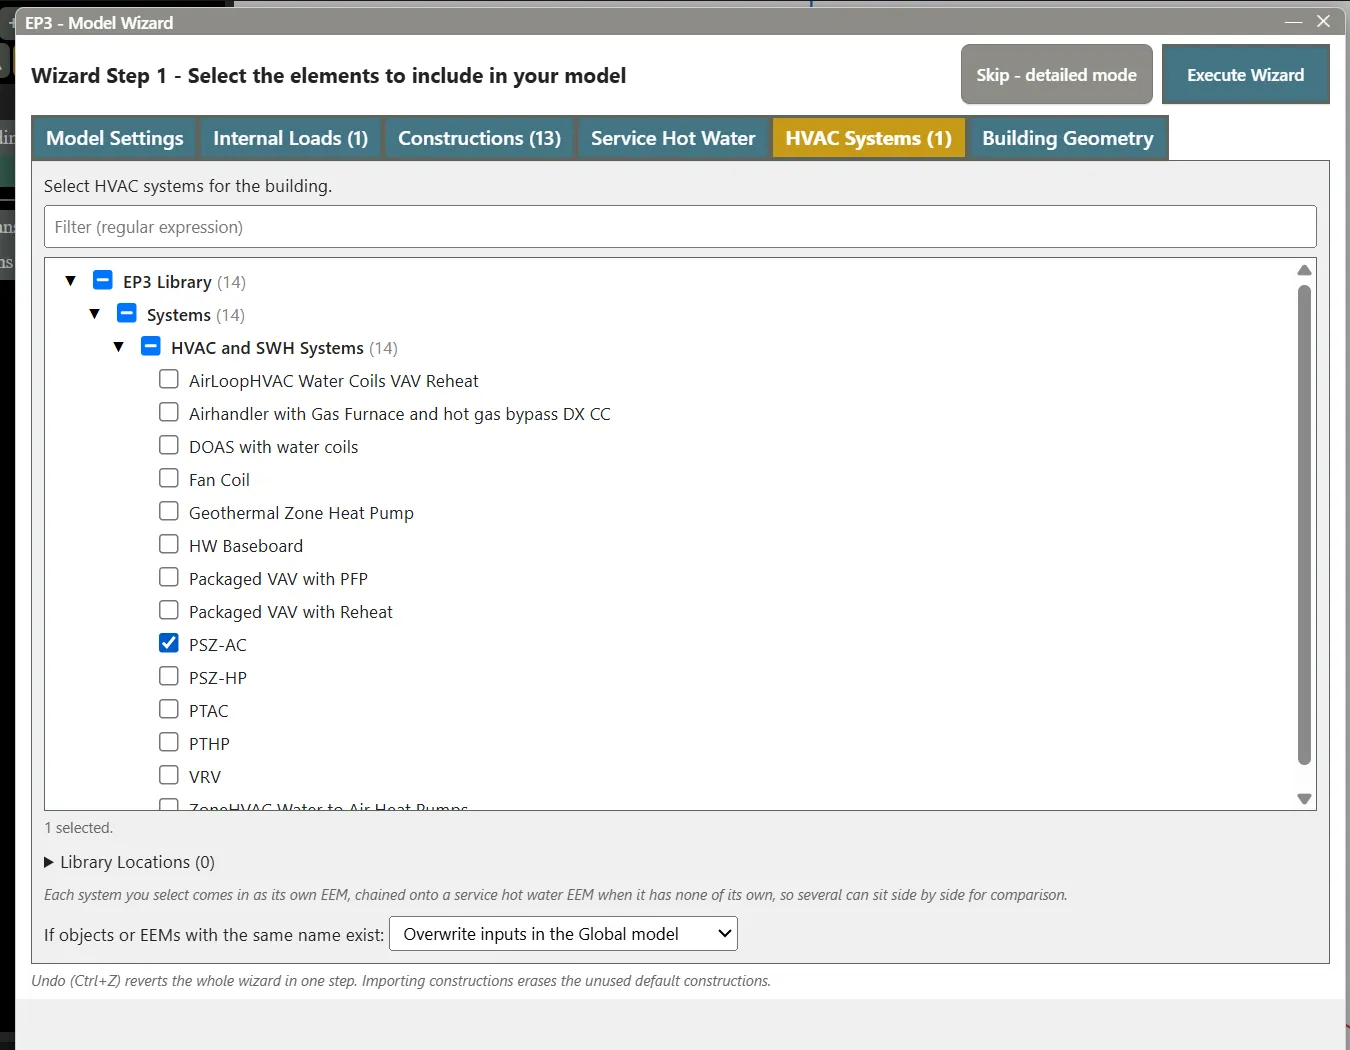
- On HVAC Systems, expand EP3 Library > Systems > HVAC and SWH Systems.
- Tick PSZ-AC (packaged single-zone air conditioner), a packaged unit with gas heating for each zone.
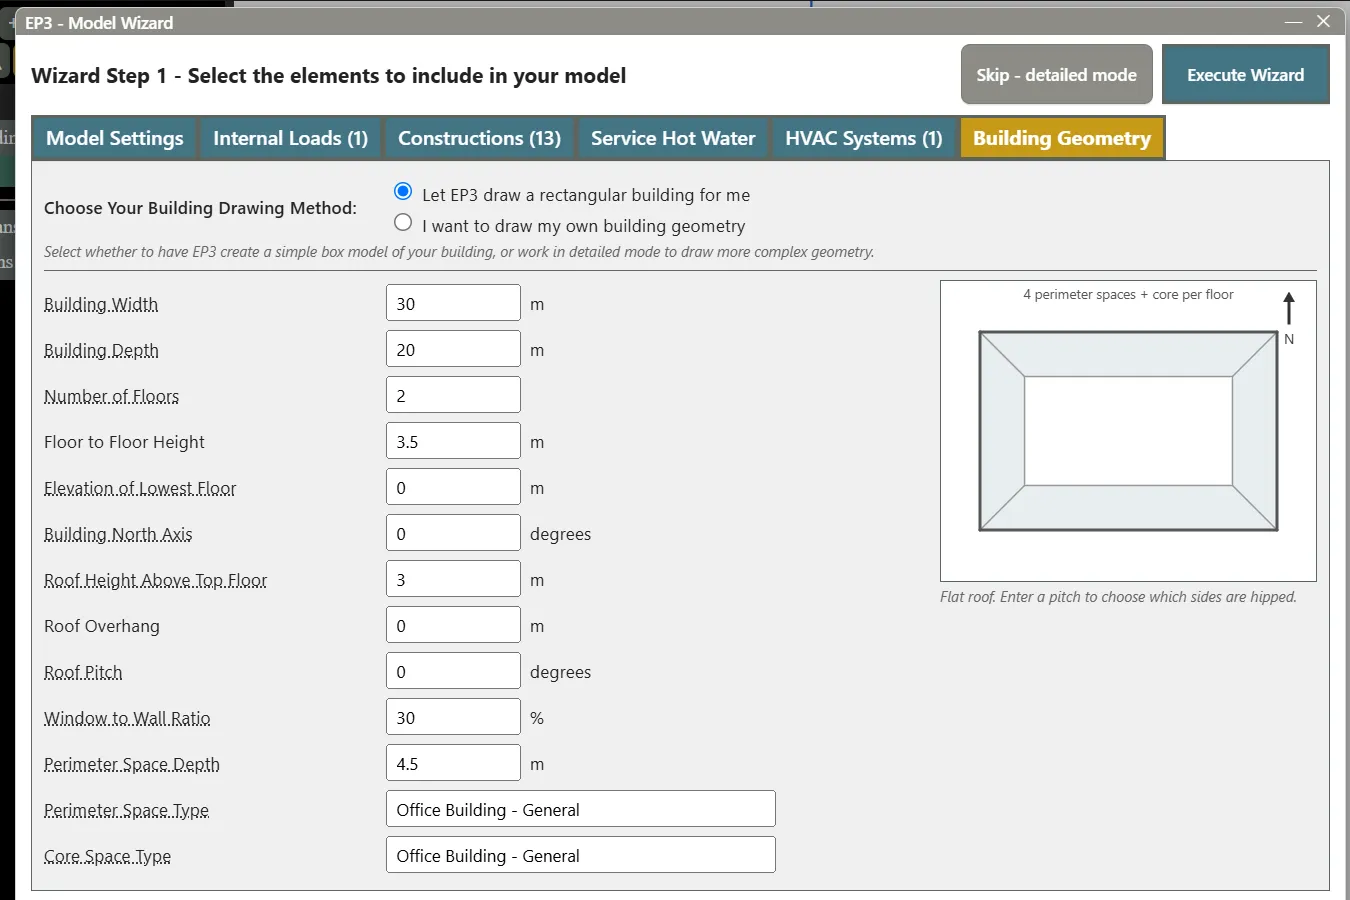
- On Building Geometry, keep Let EP3 draw a rectangular building for me and enter:
- Building Width 30 m and Building Depth 20 m
- Number of Floors 2 and Floor to Floor Height 3.5 m
- Window to Wall Ratio 30 %
- Perimeter Space Depth 4.5 m
- Perimeter Space Type and Core Space Type:
Office Building - General
Each floor gets four perimeter spaces and a core space. Typing the Space Type name connects each space to the office loads you picked on Internal Loads.
- Click Execute Wizard.
The status bar reads “Templates: 3 file(s), 58 object(s) added, 1 EEM(s). Building drawn.” An EEM (energy efficiency measure) is a named variation of the model. The Building Geometry Outliner lists the Bottom Floor and Top Floor with five spaces each, then the exterior and interior walls and the roofs. The HVAC Outliner on the right lists the PSZ-AC equipment. The button over the 3D view reads Mode Automatic, so EP3 keeps the walls, roofs and constructions up to date as the floors change.
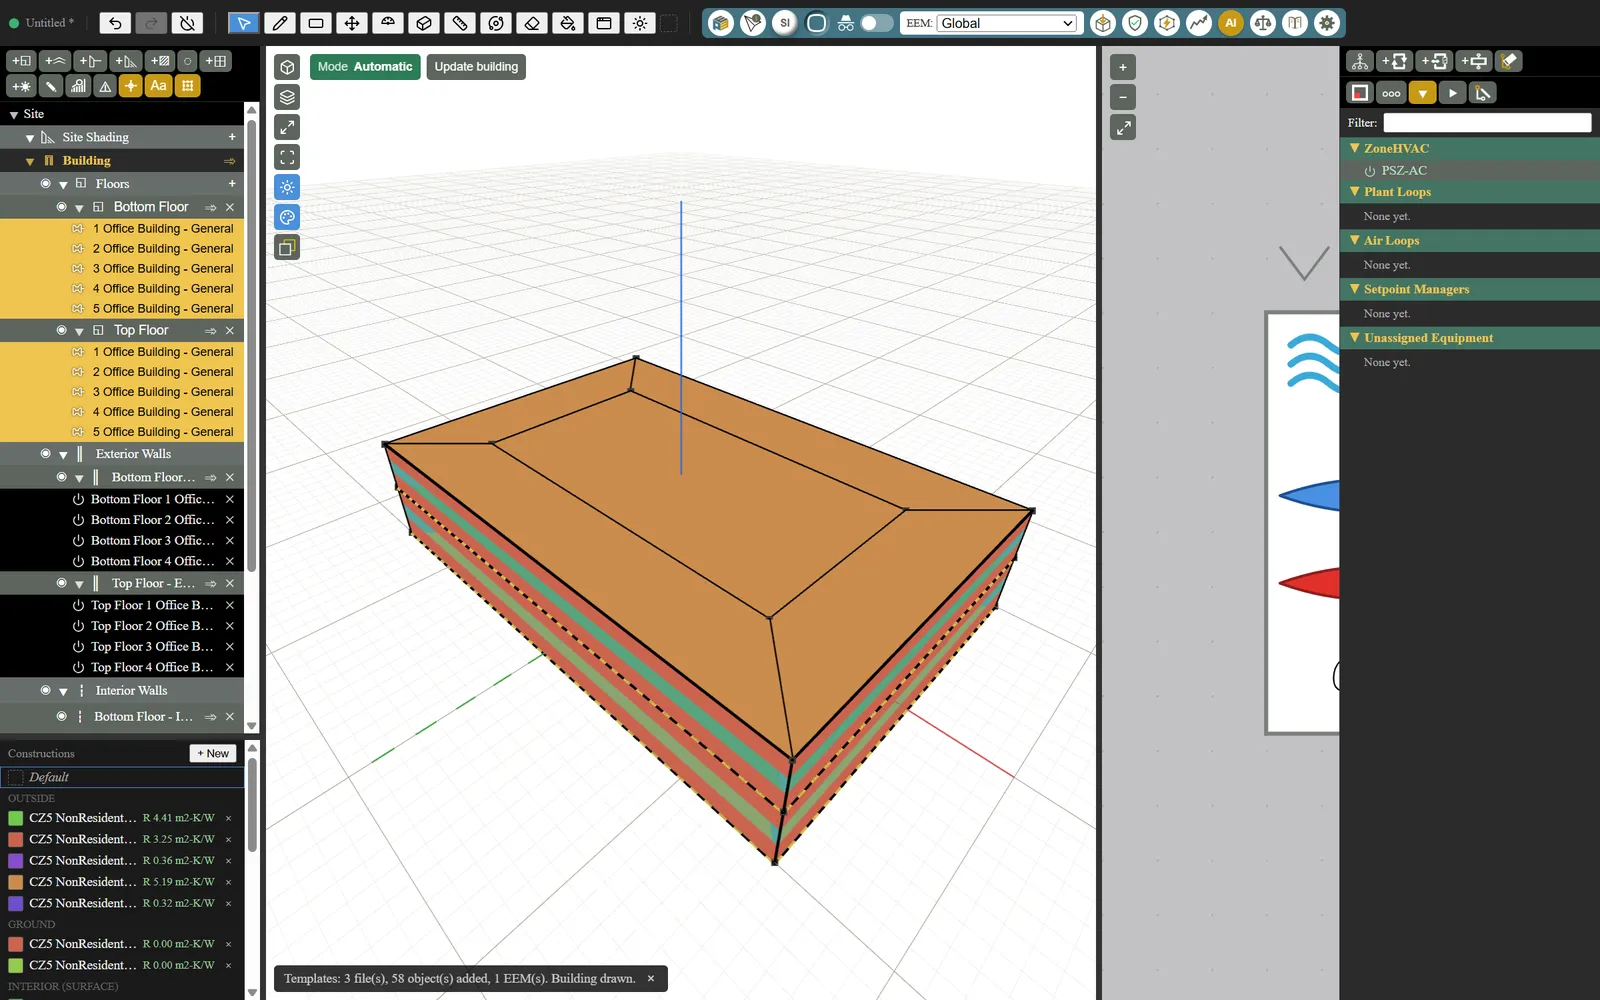
Tip: Ctrl+Z straight after the Wizard undoes everything it did in one step, so you can return to the Wizard and try other choices.
Look at the building in 3D
- If the 3D view is cramped, drag the divider between the 3D view and the HVAC diagram to the right.
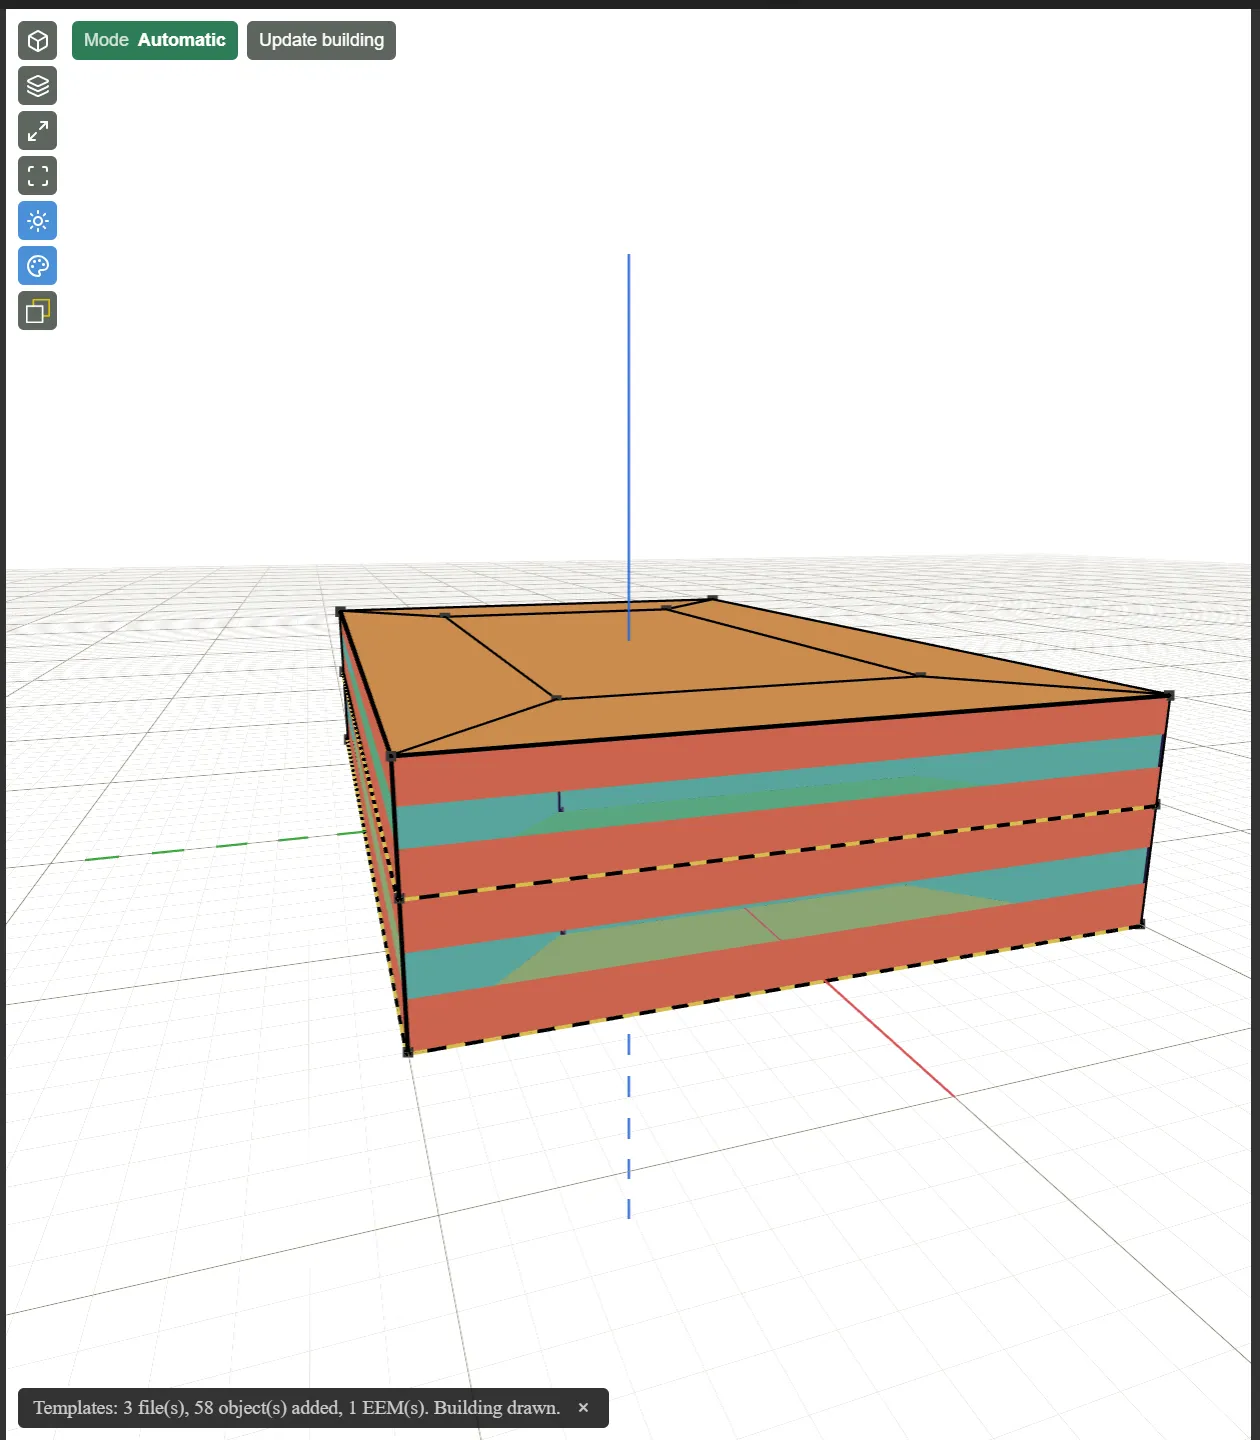
- Click View Iso, the first of the view buttons at the top left of the 3D view, then Zoom Extents. The whole building is framed.
- Click the Orbit tool in the top toolbar and drag in the 3D view to turn the building. Click the Select tool again when you are done.
The glazing shows as the teal band on each wall: one window per wall, sized for the 30 % window to wall ratio. Each wall colour is a different construction.
Run Model Validation
Validation lists problems EP3 finds while writing the EnergyPlus input. Running it before each simulation catches most problems that would make a run fail.
- Click the Validate button in the top toolbar (tooltip: “Check the model for common issues (space enclosure, missing constructions, etc.)”).
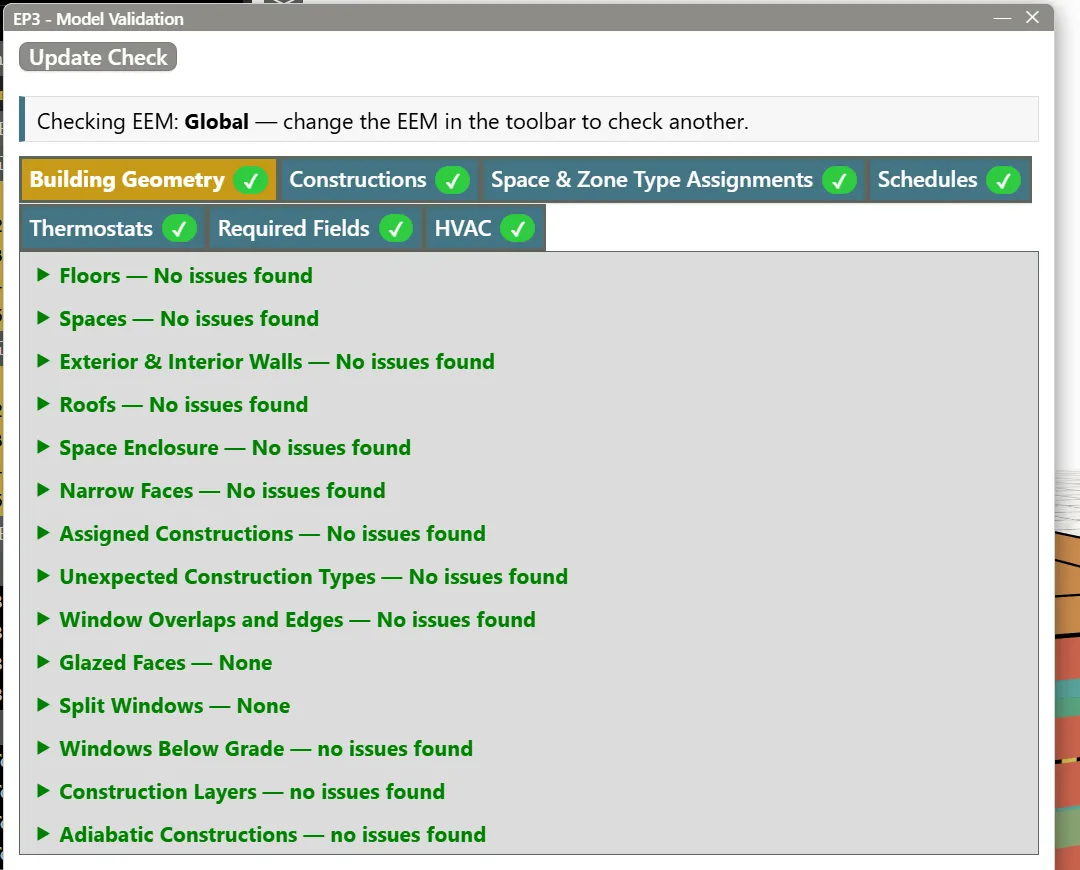
The EP3 - Model Validation dialog checks the active EEM, Global, the base model. Every tab (Building Geometry, Constructions, Space & Zone Type Assignments, Schedules, Thermostats, Required Fields, HVAC) shows a green check, and each check reads “No issues found”. A tab with a problem shows a warning and lists the objects involved.
- Close the dialog.
- Choose File > Save, go to your project folder, and save the model as
first-office.ep3.
Simulate the model
- Click the Simulate button in the top toolbar (tooltip: “Simulate your model: export the chosen EEMs as epJSON and run EnergyPlus on each.”).
The Simulate / Export dialog lists Global and PSZ-AC. Global is ticked: it holds the building and its PSZ-AC equipment. The dialog also shows the EnergyPlus folder for the model’s version.
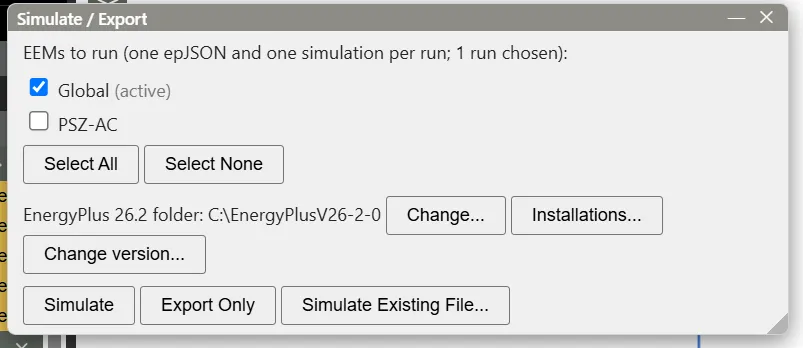
- Click Simulate and choose your project folder when EP3 asks for the run folder.
EP3 writes first-office.epJSON and runs EnergyPlus. This model finishes in about 15 seconds. The run table then reads Completed, with the counts of fatal errors, severe errors and warnings. Look for 0 fatal and 0 severe. Warnings are normal for a first run.
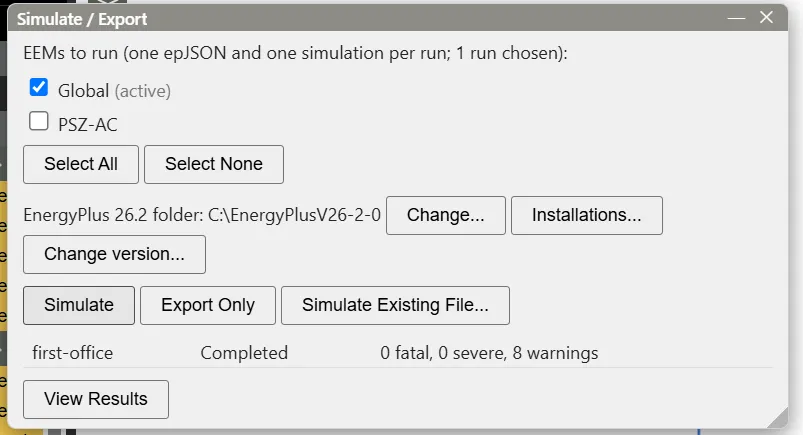
Note: The run folder holds everything EnergyPlus wrote: the input, the
.errfile, the tables and the time-series files. The Results dialog reads the same folder.
Open the results
- Click View Results in the Simulate dialog. The toolbar’s View Results button (tooltip: “View simulation results.”) opens it later.
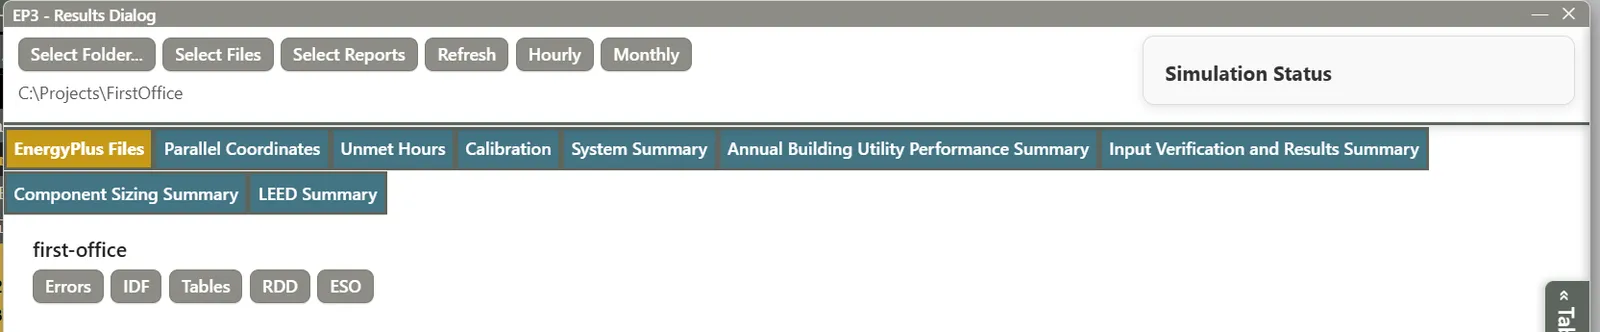
The EP3 - Results Dialog opens on the EnergyPlus Files tab, which lists the run with buttons for its raw files. The other tabs are the report tables, Unmet Hours and Calibration. The Hourly and Monthly buttons in the header open the time-series viewers.
Check that the run covers a full year
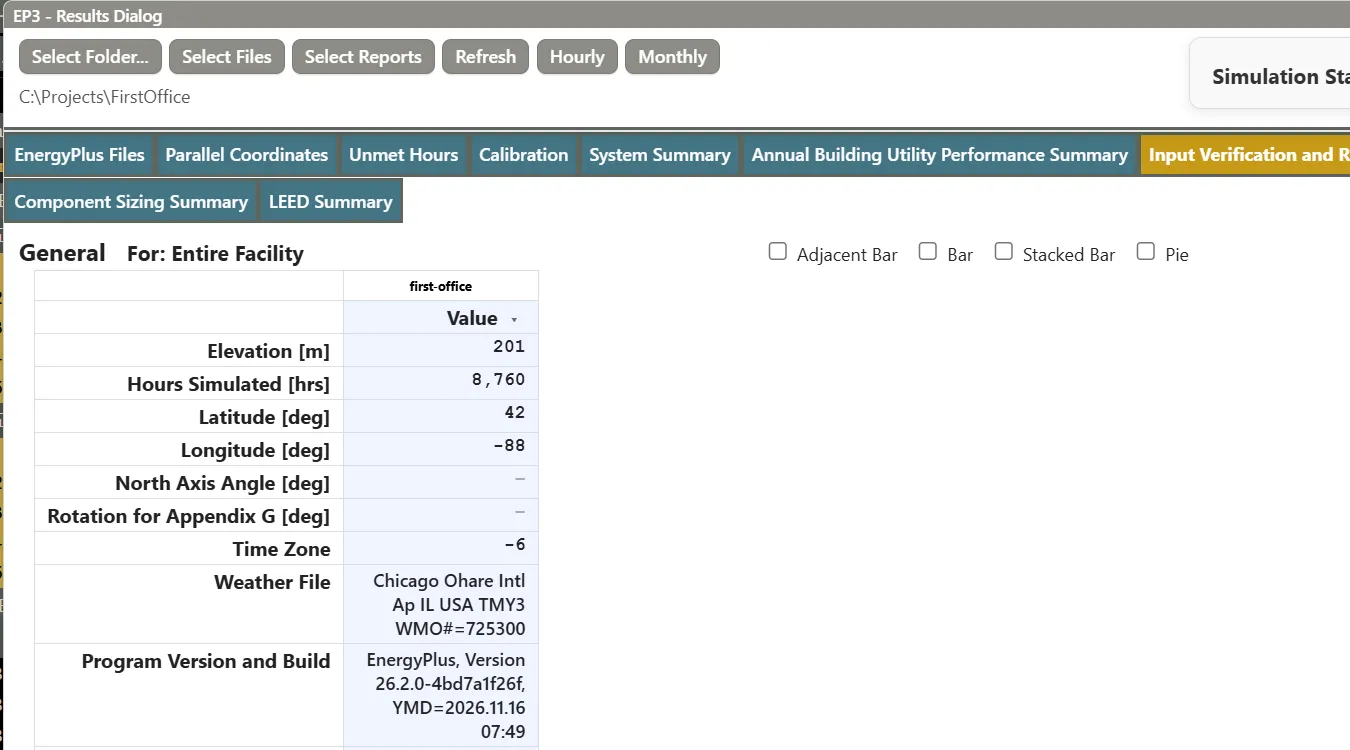
- Open the Input Verification and Results Summary tab. Hours Simulated reads 8,760, a full year, and Weather File names Chicago Ohare Intl Ap.
Annual end uses
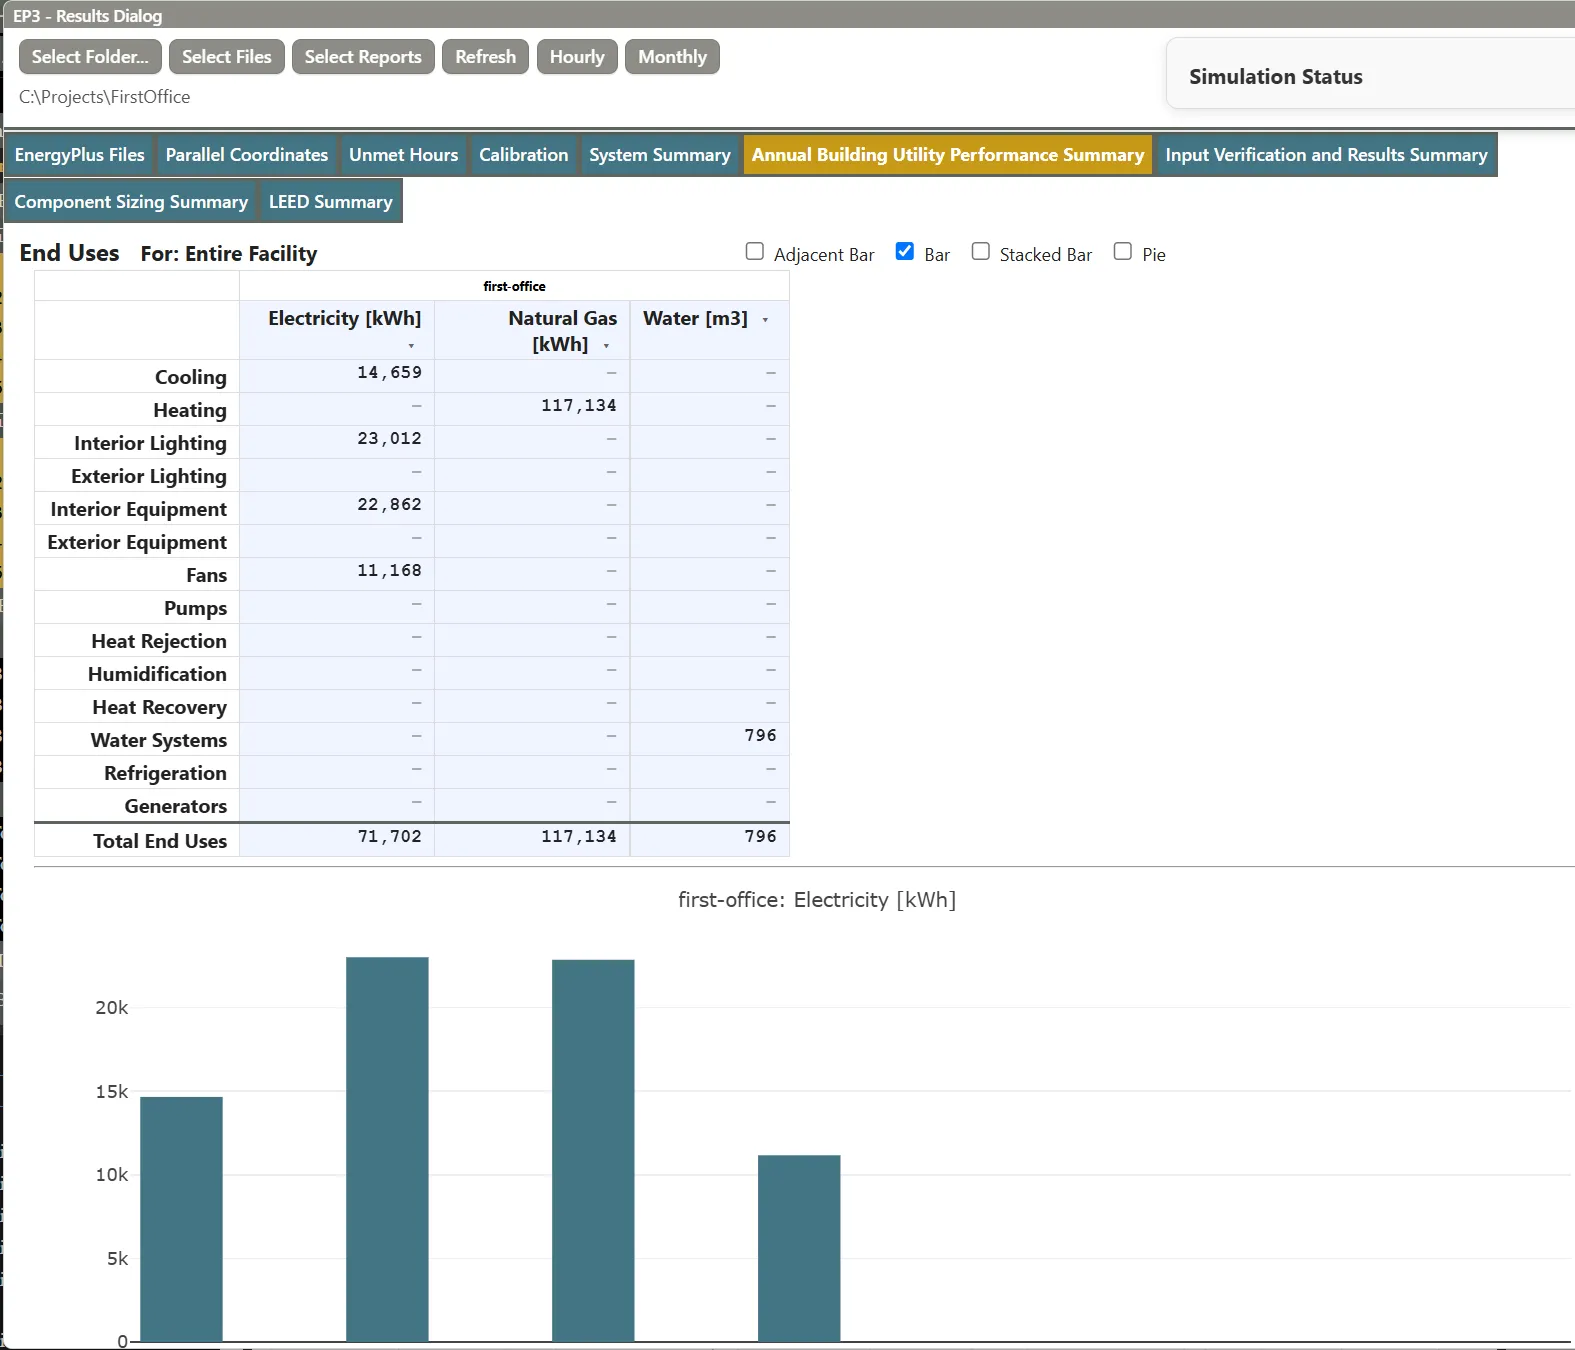
- Open the Annual Building Utility Performance Summary tab. It opens on the End Uses table, with a bar chart below it.
The table splits the year’s energy by use and fuel. For this model:
- Electricity totals 71,702 kWh: interior lighting 23,012, interior equipment 22,862, cooling 14,659 and fans 11,168.
- Natural gas totals 117,134 kWh, all of it heating. Chicago winters make heating the largest single use.
- Water Systems is 796 m³ of water use. There is no water heater, so none of it adds energy.
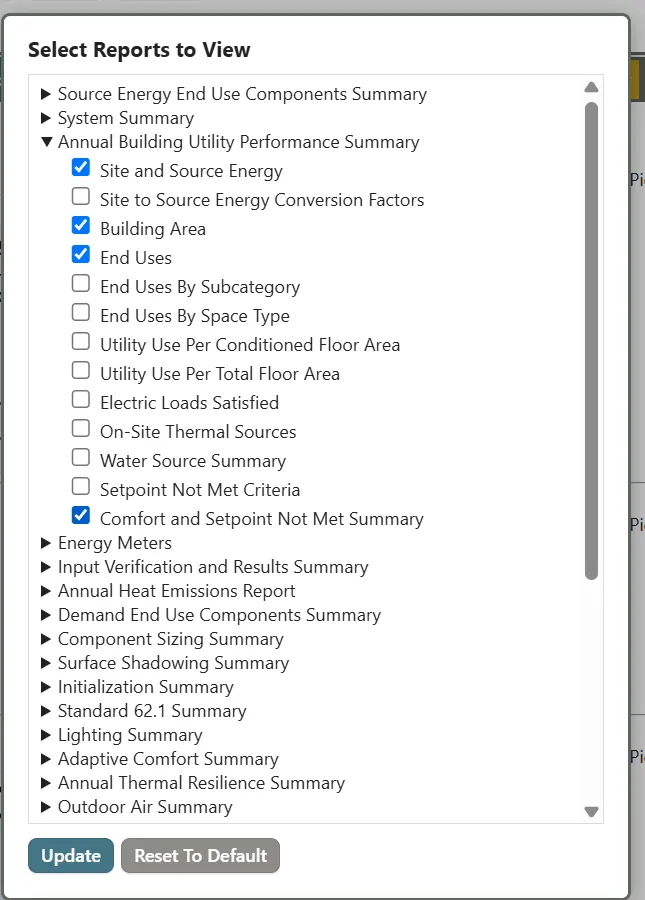
- Click Select Reports. Under Annual Building Utility Performance Summary, also tick Site and Source Energy, Building Area and Comfort and Setpoint Not Met Summary, then click Update.
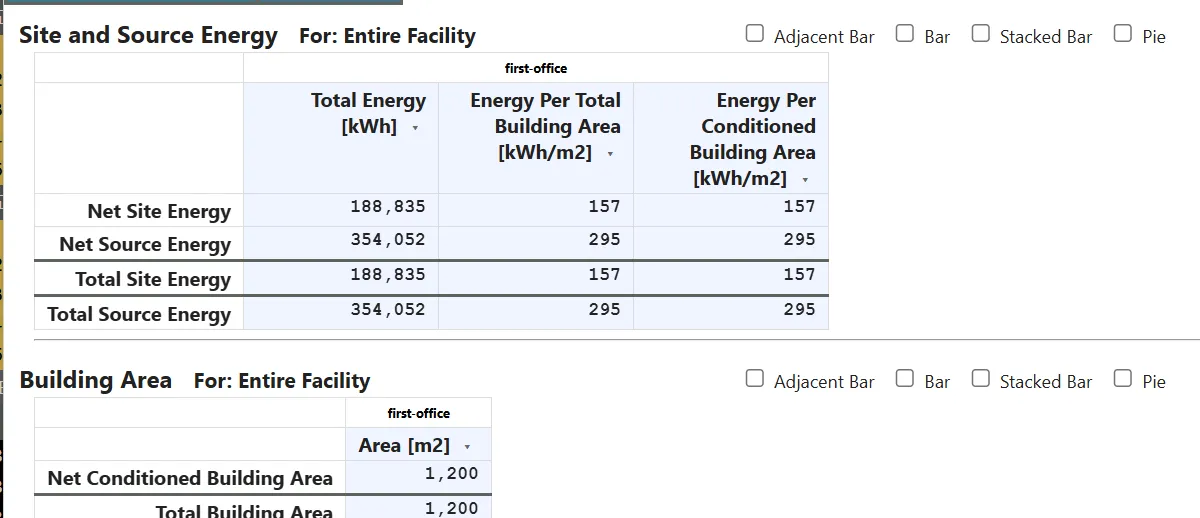
The new tables show 1,200 m² of conditioned floor area and a site energy use of 157 kWh/m², or 188,835 kWh in total. Source energy is 295 kWh/m².
Tip: Your table and chart choices are remembered on this computer. Reset To Default in Select Reports returns to the standard set.
Unmet hours
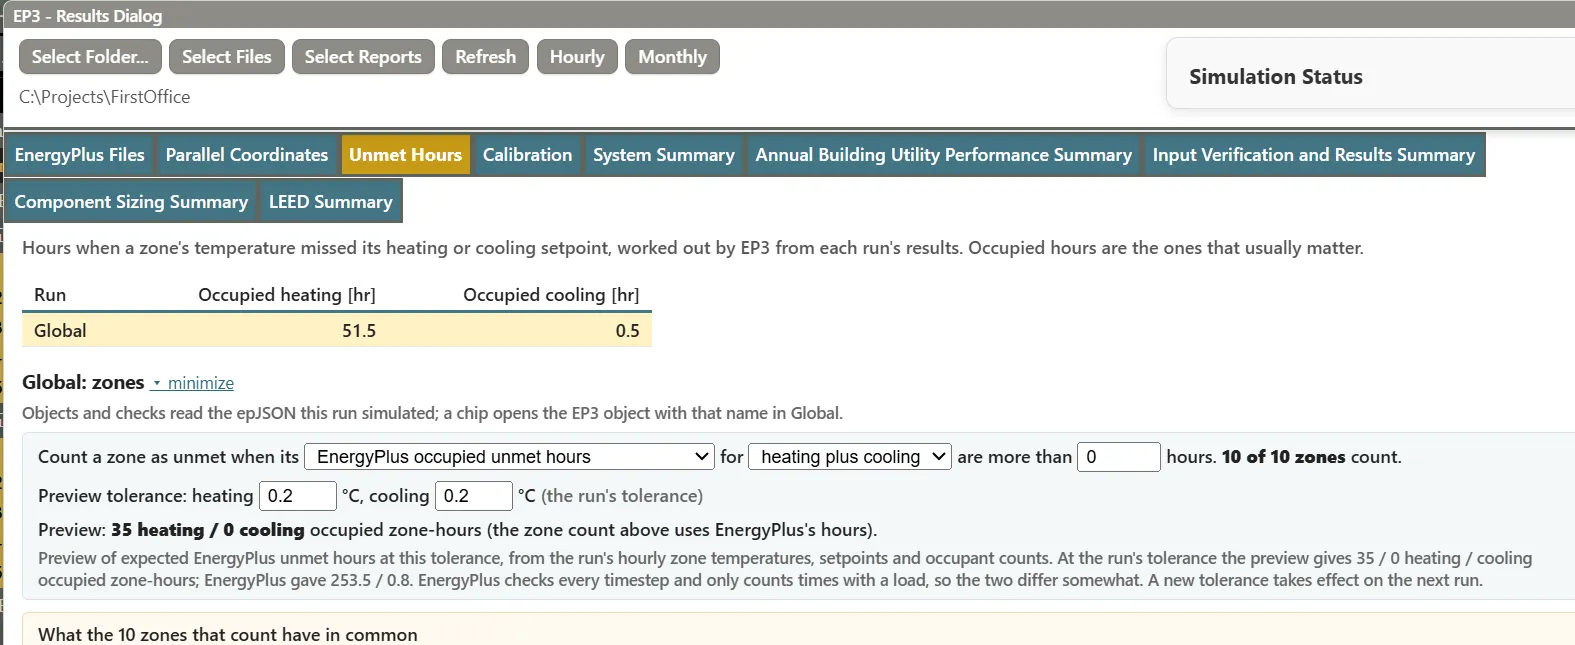
Unmet hours count the time a zone was too cold or too warm compared with its thermostat setpoint, so they show whether the HVAC system can keep up.
- Open the Unmet Hours tab.
The first table gives the run’s Occupied heating and Occupied cooling hours: 51.5 and 0.5. ASHRAE 90.1 Appendix G allows up to 300 occupied hours with setpoints not met (Section G3.1.2.3), so this model is well inside that limit. The Comfort and Setpoint Not Met Summary table you added reports the same hours, rounded, as 52 and 1.
The tab also lists every zone that missed its setpoint, with likely causes. All ten zones are tagged No warm-up: the heating comes on in the same hour people arrive, so the first hour of some winter mornings runs cool. At about 50 hours a year, the effect is minor.
A time-series chart
The time-series viewer charts any variable the run reported, hour by hour.
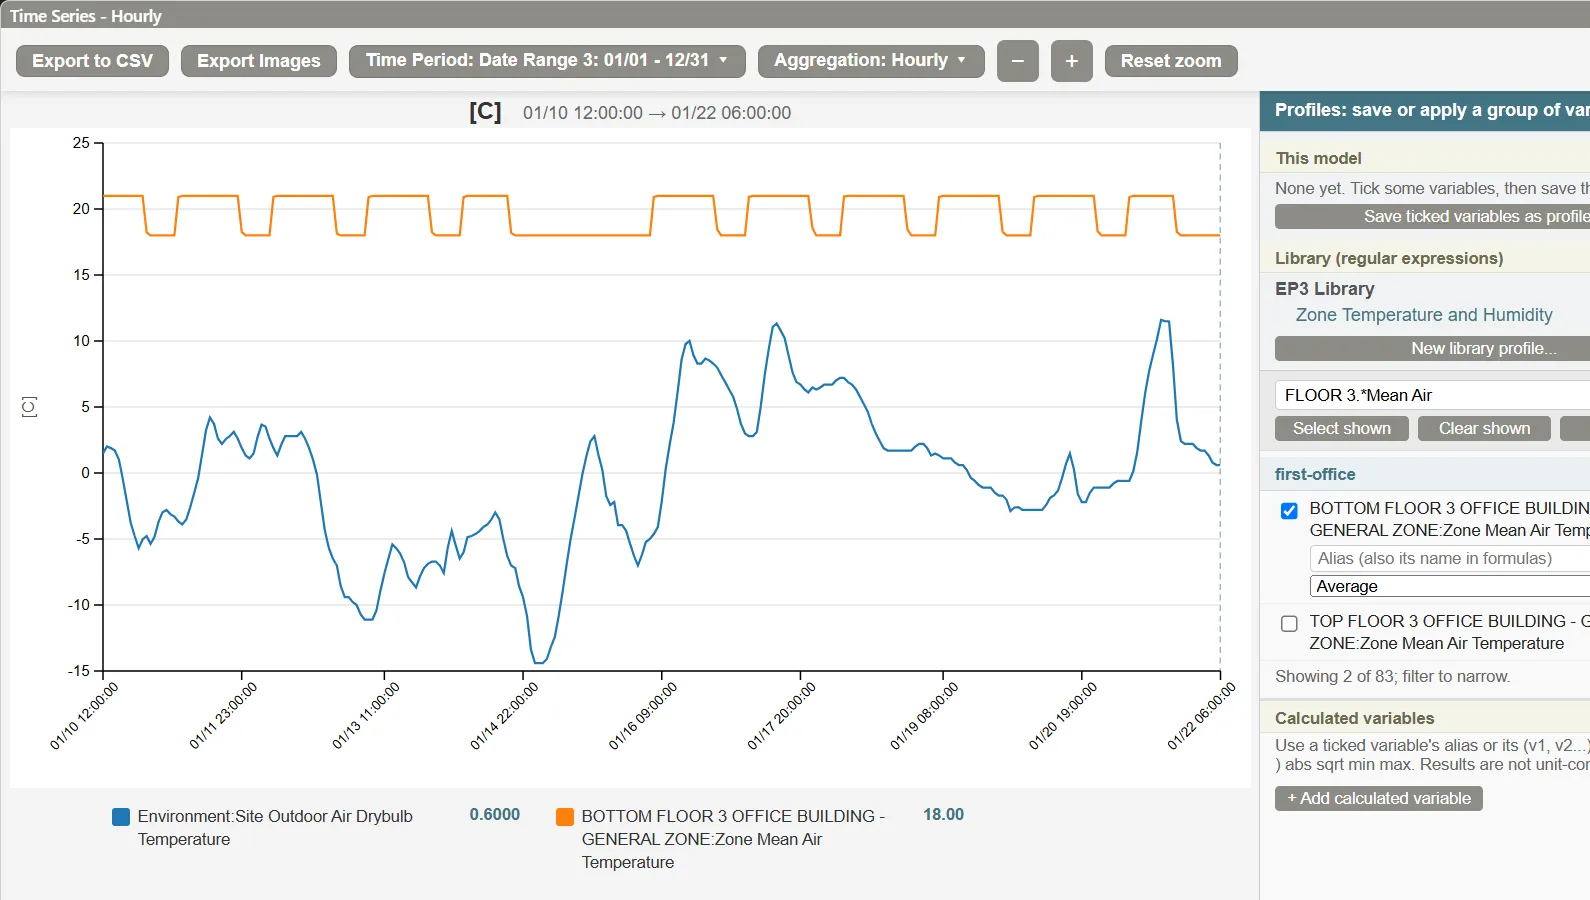
- Click Hourly in the Results dialog’s header. Time Series - Hourly opens.
- Click Time Period and choose Date Range 3, the full year. The other ranges are the design-day periods EnergyPlus sizes the equipment on.
- In the Variables panel, tick Environment:Site Outdoor Air Drybulb Temperature.
- Type
FLOOR 3.*Mean Airin the filter box, then tick BOTTOM FLOOR 3 OFFICE BUILDING - GENERAL ZONE:Zone Mean Air Temperature. - Drag across a stretch of the chart in mid-January to zoom to it. Reset zoom shows the whole year again.
The zone temperature (orange) holds 21 °C during working hours and drops to the 18 °C setback overnight and at weekends, while the outdoor temperature (blue) falls as low as -14 °C. The system follows the thermostat schedule through the coldest week.
Tip: Aggregation at the top rolls the data up to daily, monthly or annual values, and Export to CSV saves the chart’s values.
Save the model for other tutorials
- Close the time-series viewer and the Results dialog.
- Choose File > Save (Ctrl+S).
The saved .ep3 file holds the model, its weather file setting and its run settings. To start the other tutorials from the same building, download first-office.ep3. It looks for the weather file at C:\Projects\FirstOffice; if your copy is elsewhere, choose Select Weather File again in the model settings.
Next steps
- The Model Wizard chapter covers every Wizard tab, including the other HVAC systems, service hot water, and the perimeter and core options.
- Running Simulations and Viewing and Interpreting Results cover the Simulate settings, the other result tabs and coloring the 3D view by a result.
- Weather, Climate, and Design Conditions explains weather files and design days.
- Model Troubleshooting and Quality Assurance explains what to do when Validation or EnergyPlus reports a problem.
- Energy Efficiency Measures (EEMs) shows how to compare variations of this office, such as a different HVAC system.